Introduction
Welcome back! In our last lesson, you created your first interactive command, new-story-idea, and saw how adding (interactive) makes a function available for you to run via M-x. We also saw its limitation: when a function needs arguments, like our (greet-person name) example, a simple (interactive) isn't enough and results in an error.
Today, we will overcome that limitation. This lesson directly addresses the learning outcome: Use common interactive codes to accept user input (e.g., strings, regions). We'll explore how to pass arguments to the interactive specifier itself to tell Emacs how to get the necessary inputs from you. This will enable you to build commands that can prompt for text, operate on selected regions, and much more—transforming them from static snippets into dynamic tools for your writing and workflow.
1. Prompting for Simple Input: Strings, Numbers, and Files
The most straightforward way to provide arguments to an interactive function is to prompt the user in the minibuffer. You accomplish this by passing a specially formatted string to interactive.
The general format is:"(<code><prompt>\n<code><prompt>...)"
<code>: A single character that specifies the type of input to read.<prompt>: The text displayed to the user in the minibuffer.\n: A newline character to separate prompts for multiple arguments.
Let's explore the most common codes.
Getting Started With Emacs Lisp Hands On
This article provides a clear, hands-on introduction to using interactive codes. It's a great starting point for understanding how to prompt for user input.
Read the section 'Exposing Your Functions To Emacs'. Focus on the name-func examples and how the 'M' code is used to capture a string, and how \n is used to capture multiple strings.
Your Turn: Fixing greet-person
As you just read, the M code is used to prompt for a string. Let's apply this to the greet-person function that failed in our last lesson.
-
Open your
*scratch*buffer. -
Write or paste the following code:
(defun greet-person (name) "Display a personalized greeting for NAME." (interactive "MEnter your name: ") (message "Hello, %s!" name)) -
Evaluate the function with
C-x C-e. -
Now, run it with
M-x greet-person.
This time, Emacs prompts you in the minibuffer for a name. The string you type is automatically passed as the name argument to the function.
Common Interactive Codes
Besides M for a string, here are a few other essential codes:
n: Prompts for a number.f: Prompts for an existing file path, with completion.b: Prompts for an existing buffer name, with completion.r: A special code that doesn't prompt but provides the region's start and end points. We'll explore this next.
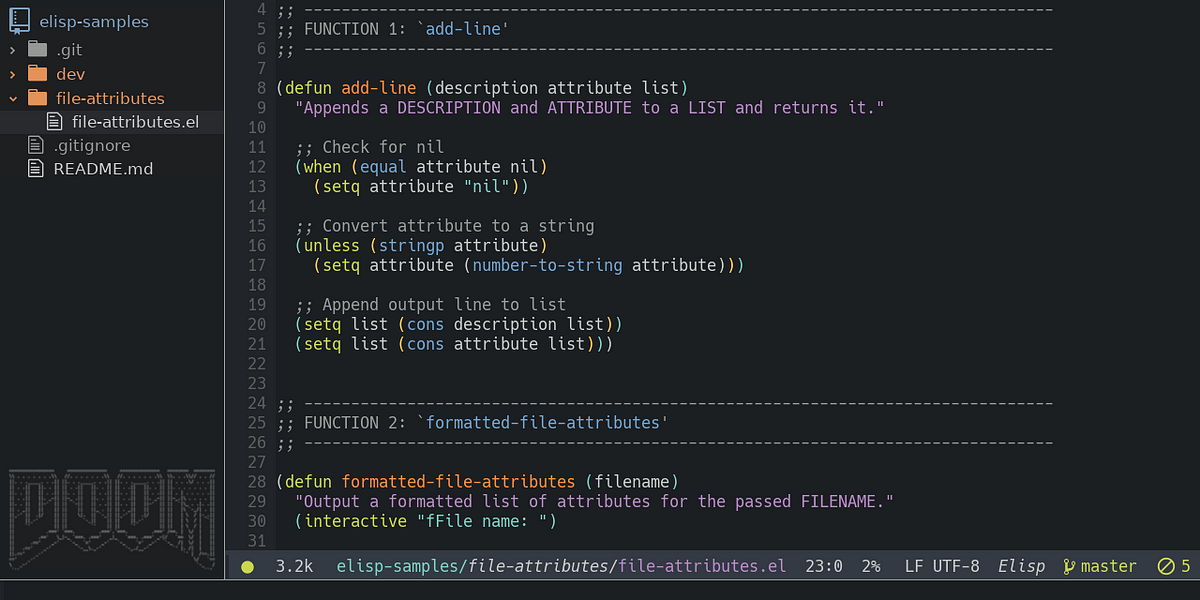
The image below shows a function that uses the f code to ask for a filename. Notice the structure is identical to our greet-person example.
2. Working with the Active Region
As a writer and editor, many of your custom commands will likely operate on a piece of selected text—what Emacs calls the region. The r interactive code is designed for exactly this.
When you use (interactive "r"), Emacs does not prompt you. Instead, it automatically passes two arguments to your function: the numeric positions of the point (where the cursor is) and the mark (the other end of the selection). By convention, the function should accept these as start and end.
Let's build a command to convert the selected text to uppercase.
Step 1: The Basic Function
(defun upcase-region (start end)
  "Convert the text in the region to uppercase."
  (interactive "r")
  (let ((text (buffer-substring-no-properties start end)))
    (delete-region start end)
    (insert (upcase text))))
Let's break this down:
(defun upcase-region (start end) ...): The function is defined to accept two arguments.(interactive "r"): This tells Emacs to pass the region's boundaries tostartandend.(let ((text (buffer-substring-no-properties start end))) ...): We create a local variabletextand store the string from the region in it.(delete-region start end): We remove the original text.(insert (upcase text)): We insert the new, uppercased version of the text.
Try it out:
- Evaluate the function in your
*scratch*buffer. - In any buffer, select a piece of text.
- Run
M-x upcase-region.
The selected text should be replaced by its uppercase version.
Step 2: A User-Experience Improvement with save-excursion
You might notice that after the command runs, your cursor (the point) is left at the end of the newly inserted text. This can be disruptive. A common practice in Emacs Lisp is to wrap buffer-modifying code in save-excursion, which saves the state of the point, mark, and current buffer, executes your code, and then restores everything. This makes your command feel much smoother.
Watch this short clip to see save-excursion in action.
Elisp Tutorial - Part 4 Interactive Functions
This segment demonstrates the problem of the cursor moving unexpectedly and presents save-excursion as the clean solution.
Watch from 06:48 to 07:52. Pay attention to how save-excursion wraps the code that moves the point and ensures the cursor returns to its original position.
Let's apply this to our function:
(defun upcase-region (start end)
  "Convert the text in the region to uppercase."
  (interactive "r")
  (save-excursion
    (let ((text (buffer-substring-no-properties start end)))
      (delete-region start end)
      (goto-char start) ; Go back to the start before inserting
      (insert (upcase text)))))
Notice we now wrap the core logic in save-excursion. We also explicitly move to the start of the original region before inserting. When you run this version, the text will be uppercased, but your cursor will remain exactly where it was.
3. A Practical Tool: The "Surround Region" Command
Now, let's combine these concepts to build a genuinely useful command for your creative writing workflow. A common task is to surround a piece of text with delimiters—for example, wrapping a word in asterisks for italics in Markdown, or surrounding a phrase with quotation marks.
We will create a command surround-region that:
- Acts on the selected region (
r). - Prompts you for the opening delimiter (
M). - Prompts you for the closing delimiter (
M).
Your Turn: Build the surround-region Command
Here is the complete code. Read through it, then copy it to your *scratch* buffer and evaluate it.
(defun surround-region (start end opening-str closing-str)
  "Surround the active region with user-provided strings."
  (interactive "r\nMOpening string: \nMClosing string: ")
  (save-excursion
    ;; Go to the end first so the 'start' position remains valid
    (goto-char end)
    (insert closing-str)
    ;; Now go to the start and insert
    (goto-char start)
    (insert opening-str)))
Let's analyze the interactive string: "r\nMOpening string: \nMClosing string: ".
r: Provides thestartandendarguments.\n: Separates the specifiers.MOpening string:: Prompts for and provides theopening-strargument.\n: Separates the specifiers.MClosing string:: Prompts for and provides theclosing-strargument.
Test your new tool:
- Select a word in a buffer.
- Run
M-x surround-region. - At the "Opening string:" prompt, type
*and press Enter. - At the "Closing string:" prompt, type
*and press Enter.
The word will now be surrounded by asterisks. Try it again with"for both, or(and). You've built a flexible text manipulation utility.
For a deeper dive into this "surround" concept and to see how it can be made even more powerful, this article is an excellent resource.
Emacs: Let's surround! - Prompt the user for inputs
This article walks through building a 'surround' command, very similar to what we just did. It clearly explains how to handle multiple interactive arguments.
Read the section titled 'Passing interactive a string'. It reinforces the concepts we just covered with another practical example.
The article goes on to show more advanced techniques, like providing a menu of pre-defined choices, which you might find useful as you get more comfortable with Elisp.
Conclusion
You have now unlocked one of the most powerful features of Emacs Lisp for customization. By providing a formatted string to interactive, you can build sophisticated commands that take input directly from the user or the buffer's context.
Key Takeaways:
- The
interactivespecifier can take a string argument to define how a command gets its parameters. - Interactive codes like
M(string),n(number), andf(file) prompt the user for input in the minibuffer. - The
rcode is special: it automatically passes the start and end points of the active region as two integer arguments. - You can combine codes using
\nto supply multiple arguments to a single command. - Using
save-excursionis a best practice to ensure your commands don't have disruptive side effects, like moving the cursor unexpectedly.
Preview of the Next Lesson
Running your commands via M-x is fine, but for tools you use frequently, you'll want faster access. In the next lesson, we will focus on the final step in making a command truly part of your workflow: binding it to a key sequence. You'll learn how to use global-set-key to make your custom commands available at the press of a few keys.