Welcome back. This lesson marks the conclusion of our first module on Rust's fundamentals. Over the past lessons, you've built a solid foundation in Rust's most powerful features: the ownership and borrowing system that guarantees memory safety, the rich type system with enums and pattern matching, the expressive power of traits, robust error handling with Result and Option, and the compile-time guarantees provided by lifetimes.
So far, we have worked within single files. Now, it's time to learn how to structure larger, real-world applications. Your experience leading development teams and architecting complex systems has shown you that a well-organized codebase is critical for maintainability, scalability, and collaboration. Rust provides a powerful and explicit system for this. Our goal for this lesson is to learn how to organize code using modules, crates, and the Cargo build system. We will explore the hierarchy of Rust projects and the tools you'll use to manage them, which is the final piece of the puzzle before we dive into low-level and embedded-specific topics.
The Rust Project Hierarchy: Packages, Crates, and Modules
Understanding the distinction between packages, crates, and modules is fundamental to organizing Rust code. These terms are sometimes used interchangeably in other languages, but in Rust, they have very precise meanings.
A great blog post, "Rust at scale," clarifies these definitions perfectly.
Rust at scale: packages, crates, and modules
This article provides precise definitions for Rust's organizational units.
Please read the section Dramatis Personae to understand the formal definitions of Module, Crate, and Package. Then, read the section Modules vs Crates to understand the trade-offs between these two organizational units, particularly regarding compilation time—a factor you'll appreciate from managing large projects.
To summarize the hierarchy:
- Package: A project containing one or more crates, defined by a
Cargo.tomlfile. It's the unit of distribution and what you typically think of as a "project". - Crate: The unit of compilation. It's either a library (producing a
.rlibfile) or a binary executable. - Module: The unit of code organization within a crate. It controls scope, privacy, and helps logically group related code.
Cargo: The Build System and Package Manager
Everything in the Rust ecosystem revolves around Cargo, the official build tool and package manager. It handles creating projects, compiling code, managing dependencies, running tests, and more. Coming from a world of Makefiles, CMake, and various language-specific package managers, you'll find Cargo's unified and convention-over-configuration approach very efficient.
Let's get an overview of Cargo's basic functions.
Navigating Rust Projects: A Guide to Cargo, Crates, and Modules
This article gives a practical introduction to Cargo and the project structure it creates.
Please read the following sections: Introduction to Cargo: This covers the core purpose of Cargo. Structuring Projects with Cargo: This explains the Cargo.toml file and the default directory structure created by cargo new. Cargo Commands: Familiarize yourself with the most common commands like build, run, check, and test. Key Takeaways: A concise summary of the concepts.
From Packages to Crates
When you run cargo new my_project, Cargo creates a package for you. By convention, this package contains a single binary crate.
- If your
srcdirectory containsmain.rs, Cargo builds a binary crate with the same name as the package. Themain.rsfile is the crate root. - If your
srcdirectory containslib.rs, Cargo builds a library crate. Thelib.rsfile is the crate root.
A single package can contain at most one library crate but any number of binary crates (by placing them in a src/bin/ directory). This is a common pattern for providing both a library and a command-line tool that uses it.
The video "Rust's Module System Explained!" from the Let's Get Rusty channel provides a very clear visual walkthrough of these initial concepts.
Rust's Module System Explained!
This video introduces the hierarchy and shows how Cargo conventions determine what crates are built.
Watch from the beginning to the end of the crates section. This will cover the package/crate/module hierarchy and the conventions for main.rs, lib.rs, and the src/bin directory.
Organizing Code with Modules
Now we get to the core of code organization: modules. While crates are for compilation and sharing between projects, modules are for organizing code within a single crate. Modules are similar to namespaces in C++ or packages in Java. They allow you to:
- Group related functions, structs, enums, and other items.
- Control visibility (privacy). By default, everything in a module is private to that module. You must use the
pubkeyword to make items accessible from outside. - Create a clear API for your code by only exposing what's necessary.
The module system is defined by a tree structure, starting from the crate root (lib.rs or main.rs). You define modules with the mod keyword and navigate the tree using paths. The use keyword allows you to bring paths into the current scope for convenience.
Let's continue with the same video, as it provides an excellent step-by-step guide to the module system using a restaurant library example.
Rust's Module System Explained!
This part of the video is the practical core of the lesson. It demonstrates defining modules, controlling privacy with pub, and using paths with use.
Watch from the start of the restaurant example up to the section on nested paths. Pay close attention to: How mod creates nested scopes. The pub keyword and Rust's "private-by-default" rule. Absolute (crate::...) vs. relative (super::...) paths. Using the use keyword to bring items into scope. The concept of re-exporting with pub use.
Mapping Modules to Files
So far, we've seen modules defined inline within a single file. For any non-trivial project, you'll want to split your modules into separate files. This is where Rust's conventions can feel a bit different from the one-file-per-class model of other languages.
There are two primary ways to do this (both of which are supported in the 2018 edition of Rust and later):
- For a module
foodeclared inparent.rs(mod foo;), its content goes intoparent/foo.rs. - If the module
fooalso has sub-modules, they live inside a directory named after the module:parent/foo/bar.rs.
The video you just watched continues to explain this process clearly. It's one of the most common points of confusion for new Rust developers, so this visual guide is very helpful.
Rust's Module System Explained!
This final segment explains how to organize your module tree across the filesystem.
Please watch from where the video discusses moving modules into separate files.
Your background in C/C++ involved managing header (.h, .hpp) and implementation (.cpp) files. Rust consolidates this. The module system, combined with the pub keyword, defines the public API (like a header file), while the function bodies provide the implementation. All of this is checked by the compiler.
This image contrasts a typical C++ project layout with a Rust one, highlighting the role of mod.rs (an older but still common pattern) and the general structure.

How This Applies to Embedded Rust
You might wonder how this high-level organization translates to embedded development. It's absolutely central. A typical embedded Rust project is composed of several crates that form layers of abstraction, isolating hardware-specific details from application logic.
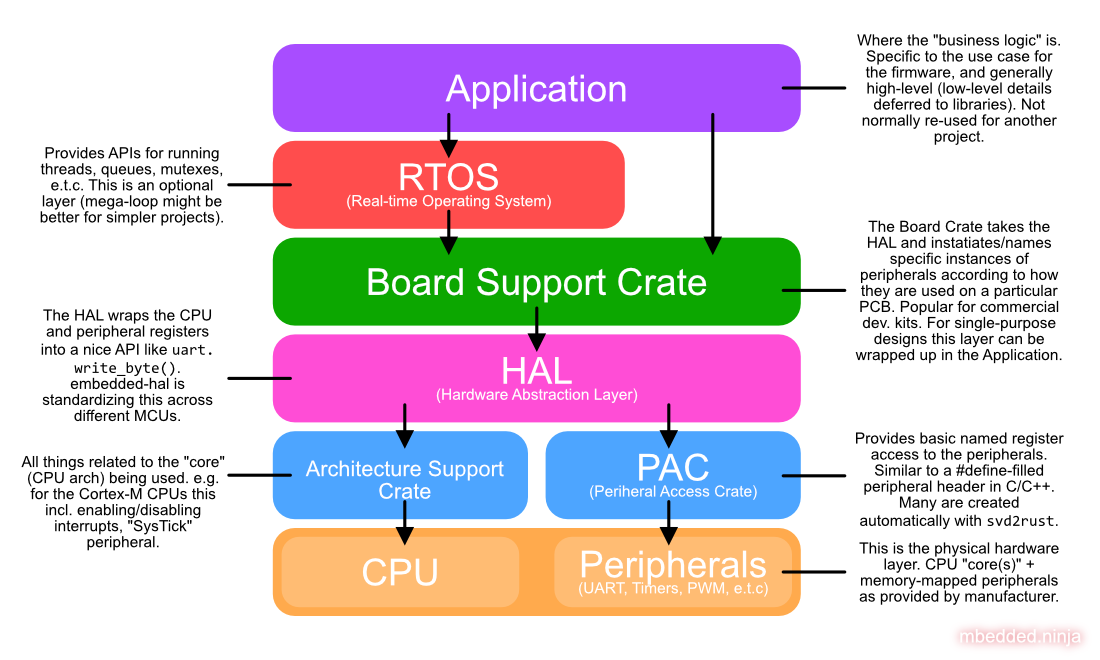
Here's how to interpret that diagram in the context of what we've learned:
- PAC (Peripheral Access Crate): An auto-generated, low-level crate providing direct, unsafe access to hardware registers. This is the bottom-most layer.
- HAL (Hardware Abstraction Layer): A crate that builds on the PAC to provide a safe, higher-level API for controlling peripherals (e.g., "turn on this GPIO pin" instead of "write this bit to this memory address").
- Board Support Crate: A crate that uses the HAL to configure the specific microcontroller and peripherals as they are laid out on your particular development board.
- Application: Your top-level crate that contains the business logic of your device. It uses the APIs provided by the Board Support Crate and HAL.
Each of these is a separate crate, linked together by Cargo as dependencies. This modularity is a massive advantage for portability and code reuse in the embedded world.
Conclusion
This lesson concludes our first module, giving you the tools to structure any Rust project, from a simple command-line utility to a complex, layered embedded system. You now understand the complete picture of how Rust enables the creation of safe, robust, and maintainable software.
The key takeaways are:
- Rust projects are organized in a clear hierarchy: Packages contain Crates, and Crates contain Modules.
- Cargo is the central tool that manages this entire ecosystem, from creation and compilation to dependency management.
- Modules (
mod) are the primary tool for in-crate organization, controlling scope and privacy (pub). - The file system layout follows specific conventions (
mod foo;looks forfoo.rsorfoo/mod.rs) that you must declare explicitly in your code. - This layered structure is directly applicable to embedded systems, where different crates (PAC, HAL, Application) provide clear separation of concerns.
With this foundation, you are now ready to move beyond general-purpose Rust and into the specifics of systems programming. In our next lesson, we will begin Module 2: Low-Level and Systems Programming in Rust. We'll start with a crucial topic: unsafe Rust. While Rust's safety guarantees are its greatest strength, direct hardware interaction in embedded systems sometimes requires us to step outside those guarantees in a controlled way. We'll explore when and why this is necessary, and how to do it responsibly.