Introduction
Welcome to your first DJ lesson! The journey into mixing music begins with understanding your instrument. In the world of digital DJing, your controller is that instrument. This lesson focuses on getting you comfortable with the Pioneer DDJ-FLX4, the centerpiece of your setup. Your background in product design gives you a unique lens through which to view this hardware; it's a user interface designed for a creative flow state. By the end of this session, you will be able to identify the four main sections of the controller—the transport controls, jog wheels, mixer, and performance pads—and understand the fundamental role each one plays. Let's get started by exploring the physical layout of your new gear.
A Tour of Your DJ Controller
Before we dive into the details, let's look at the controller as a whole. You'll notice it has a symmetrical design. This is intentional and standard across most DJ equipment. It's split into three main physical parts: a left deck, a right deck, and a mixer in the center.
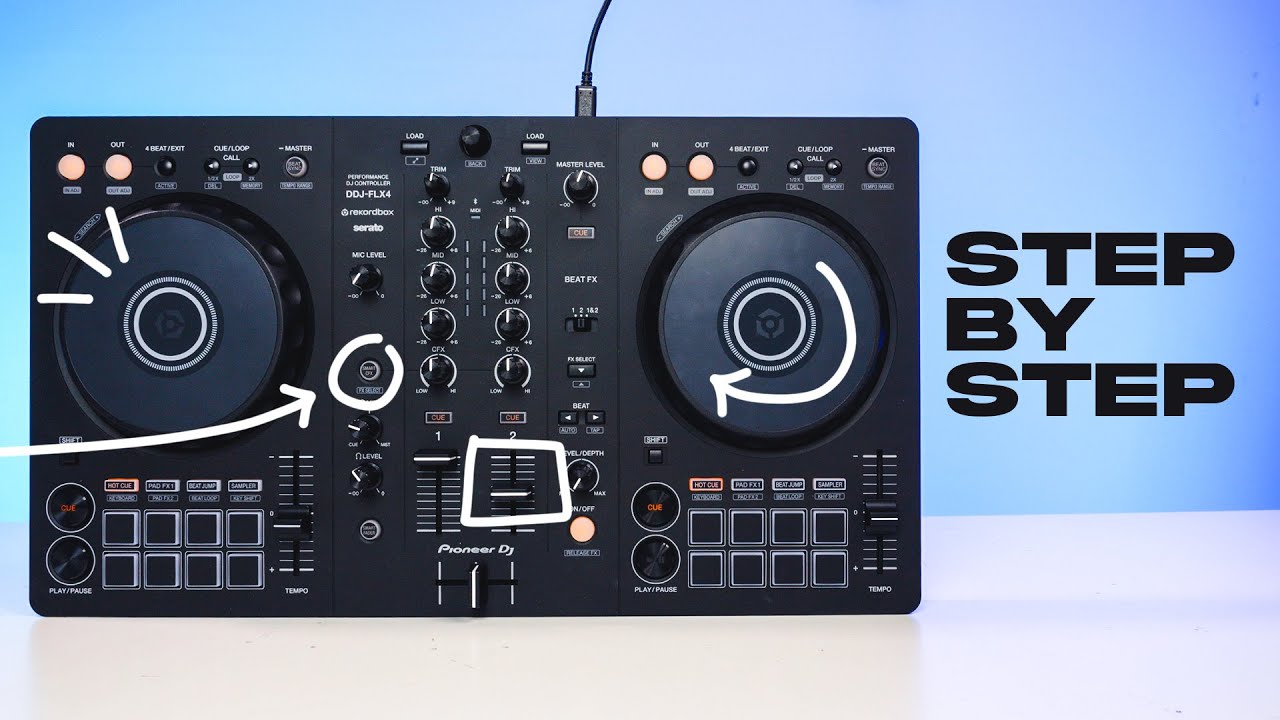
Each deck is a self-contained unit for controlling a single music track. The mixer is where the magic of combining those tracks happens. Our goal today is to break down these areas into their functional components.
The Decks: Your Track Control Centers
Each deck is equipped with several key controls. For this lesson, we'll focus on the most important ones for getting a track playing and manipulated: the jog wheels and the transport controls.
1. The Jog Wheels
The most prominent features on the decks are the large, circular platters called jog wheels. They are designed to replicate the feel of manipulating a vinyl record on a turntable. Their function is twofold, depending on how you touch them.
To understand this tactile difference, watch this first video segment. It clearly demonstrates how the jog wheel is used for both seeking through a track and for making subtle timing adjustments.
How To Use EVERYTHING On Your DJ Equipment (FLX4)
This video, "How To Use EVERYTHING On Your DJ Equipment" from Off The Rack Jack, provides a fantastic, function-by-function walkthrough of the FLX4. We'll be using several clips from it today.
Watch the section from the beginning that explains the jog wheel. Pay close attention to the difference between touching the top surface versus nudging the side.
As you saw, touching the top allows you to "scratch" or quickly move to a different part of the song. Pushing the grooved edge of the wheel temporarily speeds up or slows down the track—a crucial skill for beatmatching, which we'll cover in a future module.
2. Transport Controls
Located just below the jog wheels, the transport controls are the most fundamental buttons you'll use. They are the equivalent of the play and pause buttons on any media player, but with some DJ-specific functions.
The next clip from the same video explains the Play/Pause and Cue buttons. The Cue button, in particular, has several functions that are essential for preparing and launching a track precisely.
How To Use EVERYTHING On Your DJ Equipment (FLX4)
Let's continue with the "Off The Rack Jack" video.
Watch this segment covering the transport controls. Focus on understanding how the Cue button works both when a track is playing and when it is paused. This is a key concept for all DJing.
To recap:
- Play/Pause: Starts and stops the music.
- Cue: When the track is playing, it acts like a "return to start" button, jumping back to the cue point. When the track is paused, pressing it sets a new cue point. Holding it down plays the track temporarily until you release it.
3. The Performance Pads
Below the transport controls, you'll find a grid of eight rubber pads. These are the performance pads. They are multi-functional and allow for more creative expression, such as jumping to pre-saved parts of a song (Hot Cues) or triggering effects.
For now, you just need to know what they are and the kinds of functions they control. This next video segment gives a great overview of the different modes. Don't worry about mastering all of them; just get a feel for what's possible.
How To Use EVERYTHING On Your DJ Equipment (FLX4)
We'll watch another clip from the "Off The Rack Jack" walkthrough.
Watch this overview of the performance pads. He explains Hot Cues, Pad FX, Beat Jump, and the Sampler. We'll return to these in detail in a later module.
The Mixer: Blending the Sound
Now, let's shift our focus to the central column of the controller: the mixer. This is the heart of your setup, where you control the volume, frequencies, and blending of the tracks playing on each deck.
The mixer section can look intimidating, but it breaks down into a few logical groups of knobs and faders. The most detailed and beginner-friendly explanation comes from this final video clip.
How To Use EVERYTHING On Your DJ Equipment (FLX4)
This is the last and most important video clip for this lesson. It covers the entire mixer section, knob by knob.
Watch this entire segment on the mixer section. As you watch, try to locate each control on your own DDJ-FLX4. He will cover: The Browse Knob for selecting tracks. The Trim/Gain knob for setting the base volume of a track. The EQ (Equalizer) Knobs (High, Mid, Low) for shaping the sound. The Filter Knob (labeled CFX for Color FX) for a simple, powerful effect. The Channel Faders for controlling the volume of each individual deck. The Crossfader for fading between the left and right decks.
Your Controller Map
To bring everything together, let's use a diagram of the DDJ-FLX4 as a visual map. This will help you solidify where each key component lives.
Here is a breakdown of the key sections and their corresponding numbers on the diagram:
- Jog Wheel (Right Deck): 13
- Transport Controls (Left Deck):
- Play/Pause: 23
- Cue: 24
- Performance Pads (Right Deck): 15
- Mixer Section:
- Browse Knob (for selecting songs): 9
- Trim/Gain Knob: 8
- EQ & Filter Knobs (High, Mid, Low, CFX): 10
- Channel Faders (Volume for each deck): 18
- Crossfader (Blends between decks): 19
- Headphone Cue Buttons (to listen to a track before playing it live): Labeled "CUE" directly above the channel faders (18).
Take a moment to find each of these on your physical controller. Touch them and get a feel for their location. This muscle memory will be invaluable as you start mixing.
Conclusion
In this lesson, you've taken the first essential step by getting acquainted with your DJ controller. You can now identify the main functional areas: the decks, which house the jog wheels and transport controls for manipulating a track; the performance pads for creative triggering; and the central mixer, which you'll use to blend sounds together with faders and EQs. Thinking of this layout as a purpose-built interface for music, you can see how the design guides a DJ's workflow from track selection to the final mixed output.
In our next lesson, we will move from hardware to software. You'll learn how to connect your DDJ-FLX4 to your computer and configure the audio settings in the Rekordbox software, preparing your digital environment for your first mix.