Hello! Welcome back to our course on Finite State Machines.
In the last lesson, we built the complete server-side logic for our game loop. Our GameStateManager now automatically transitions between Lobby, Countdown, InRound, and PostRound states based on player count and timers. This is a huge step! However, this entire process is currently invisible to the players. The server knows it's in a "Countdown" state, but the clients have no idea.
Today, we'll bridge that gap. Our learning outcome is to synchronize game state changes from the server to all clients using RemoteEvents. By the end of this lesson, you will have a system where the client is always aware of the current game state, allowing us to build a responsive UI and prepare for state-specific gameplay logic.
Since you're already proficient with RemoteEvents in Roblox, we'll focus on the specific pattern for integrating them with our server-side FSM.
The Client-Server Model and the Source of Truth
As you know, in Roblox's client-server architecture, the server is the ultimate authority. It's the "single source of truth." For our game, this means the GameStateManager script on the server is the one and only definitive source of the current game state. We do this to prevent cheating and ensure a consistent experience for all players.
Our task is to inform clients about changes to this authoritative state. We'll never let a client decide the state, but we'll always make sure it's notified of the state. This is a perfect job for RemoteEvents.
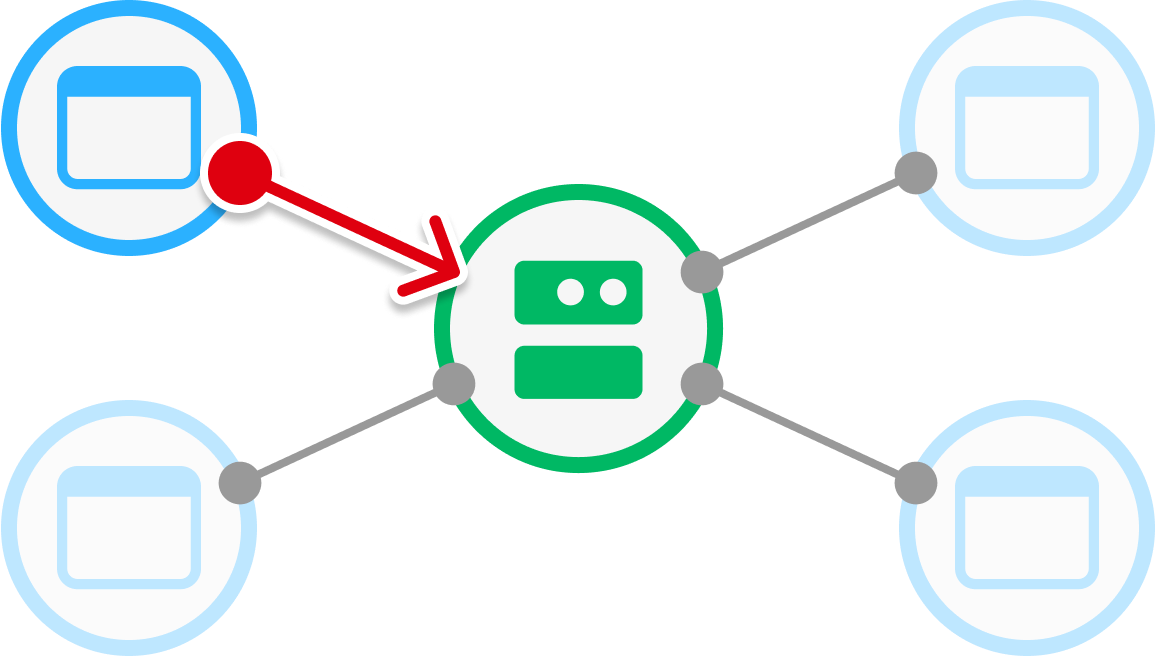
The pattern is straightforward:
- When the server's FSM transitions to a new state, it fires a
RemoteEvent. - The event is sent to all clients using
FireAllClients(). - The event payload includes the name of the new state and any other useful data (like a countdown timer's duration).
- A
LocalScripton each client listens for this event and updates its local environment—most visibly, the UI.
Reviewing Server-to-All-Clients Communication
Before we start coding, let's quickly review the FireAllClients pattern. This video provides a clear example of using RemoteEvents for a global announcement, which is conceptually identical to what we're doing for our game state.
Remote Events (One-Way Communication) - Roblox Advanced Scripting #5
This video from BrawlDev is a great refresher on RemoteEvents. The section on FireAllClients is particularly relevant to our goal of broadcasting the game state.
Please watch from 21:43 to 24:50. Pay close attention to how a server-side script uses giveAnnouncement:FireAllClients() to trigger an event on all clients simultaneously, and how a LocalScript listens with .OnClientEvent to react to it. This is the exact mechanism we'll be using.
1. Creating the RemoteEvent
First, we need the RemoteEvent object itself. Both the server and the clients need to be able to access it, so ReplicatedStorage is the correct location.
- In the Explorer window, navigate to
ReplicatedStorage. - Click the
+icon and insert aRemoteEvent. - Rename this new
RemoteEventtoGameStateChanged.
2. Modifying the Server to Broadcast State Changes
Now, let's update our GameStateManager script to fire this event whenever the state changes. The most logical place to do this is within the on callbacks of our FSM, as they execute at the moment we enter a new state.
To avoid repeating code, we'll create a small helper function to handle the broadcasting.
-
Get the
RemoteEvent: At the top of yourGameStateManagerscript, add a variable to reference the new event.local ReplicatedStorage = game:GetService("ReplicatedStorage") local GameStateChanged = ReplicatedStorage:WaitForChild("GameStateChanged") -
Create the
broadcastStateChangefunction: Add this helper function somewhere in your script, perhaps after theFSMis created. This function will take the new state and an optional data table as arguments.local function broadcastStateChange(newState, data) print("Broadcasting state change to clients:", newState) GameStateChanged:FireAllClients(newState, data) end -
Call the broadcast function from your FSM: Now, we'll update each
oncallback in your FSM definition to call our new function. We will pass the new state's name and any relevant data. For example, for theCountdownstate, we can pass theCOUNTDOWN_DURATIONso the client UI can display it.Here's an example of the updated
StartCountdownevent definition. You'll need to apply this pattern to all four events (StartCountdown,StartRound,EndRound,ResetLobby).-- Inside your StateQ.new() definition table [GameEvent.StartCountdown] = { from = GameState.Lobby, on = function() print("FSM: Entered Countdown state.") -- Broadcast the state change to all clients broadcastStateChange(GameState.Countdown, { duration = COUNTDOWN_DURATION }) task.delay(COUNTDOWN_DURATION, function() if GameFSM:getState() == GameState.Countdown then GameFSM:handle(GameEvent.StartRound) end end) return GameState.Countdown end, }, -- ... apply the same pattern for the other eventsUpdate your other
oncallbacks in the same way, callingbroadcastStateChangewith the appropriateGameStatevalue. For theInRoundandPostRoundstates, you can also pass their respective durations in the data table.
3. Creating the Client-Side UI and Listener
With the server broadcasting, we now need the client to listen and react. We'll create a simple UI that displays the current game status.
-
Create the UI Objects:
- In
StarterGui, insert aScreenGui. You can name itGameStatusUI. - Inside
GameStatusUI, insert aTextLabel. Name itStatusLabel. - Position and style the
StatusLabelhowever you like (e.g., at the top-center of the screen). Set its initialTextproperty to "Status: Loading...".
- In
-
Create the
LocalScript:- Inside the
GameStatusUIScreenGui, insert aLocalScript. Name itGameStateController.
- Inside the
-
Write the Client-Side Code: Add the following code to your
GameStateControllerLocalScript.-- GameStateController, a LocalScript in StarterGui > GameStatusUI local ReplicatedStorage = game:GetService("ReplicatedStorage") -- 1. Get references to UI and the RemoteEvent local GameStateChanged = ReplicatedStorage:WaitForChild("GameStateChanged") local StatusLabel = script.Parent:WaitForChild("StatusLabel") -- 2. Define a function to handle the event from the server local function onGameStateChanged(newState, data) print("Client received new state:", newState) -- Update the status label based on the new state if data and data.duration then StatusLabel.Text = "Status: " .. newState .. " (" .. tostring(data.duration) .. "s)" else StatusLabel.Text = "Status: " .. newState end -- We will add more client-side logic here in future lessons! -- For example, enabling/disabling player movement. end -- 3. Connect the function to the RemoteEvent's OnClientEvent signal GameStateChanged.OnClientEvent:Connect(onGameStateChanged) print("Client is ready and listening for game state changes.")
Putting It All Together
Let's see this in action. The following resources provide context for the pattern we've just implemented. The first shows a similar system for a round-based timer, and the second explains why it's better to send data (like state names and timers) rather than entire objects over the network.
Remote Events and Callbacks - Server to All Clients
The official Roblox documentation provides a concise code example for the Server → All Clients pattern. It's a great reference to confirm our implementation.
Review the section titled 'Server → All Clients'. Notice how their example uses FireAllClients in a loop to send a countdown timer value, and the LocalScript uses OnClientEvent to print it. This is very similar to how we send our state data.
DevForum: Help with Synchronizing the Client and Server
This developer forum discussion, while about a more complex topic (synchronizing a moving projectile), provides an excellent explanation of why our approach is the right one.
Read the two highlighted responses (the second and fourth posts on the page). The key idea is that the server should handle the authoritative logic and send minimal data (like CFrames or, in our case, state names) to the clients. The clients then handle the visual presentation. This reduces network load and keeps the server authoritative, which is exactly our goal.
Now, test your game using Roblox's Test > Local Server > 2 Players feature. You should see both player windows open, and the "Status" text at the top of the screen should update for both players simultaneously as the server-side FSM cycles through its states. Check the Output window to see the print statements from both the server and the clients.
Conclusion
Excellent work! You have successfully connected the server's authoritative game state to the clients. The players' screens now reflect what's happening in the game loop, a critical step for building any multiplayer game.
Key Takeaways:
- The server is the single source of truth for the game's state.
- Use a
RemoteEventinReplicatedStorageto broadcast state changes. - Fire the event from the server using
RemoteEvent:FireAllClients(newState, data)whenever the FSM transitions. Theoncallbacks in our FSM are the perfect place for this. - A
LocalScripton the client listens withRemoteEvent.OnClientEventto receive state updates and change the UI or other client-side elements.
Next Lesson Preview:
Our clients are now aware of the current game state. In the next lesson, we will leverage this information to directly impact gameplay. We'll implement logic that uses the synchronized state to manage player controls, such as disabling movement while in the Lobby and Countdown states.