Welcome back! In our last lesson, you learned to give your content structure and semantic meaning using headings, paragraphs, and text formatting. Your page is now organized, but it's an island. The power of the web comes from the connections between pages, and this lesson is about building those bridges.
You'll learn how to create hyperlinks using the HTML anchor tag (<a>). This will allow you to link your pages together and connect to the vast expanse of the external web. By the end of this lesson, you'll be able to create a multi-page experience, the first step toward building a complete website.
What is a Hyperlink?
The "HT" in HTML stands for "HyperText". A key feature of hypertext is that it contains links that allow a reader to jump from one document to another, or to a different place within the same document. These links are called hyperlinks.
In HTML, we create hyperlinks using the anchor tag, written as <a>. This tag "anchors" a link to a piece of content on your page, which is usually text.
The anchor tag itself isn't enough; you must tell the browser where the link should go. You do this with the href attribute, which stands for Hypertext Reference. The href attribute holds the destination address, known as a URL (Uniform Resource Locator).
The basic structure looks like this:
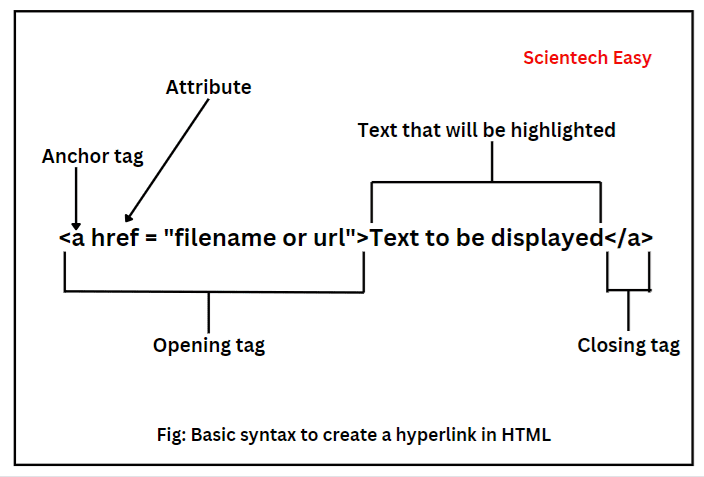
The text between the opening <a> and closing </a> tags is what becomes the clickable link on the page.
Let's watch a quick video that puts these pieces together.
Learn HTML hyperlinks in 4 minutes 👈
This short video from the Bro Code channel provides a fast-paced but clear introduction to creating hyperlinks.
Watch from the beginning up to the end of the title attribute section. You'll see the basic structure of the <a> tag, the href attribute for external links, and two useful optional attributes: target and title.
Linking to External and Internal Pages
As you just saw, you can link to any page on the web. There are two main types of links you will create:
-
External Links: These point to a different website (e.g., linking from your site to Google). For these, you must use a full, or absolute, URL, which includes the
https://protocol.
Example:<a href="https://www.wikipedia.org">Go to Wikipedia</a> -
Internal Links: These point to another page within your own website (e.g., linking from your homepage to your contact page). For these, you use a relative path. If the file is in the same folder, you just need the filename.
Example:<a href="contact.html">Contact Us</a>
Now, let's get our hands dirty and build some links. The following reading provides a great explanation and a simple, hands-on exercise.
HTML For Beginners The Easy Way: Start Learning HTML ...
This article from HTML.com clearly demonstrates how to create both external and internal links, followed by a practical exercise.
First, read the section on adding links. Focus on the structure of the anchor tag and the difference in the href value for external versus internal links. Next, follow the step-by-step exercise in the section Let’s Create An Anchor Tag. This is a great hands-on activity. In your code editor, create the page2.html file as described and add the links to connect your two pages. Feel free to use the content you created in the last lesson for these pages.
Understanding File Paths
The exercise you just completed worked because both index.html and page2.html are in the same folder. But as your website grows, you'll want to organize your files into subfolders (e.g., a folder for pages, another for images). When you do this, you need to tell the browser how to find the file by including the folder name in the path.
For example, if page2.html was inside a folder named pages, the link from index.html would need to be:<a href="pages/page2.html">Page 2</a>
This concept of relative paths is critical for building websites. The following video clip provides an excellent visual demonstration.
12: How to Create Links in HTML | Basics of CSS| Learn HTML and CSS | Full Course For Beginners
This clip from a tutorial by Dani Krossing clearly explains how file paths work when your pages are organized into folders.
Watch the section from dot html directly where the presenter demonstrates how the href path changes when the HTML file is moved into a subfolder.
Opening Links in a New Tab
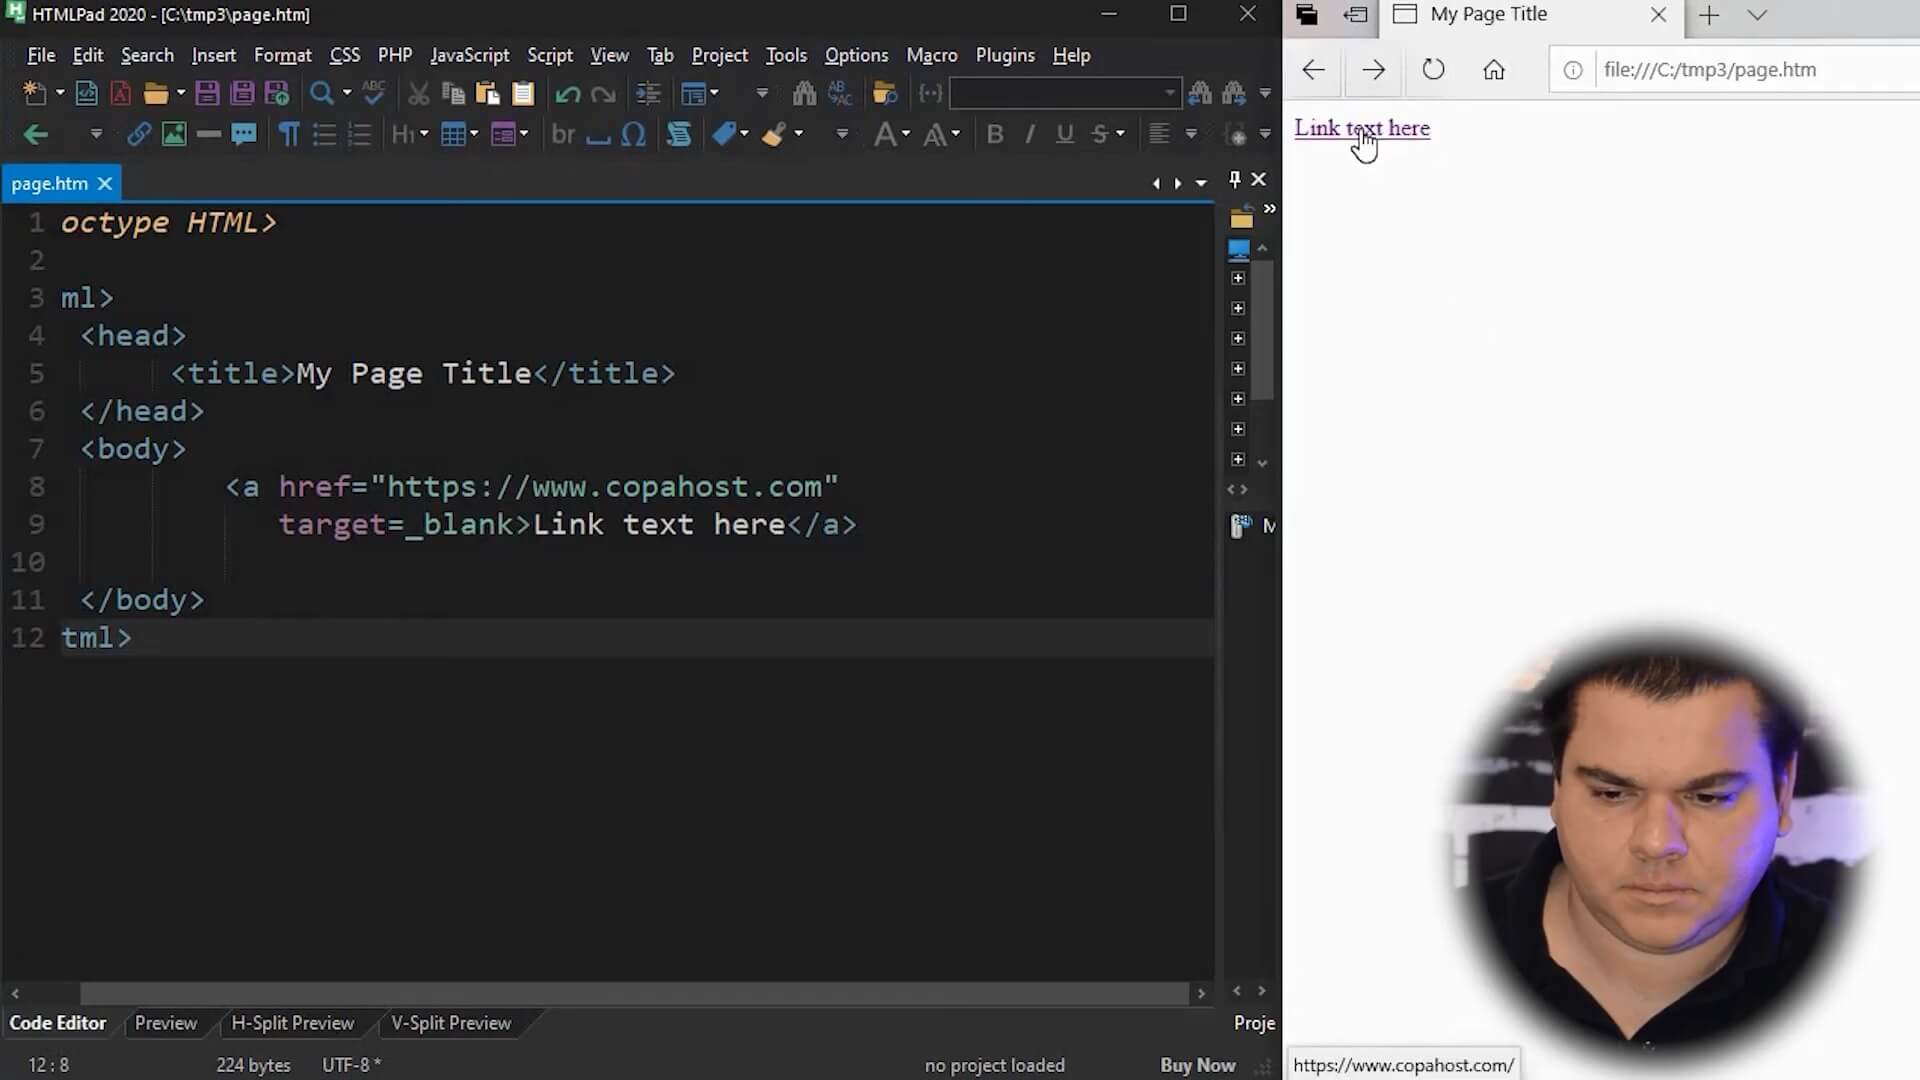
When you link to an external website, it's often a good practice to open it in a new browser tab. This keeps the user on your site. You can achieve this with the target attribute, setting its value to _blank.
<a href="https://www.example.com" target="_blank">External Site</a>
More Than Just Webpages
Anchor tags can do more than just link to other HTML pages. You can link to files for users to download (like PDFs), link to specific sections within a long page, or even trigger actions like opening an email client.
The following document provides a great summary of these other capabilities.
This Codecademy documentation provides a great summary of different link types and answers some common questions.
First, quickly scan the "Types of Links" section, paying special attention to the examples for Email and Phone Links. Note the mailto: and tel: prefixes. Then, in the "Frequently Asked Questions" section, read the answers to linking to a section and linking to a file. The concept of linking to a page section using an ID (#) is particularly useful.
As a quick preview for our next lesson, it's also worth noting that you can make an image a link by wrapping an <img> tag inside an <a> tag. We'll explore this more soon!
Practice
Now, let's apply a couple of these new ideas to the files you created during the hands-on exercise.
- In your
page2.htmlfile, find the external link you created (e.g., to Google). Add thetarget="_blank"attribute to it so that it opens in a new tab. - In your
index.htmlfile, try adding a new link that could open an email client. Use themailto:syntax you just read about. For example:<a href="mailto:contact@example.com">Email Me</a>
These small additions make your links more functional and user-friendly.
Conclusion
Today, you've unlocked one of the most fundamental features of the web: the hyperlink. You can now connect your content to create navigation within your own site and link out to any other resource on the internet.
Key Takeaways:
- The
<a>(anchor) tag is used to create hyperlinks. - The
hrefattribute is essential and contains the destination URL or path. - Absolute URLs (like
https://www.example.com) are used for external links. - Relative paths (like
page2.htmlorpages/about.html) are used for internal links. - The
target="_blank"attribute opens a link in a new browser tab, which is good practice for external links. - You can create special links for emails (
mailto:) and page sections (#some-id).
With structure and links in your toolkit, the next logical step is to add visual media. In our next lesson, we will cover how to insert and configure images using the <img> tag, bringing your pages to life.