Hello! Welcome back to our second module, "From Model to Object."
In our last lesson, we established the fundamental rules separating cast and struck medals. We learned that striking, an industrial process of metal displacement, imposes strict constraints on your design: no undercuts and the mandatory use of positive draft angles.
Today, we will explore the traditional industrial workflow that was developed to meet these constraints. Our goal is to outline the traditional workflow for creating struck medals, from large-scale plaster model to die creation via mechanical reduction. This process beautifully marries the artist's hand with mechanical precision, translating a sculptural work into a hardened steel tool. Your background in sculpture and mold-making will make the first part of this process feel very familiar, allowing us to focus on the unique industrial steps that follow.
1. The Artist's Model: Sculpting at Scale
The traditional process for a struck medal doesn't start at the final size. Instead, the artist creates a large-scale model, typically around 10 inches (25 cm) in diameter. There are two main reasons for this:
- Detail: Working at a larger scale allows the sculptor to create and refine intricate details with much greater ease and precision.
- Refinement: The subsequent mechanical reduction process has a natural smoothing effect, minimizing minor imperfections in the artist's original model.
This initial model is not carved from a single block of plaster. Instead, it is built up using oil-based plastiline clay on a prepared plaster base.

To understand the specifics of creating this master model, let's turn to an excellent description of the process used by the historic Medallic Art Co. (MACO).
The Medallic Production Process
The American Numismatic Society provides a detailed, step-by-step guide to the traditional medallic production process. We will focus first on how the initial model is created and refined.
Please read the sections that describe the creation of the model. Start from the paragraph beginning 'After conceptualizing a piece...' and continue through to the end of the paragraph '...this entire process was then repeated for the reverse design.' Focus on the sequence: plastiline model -> plaster negative -> plaster positive.
As you've read, the process is a sophisticated version of standard studio practice:
- Plastiline Model: The artist builds the relief in clay on a concave plaster "basin."
- Plaster Negative: A plaster mold is taken of the clay model. This transfers the design into a negative (incuse) form.
- Refining the Negative: While this plaster negative is still relatively soft, the artist does the critical work of cutting the lettering (which appears reversed and raised in the negative) and adding any desired textures.
- Plaster Positive: A final, definitive plaster positive is cast from this refined negative. Any small imperfections are filled, and the relief of the letters is sanded to a uniform height.
The result is a large, highly-refined, and hardened plaster model that perfectly represents the final medal's design.
2. From Plaster to Steel: Mechanical Reduction
The artist's work is now done. The plaster model is handed off to the mint or medal manufacturer for the industrial phase. The next challenge is to translate this large, fragile plaster object into a small, incredibly hard steel die. This is accomplished using a remarkable piece of 19th-century technology: the reducing machine.
Step 2a: The Die Shell
First, the plaster model must be converted into a more durable material that can withstand the tracing stylus of the reducing machine. This is done through an electro-chemical process called galvanoplasty.
The Medallic Production Process
Let's return to the ANS article to see how the plaster model is prepared for reduction.
Read the section starting 'From this point on...' which describes how the plaster model is used to create a copper 'die shell' in an electrolytic bath. This is a short but crucial intermediate step.
This process creates a perfect copper negative of the plaster model, known as a die shell. This shell is then backed with lead or plaster to give it strength and mounted in the reducing machine.
Step 2b: The Reducing Machine
The reducing machine, also known as a pantograph or Janvier lathe, is the heart of this entire workflow. It works like a 3D record player, "reading" the large model and "writing" a smaller version.
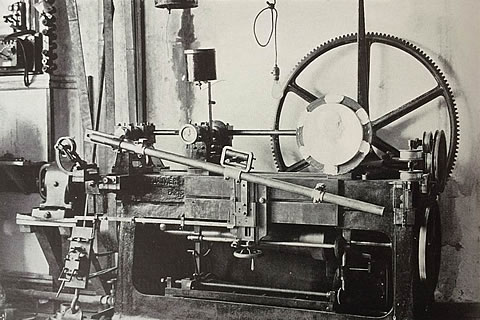
Let's look at how this machine works.
The Medallic Production Process and Designing and making a medal
The ANS article and an article by French engraver Nicolas Salagnac both provide excellent descriptions of the reduction process.
First, read the section 'The die shell would then be fixed...' in the ANS article. This explains what the machine does and introduces the concepts of a 'working die' and a 'hub'.
Now, let's look at Nicolas Salagnac's description, which includes animated images of the process.
On this page, please read section '3 – Reproduction of sculptures on dies' and section '4 – Hand engraving the steel dies'. Notice the GIF showing the touch probe and cutting tool in action, and the emphasis on the final hand-finishing of the die.
To summarize this fascinating process:
- A tracer slowly moves across the large copper die shell.
- A system of levers reduces these movements and guides a high-speed cutting tool.
- The cutting tool engraves the design into a block of softened steel, creating the working die.
- The artist's design is now captured in steel, but the process isn't quite over. A master engraver then hand-finishes the die, removing machine marks and sharpening details, adding the final "touch" of the craftsman.
3. The Final Act: Striking the Medal
With the hardened steel dies complete, they are mounted into a massive coining press. Metal blanks, called planchets, are struck between the dies with immense force, causing the metal to flow into the engraved designs. To see this final step in action, let's look at how coins were made using historical equipment.
I Made Coins Using 18th Century Techniques!
This video shows 18th-century techniques for making coins. While the machinery is simpler than the modern presses described in the articles, it clearly demonstrates the fundamental principle of striking a planchet between two dies.
Please watch the segment from 04:07 to 05:14. Observe how the planchet is placed on the bottom die and the top die is forced down to create the impression.
As the ANS article mentions, medals with deep relief often require multiple strikes, with the planchet being heated and softened (annealed) between each strike to fully bring up the details.
Conclusion
You now have an overview of the traditional, intricate dance between art and industry that produces a struck medal. This workflow was the standard for over a century and is still used by some traditional mints today.
Key Takeaways:
- The process begins with a large-scale plastiline and plaster model, which allows for detailed artistic work.
- This model is refined through a series of plaster negative and positive casts, where lettering and textures are perfected.
- The final plaster is used to create a durable copper die shell via electrolysis.
- A mechanical reducing machine traces the large copper shell to engrave a scaled-down version of the design into a steel die.
- The machine-made die is hand-finished by an engraver before being used in a press to strike the final medals.
This entire mechanical pathway—from plaster model to reducing machine to steel die—is what we will replace in our next lesson. We will explore the modern digital workflow, where you, the artist, can take your 3D model from Blender and prepare it directly for digital fabrication via CNC milling or 3D printing, creating a die or a master model for casting.