Hello! Welcome back to our deep dive into building a ray tracer.
In our last lesson, we laid a critical foundation by implementing the aabb class. We defined it as a primitive, gave it the ability to be constructed from points or by enclosing other AABBs, and, most importantly, we added a hit method to it.
Today, we're going to put that hit method under a microscope. The goal of this lesson is to master the implementation of a fast ray-AABB intersection test. While the previous lesson gave us a working function, this lesson is about understanding why it's fast, how to make it robust, and exploring optimizations that are crucial for high-performance rendering. This fast test is the engine that will power our Bounding Volume Hierarchy, so getting it right is essential.
1. The "Slab" Method Revisited
Let's quickly recap the core algorithm we're implementing: the slab test. An AABB is the intersection of three pairs of axis-aligned planes (slabs). A ray hits the box if, and only if, the segments of the ray inside each of the three slabs overlap.
Each slab defines an interval [t_min, t_max] along the ray. We find the overall intersection interval by taking the maximum of all t_min values and the minimum of all t_max values. An intersection occurs if this final interval is valid (i.e., t_final_min < t_final_max).
This image provides an excellent visual breakdown of the process in 2D.
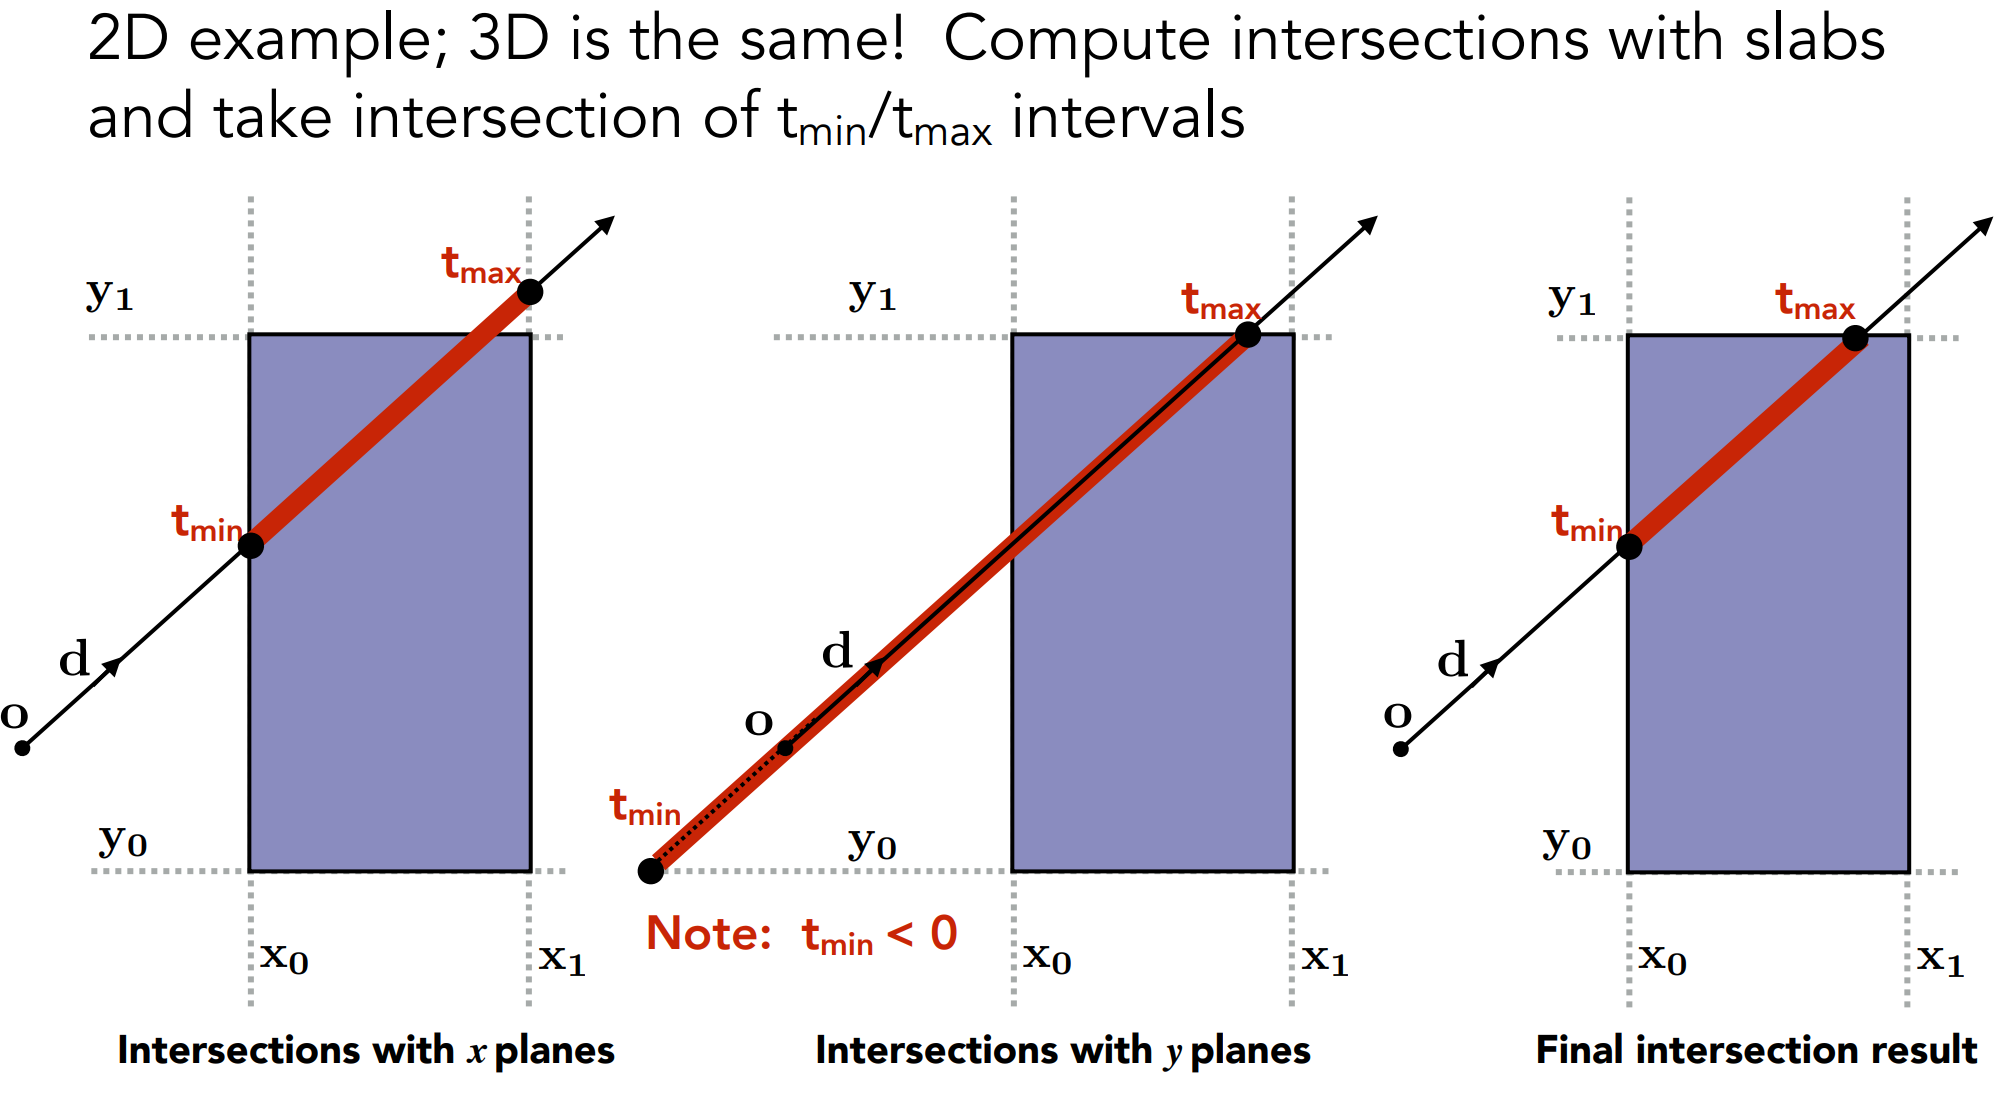
The key insight is that we can process each axis independently and accumulate the result.
2. A Robust and Fast Implementation
A naive implementation of the slab method can be slow and prone to numerical errors. A production-quality function must be both fast and robust. Let's explore the key components of such an implementation.
The Core Algorithm
First, let's review the fundamental logic and the mathematical derivation. Both of the following resources provide excellent explanations of the slab test, starting from the ray equation and deriving the intersection logic.
Peter Shirley's 'Ray Tracing: The Next Week' provides a concise explanation of the slab method, including the math and the interval overlap logic.
Please read the section 'Ray Intersection with an AABB', starting from the text 'Most people use the “slab” method.' down to the end of the pseudo-code blocks. Focus on how the 1D ray-plane intersection formula, t = (x_0 - Q_x) / d_x, is used to find a t-interval for each axis, and how these intervals are combined.
Optimization Strategy 1: The Curse of Division
In the formula t = (plane_pos - ray_origin) / ray_direction, the division is computationally more expensive than multiplication. Since we will call this intersection function billions of times when rendering a complex scene, every saved instruction matters.
The standard optimization is to pre-calculate the inverse of the ray's direction components (1/d.x, 1/d.y, 1/d.z) once when the ray is created. Then, the intersection calculation becomes a much faster multiplication: t = (plane_pos - ray_origin) * inv_ray_direction.
Optimization Strategy 2: Handling Ray Direction
What happens if the ray travels in a negative direction along an axis (e.g., d.x < 0)? The t value for the min plane (x_0) will be larger than the t for the max plane (x_1). Our computed t-interval will be "reversed," like [7, 3].
There are two elegant ways to handle this without expensive branching:
- The
min/maxapproach: As seen inRay Tracing: The Next Week, you can compute botht0andt1and then usemin()andmax()to sort them into the correct[t_min, t_max]interval. This is conceptually simple but involves an extra comparison. - The
swapapproach: Computet_minandt_maxassuming a positive direction. Ift_min > t_max, swap them. - The sign-precomputation approach: This is a very slick optimization. Before any tests, you determine the sign of each component of the ray's direction. You can then use this sign to fetch the correct box boundaries (
minormax) directly, eliminating the need for a swap.
The resource from Scratchapixel provides a fantastic, detailed walkthrough that culminates in this highly optimized version.
The article from Scratchapixel, 'Ray-Box Intersection', details several stages of optimization for the intersection function, culminating in a very fast implementation.
Please read through the entire article. It's a progressive journey: Ray-Box Intersection: Understand the initial derivation and the logic for combining tmin and tmax across axes. First Code Block: See the initial C++ implementation using swap(). Optimizing the Code: Pay close attention to the discussion of division-by-zero, pre-computing the inverse direction, and finally, the highly optimized version that uses a pre-computed sign array to avoid swaps entirely. This final version is an excellent example of performance-minded C++.
Test your understanding!
In the final Scratchapixel implementation, a sign array is pre-computed for the ray: sign[0] = (invdir.x < 0). This is then used to index the box's bounds array, like bounds[r.sign[0]]. Explain what this line of code achieves and why it's faster than an if/else or swap approach.
Show answer
The sign array stores a 0 (false) or 1 (true) based on whether the inverse direction is negative.
- If
invdir.xis positive (ray travels along +X),sign[0]is0. The code fetchesbounds[0].x(the min corner) for thetmincalculation andbounds[1].x(the max corner) for thetmaxcalculation. - If
invdir.xis negative (ray travels along -X),sign[0]is1. The code fetchesbounds[1].x(the max corner) for thetmincalculation andbounds[0].x(the min corner) for thetmaxcalculation.
This correctly assigns the nearer plane to tmin and the farther plane to tmax regardless of ray direction. It is faster because it replaces a conditional branch (like an if statement or a swap which often compiles to conditional moves) with a simple array lookup. On modern CPUs, branches can cause pipeline stalls if the prediction is wrong, while a simple memory lookup is much more predictable and therefore faster.
3. Final Implementation and Robustness
Now let's look at the full C++ implementation from Ray Tracing: The Next Week, which we saw in the last lesson. This time, analyze it through the lens of performance and robustness.
Let's re-examine the aabb::hit method from Peter Shirley's book. It's a compact and robust implementation that cleverly handles the performance optimizations we've discussed.
First, review the hit method within the aabb class listing. Notice how it implements the optimizations: It computes adinv (the inverse direction) at the start of the loop. The if (t0 < t1) block implicitly handles the ray direction sign without a swap or a pre-computed sign array. It's a different, but equally valid, way to achieve the same result. The check if (ray_t.max <= ray_t.min) provides an efficient 'early out' if the intervals don't overlap on any axis. After reviewing the code, read the section prior to it (labeled with caveats) that discusses numerical issues like division by zero and how IEEE floating-point math handles infinities, making the code work without special checks.
A final point on robustness: what if an object is perfectly flat, like a quad aligned with the XY plane? Its AABB would have zero thickness in the Z dimension. This can cause floating-point precision issues for rays that are nearly parallel to the object. A common solution is to ensure every AABB has a small, non-zero thickness on all axes by "padding" it slightly. This is discussed in section 5 of the AABB chapter in Ray Tracing: The Next Week (resource LINK), which you can review if you're interested in making your implementation even more robust.
4. The Bigger Picture: A Glimpse into BVH Traversal
Why this obsession with speed? Because this intersection test is the most frequently called function in the entire BVH acceleration process. For each ray, the renderer will traverse the BVH tree, calling aabb::hit() at each node.
In the video below, the presenter implements a BVH and discovers an important optimization. The aabb::hit function can be made even more useful if, instead of returning a simple true/false, it also returns the distance t to the intersection point. This allows the traversal algorithm to intelligently skip entire branches of the tree that are further away than an already-found intersection.
Coding Adventure: More Ray Tracing!
This video by Sebastian Lague provides excellent motivation. I'd like you to watch a specific segment where he optimizes his BVH traversal using a more informative AABB intersection test.
Please watch the segment from 24:54 to 27:30. Notice how he modifies his ray-box intersection function to return the distance to the box. This allows the traversal code to check if a box is 'closer than our current closest result' and prune the search space, providing a significant speedup.
We won't implement this distance-based optimization just yet, but it's a fantastic example of how a well-designed, low-level function enables high-level algorithmic improvements.
Conclusion
In this lesson, we took a magnifying glass to the ray-AABB intersection test, moving from a basic working function to a deep understanding of how to make it fast and robust.
Key Takeaways:
- The Slab Test is King: It's an elegant, component-wise algorithm for ray-AABB intersection.
- Optimization is Non-Negotiable: For a function this critical, you must optimize. Pre-calculating the inverse ray direction is the most important first step.
- Handle All Directions: A robust implementation must correctly handle rays traveling in negative directions, either through logic (swaps,
if/else) or clever data structures (sign array). - Floating-Point is Tricky: Understanding how IEEE 754 handles infinities helps write simpler code for edge cases like parallel rays. Padding boxes ensures robustness for flat objects.
- Informing Higher-Level Algorithms: The design of this low-level function (e.g., returning
tvs. abool) has a direct impact on the efficiency of the larger BVH traversal algorithm.
Next Steps
We now have our razor-sharp tool: a fast, robust aabb::hit() function. In the next lesson, we will finally put it to work. We'll use it as the core component to construct a Bounding Volume Hierarchy, recursively subdividing our scene geometry and building the tree structure that will accelerate our renders from minutes to seconds.