Hello! Welcome to the next lesson in our journey to build a ray tracer.
In the previous lesson, we did the heavy lifting on the mathematical side. We derived the vector formula for a refracted ray and discovered a crucial detail: the term under the square root, , naturally tells us when refraction is physically impossible. When becomes negative, it signals the onset of Total Internal Reflection (TIR).
Today, we'll put that theory into practice. Our learning outcome is to implement the logic to handle the phenomenon of total internal reflection. We'll write a robust C++ function that attempts to calculate refraction, signals failure if TIR occurs, and then modify our dielectric material's scatter method to correctly fall back to reflection. This step is what makes transparent objects like glass balls behave correctly, especially around their edges.
1. From Math to Code: Detecting Total Internal Reflection
Let's start by recalling the condition for TIR. It occurs when a ray travels from a denser medium (like glass, ) to a less dense one (like air, ) at a sufficiently shallow angle.
Mathematically, this happens when Snell's Law would require , which is impossible. Our vector formula neatly captured this with the discriminant term: . If , refraction cannot happen.
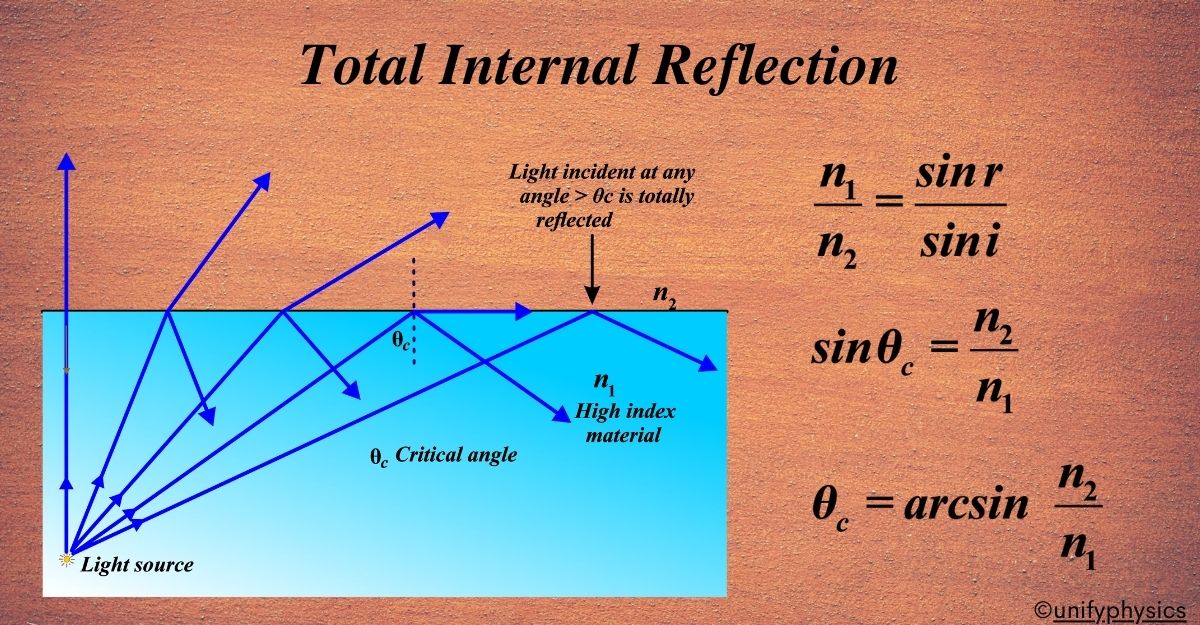
This check, k < 0, is the core of our implementation. It's a simple, efficient test that avoids any trigonometric functions and tells us exactly what to do.
TU Wien Rendering #6 - Snell's Law and Total Internal Reflection
This short video from a TU Wien course offers a great intuitive moment when the math breaks down, revealing TIR. The speaker's reaction when the calculation results in sin(θ) > 1 highlights why this isn't just a math error, but a signal of a real physical event.
Watch from 08:14 to 11:00. Pay attention to the moment at 09:50 where the calculation yields a sine value greater than 1, and how the speaker interprets this as a mathematical impossibility that points to a physical phenomenon.
2. Implementing the refract Function
Our goal is to create a helper function that encapsulates the refraction logic. A common and effective design in C++ is to have the function return a bool indicating success or failure, and to pass the output vector by reference.
Here's a typical signature:bool refract(const vec3& ray_in, const vec3& normal, float n_ratio, vec3& refracted_out);
ray_in: The incoming unit direction vector.normal: The surface normal at the hit point.n_ratio: The ratio of refractive indices, .refracted_out: A reference to avec3that will store the result if refraction is successful.
If refraction occurs, the function calculates refracted_out and returns true. If TIR occurs, it returns false, and refracted_out is left untouched.
The article 'Ray Tracing in One Weekend' provides a very clear and concise implementation of this refract function. We will use it as our reference.
Please read the section 'Coding the Refraction Vector'. It presents the full refract function and explains how the discriminant is used to determine whether a refracted ray exists.
Let's break down the implementation from the resource:
bool refract(const vec3& v, const vec3& n, float ni_over_nt, vec3& refracted) {
    vec3 uv = unit_vector(v);
    float dt = dot(uv, n);
    float discriminant = 1.0 - ni_over_nt * ni_over_nt * (1.0 - dt*dt);

    if (discriminant > 0) {
        refracted = ni_over_nt * (uv - n*dt) - n*sqrt(discriminant);
        return true;
    }
    else {
        // Total Internal Reflection
        return false;
    }
}
This code directly translates our physics derivation:
uvis the unit direction vector of the incoming ray ().dtis , which corresponds to (or its negative, which gets squared away).discriminantis our . Note that1.0 - dt*dtis equivalent to , which is . So the discriminant is , exactly what we derived.- The
if (discriminant > 0)block is our TIR check. If true, we compute the refracted ray using the vector formula from the last lesson and returntrue. - If false, we simply return
falseto signal to the caller that TIR happened.
3. Integrating TIR Logic into the dielectric Material
Now that we have our refract utility, we can use it within the scatter method of our dielectric material class. The logic is straightforward: try to refract, and if you can't, reflect.
This involves a crucial detail you'll often encounter in graphics programming: determining if a ray is entering or leaving an object.
- When a ray hits the outer surface, it's going from air into glass. The ratio of indices is .
- When a ray hits the inner surface (it's already inside the object), it's going from glass into air. The ratio is .
We can determine this by checking the dot product between the ray's direction and the surface normal. By convention, normals point out of the surface.
- If
dot(ray_direction, normal) < 0, the ray and normal are pointing in generally opposite directions, so the ray is hitting an outer, front-facing surface. - If
dot(ray_direction, normal) > 0, they point in similar directions, meaning the ray is inside the object hitting a back-facing surface. In this case, we must also invert the normal for our calculations to be correct.
Introduction to Shading (Reflection, Refraction and Fresnel)
Let's look at how to put this all together in the material's scatter method. The Scratchapixel article and 'Ray Tracing in One Weekend' both provide excellent, similar implementations.
Focus on the complete C++ implementation of the refract function in this section. Notice the if (cosi < 0) block. This is where it handles the case of the ray being inside the object by swapping the refractive indices (etai, etat) and inverting the normal.
Here is how the logic looks inside the scatter method, combining the check for direction and the call to our refract function.
virtual bool scatter(const ray& r_in, const hit_record& rec, vec3& attenuation, ray& scattered) const {
    attenuation = vec3(1.0, 1.0, 1.0); // Glass absorbs no light

    vec3 outward_normal;
    float ni_over_nt;

    // Check if the ray is entering or exiting the material
    if (dot(r_in.direction(), rec.normal) > 0) {
        // Ray is inside the object, hitting the inner surface
        outward_normal = -rec.normal;
        ni_over_nt = ref_idx; // e.g., 1.5 / 1.0
    } else {
        // Ray is outside the object, hitting the outer surface
        outward_normal = rec.normal;
        ni_over_nt = 1.0 / ref_idx; // e.g., 1.0 / 1.5
    }

    vec3 refracted;
    // Try to refract the ray
    if (refract(r_in.direction(), outward_normal, ni_over_nt, refracted)) {
        // Refraction was successful
        scattered = ray(rec.p, refracted);
    } else {
        // Total Internal Reflection occurred
        vec3 reflected = reflect(r_in.direction(), rec.normal);
        scattered = ray(rec.p, reflected);
    }

    return true;
}
In this code block:
- We first determine the correct
outward_normaland the ratio of refractive indicesni_over_nt. - We then call our
refractfunction. - If it returns
true, we create ascatteredray with therefracteddirection. - If it returns
false, we ignore therefractedvector and instead call our existingreflectfunction (from the metal material lesson) to compute the reflected ray direction.
Test your understanding!
Imagine you're debugging your ray tracer. You shoot a ray from inside a glass sphere (\text{ref_idx} = 1.5) towards the outer boundary. The angle is very shallow, causing TIR.
Trace the logic in the scatter method above:
- What will be the result of
dot(r_in.direction(), rec.normal)? (Positive or negative?) - What values will be assigned to
outward_normalandni_over_nt? - What will the
refract(...)function return? - Which branch of the
if/elsestatement will be executed, and what kind of ray will be generated?
Show answer
- Since the ray is inside the object moving outwards, its direction and the surface normal (
rec.normal) will be pointing in roughly the same direction. The dot product will be positive. - The
ifblock will execute.outward_normalwill be-rec.normal(to point against the ray), andni_over_ntwill beref_idx(1.5). - Because the angle causes TIR, the discriminant will be negative, and
refract(...)will returnfalse. - The
elsebranch will be executed. A reflected ray will be calculated using thereflectfunction, and this will become the newscatteredray. The ray correctly bounces back inside the sphere.
Conclusion
Congratulations! You have now implemented one of the most visually important phenomena in dielectric rendering. By translating a mathematical condition into a simple check within a helper function, you've enabled your ray tracer to correctly simulate both refraction and total internal reflection.
Key Takeaways:
- Total Internal Reflection is detected in code by checking if the discriminant of the refraction formula, , is negative.
- A robust
refracthelper function can return aboolto signal success or failure (TIR), making the calling code in the material clean and readable. - The
dielectricmaterial'sscattermethod must handle TIR by falling back to computing a standard reflection when refraction is not possible. - Correctly handling refraction requires checking whether a ray is entering or leaving an object to set the ratio of refractive indices () and the normal direction appropriately.
Next Steps
If you render a glass sphere with this code, it will look good, but slightly odd. It will either refract or reflect, but real-world glass does both at the same time. The front surface of a window reflects a faint image of the room while you can still see through it. In our next lesson, we will implement Schlick's approximation for calculating Fresnel reflectance. This will allow us to determine the probability of reflection versus refraction, letting us mix the two results for a much more realistic image.