Hello! Welcome back to our C++ foundations module.
In the last lesson, we created our first building block: the vec3 class. This gave us a way to represent a single vector, point, or color. However, a compelling 3D scene is rarely just one thing; it's a collection of many objects. This leads to a fundamental question: how do we manage a list of objects in our scene, especially when we don't know how many there will be ahead of time?
Today's lesson answers that question by focusing on our next learning outcome: using std::vector to manage dynamic collections of objects. We'll explore std::vector, a powerful and flexible container from the C++ Standard Template Library (STL). By the end of this lesson, you'll understand how to use std::vector to create, populate, and access a list of objects, setting the stage for building our first multi-object scene.
1. What is std::vector?
First, a quick clarification: despite its name, std::vector is not a mathematical vector like our vec3 class. It's a C++ library type that represents a dynamic array—a list that can automatically grow or shrink in size as you add or remove elements.
This is incredibly useful. Unlike a built-in C-style array (Type array[size]), you don't need to specify its size when you create it. std::vector handles all the underlying memory management for you.
To get a quick and clear introduction, let's watch a short video.
Dynamic Arrays in C++ (std::vector)
The following video from The Cherno's YouTube channel provides an excellent overview of what std::vector is and how it manages memory.
Please watch from 01:04 to 02:02 and from 03:32 to 04:16. Focus on these key points: std::vector as a dynamic array or 'ArrayList'. The high-level process of how it resizes: allocating a new, larger block of memory, copying the old elements over, and then freeing the old block.
As the video explains, this automatic resizing is convenient, but it involves a performance cost due to the copy operation. We'll learn how to manage this cost later in the lesson.
2. Core Operations with std::vector
Now let's get hands-on. Using a std::vector involves a few fundamental operations: creating it, adding elements, accessing them, and iterating over them.
First, to use std::vector, you must include the corresponding header file:
#include <vector>
Creating and Populating a Vector
You declare a vector by specifying the type of data it will hold inside angle brackets <>. Let's create a vector to hold our vec3 objects from the last lesson.
#include <vector>
#include "vec3.h" // Assuming vec3 is in its own header

// Create an empty vector that can hold vec3 objects
std::vector<vec3> my_points;
To add elements to the end of the vector, we use the push_back() member function.
// Add three points to our vector
my_points.push_back(vec3(0.0, 0.0, 0.0));
my_points.push_back(vec3(1.0, 2.0, 3.0));
my_points.push_back(vec3(4.0, 5.0, 6.0));
Accessing Elements and Size
You can find out how many elements are in a vector using the size() member function. To access a specific element, you can use the familiar square-bracket [] operator, just like with an array.
std::cout << "The vector contains " << my_points.size() << " points." << std::endl; // Outputs: 3

// Access the second element (at index 1)
vec3 p = my_points[1];
std::cout << "The second point is (" << p.x() << ", " << p.y() << ", " << p.z() << ")" << std::endl; // Outputs: (1, 2, 3)

// You can also modify elements
my_points[0] = vec3(10, 10, 10);
Note: std::vector also has an .at() member function (e.g., my_points.at(1)). The key difference is that .at() performs bounds checking and will throw an exception if you try to access an out-of-range index, while [] does not. For performance-critical code like a ray tracer, [] is generally used, but at() can be safer during development and debugging.
Iterating Over a Vector
A common task is to loop through all the elements in a vector. While you can use a traditional for loop with an index, modern C++ provides a cleaner and safer syntax: the range-based for loop.
// Iterate over each point in the vector and print it
for (const vec3& point : my_points) {
    std::cout << "(" << point.x() << ", " << point.y() << ", " << point.z() << ")" << std::endl;
}
Notice the use of const vec3&. This is a crucial C++ idiom.
- The
&makespointa reference to the element in the vector, which avoids creating a costly copy of thevec3object in each iteration. - The
constmakes it a constant reference, preventing you from accidentally modifying the element inside the loop.
This is the preferred way to iterate over a collection when you only need read-only access.
Test your understanding!
Write a small C++ main function that does the following:
- Creates a
std::vectorofint. - Uses
push_backto add the numbers 10, 20, and 30 to it. - Uses a range-based
forloop to calculate the sum of the elements. - Prints the final sum.
Show answer
#include <iostream>
#include <vector>

int main() {
    // 1. Create a vector of integers
    std::vector<int> numbers;

    // 2. Add elements
    numbers.push_back(10);
    numbers.push_back(20);
    numbers.push_back(30);

    int sum = 0;
    // 3. Iterate and calculate the sum
    for (const int& num : numbers) {
        sum += num;
    }

    // 4. Print the result
    std::cout << "The sum is: " << sum << std::endl; // Should print 60

    return 0;
}
3. Application in Our Ray Tracer: A List of Objects
So, how does this fit into our ray tracer? Our "scene" will simply be a list of all the objects that can be hit by rays. We can use a std::vector to hold these objects.
In upcoming lessons, we'll define an abstract hittable class that can represent any object with a ray intersection test (like a sphere). We'll then create a hittable_list class that uses a std::vector to store pointers to all hittable objects in our scene.
Let's preview the code for this from Ray Tracing in One Weekend.
Ray Tracing in One Weekend Series
This section from the textbook shows the exact application of std::vector we will be building. It defines a class to represent a list of objects that can be intersected by rays.
Read the first two subsections, 'A List of Hittable Objects' and 'Some New C++ Features'. Focus on how hittable_list contains a std::vector member variable. We will cover shared_ptr in detail in the next lesson; for now, just think of it as a pointer to an object.
The key declaration here is:std::vector<shared_ptr<hittable>> objects;
This creates a vector that stores pointers to objects, not the objects themselves. Given your graphics background, you can appreciate why this is a good design:
- Polymorphism: It allows us to store different kinds of objects (spheres, triangles, planes) in the same list, as long as they all derive from the
hittablebase class. - Efficiency: Storing pointers is cheap. If we stored large objects directly, the vector would have to copy these entire objects every time it resized, which would be very slow. Copying a pointer is fast and trivial.
4. Memory Management and Performance
Since std::vector's resizing can be expensive, it's wise to manage it.
If you know in advance that you will need to store, say, 1000 objects, you can tell the vector to allocate all the necessary memory at once using the reserve() function.
std::vector<vec3> lots_of_points;
lots_of_points.reserve(1000); // Allocate memory for 1000 vec3 objects upfront

// Now, the first 1000 calls to push_back() will not trigger any reallocations.
for (int i = 0; i < 1000; ++i) {
    lots_of_points.push_back(vec3(i, i, i));
}
This is a common and important optimization in performance-sensitive applications like rendering.
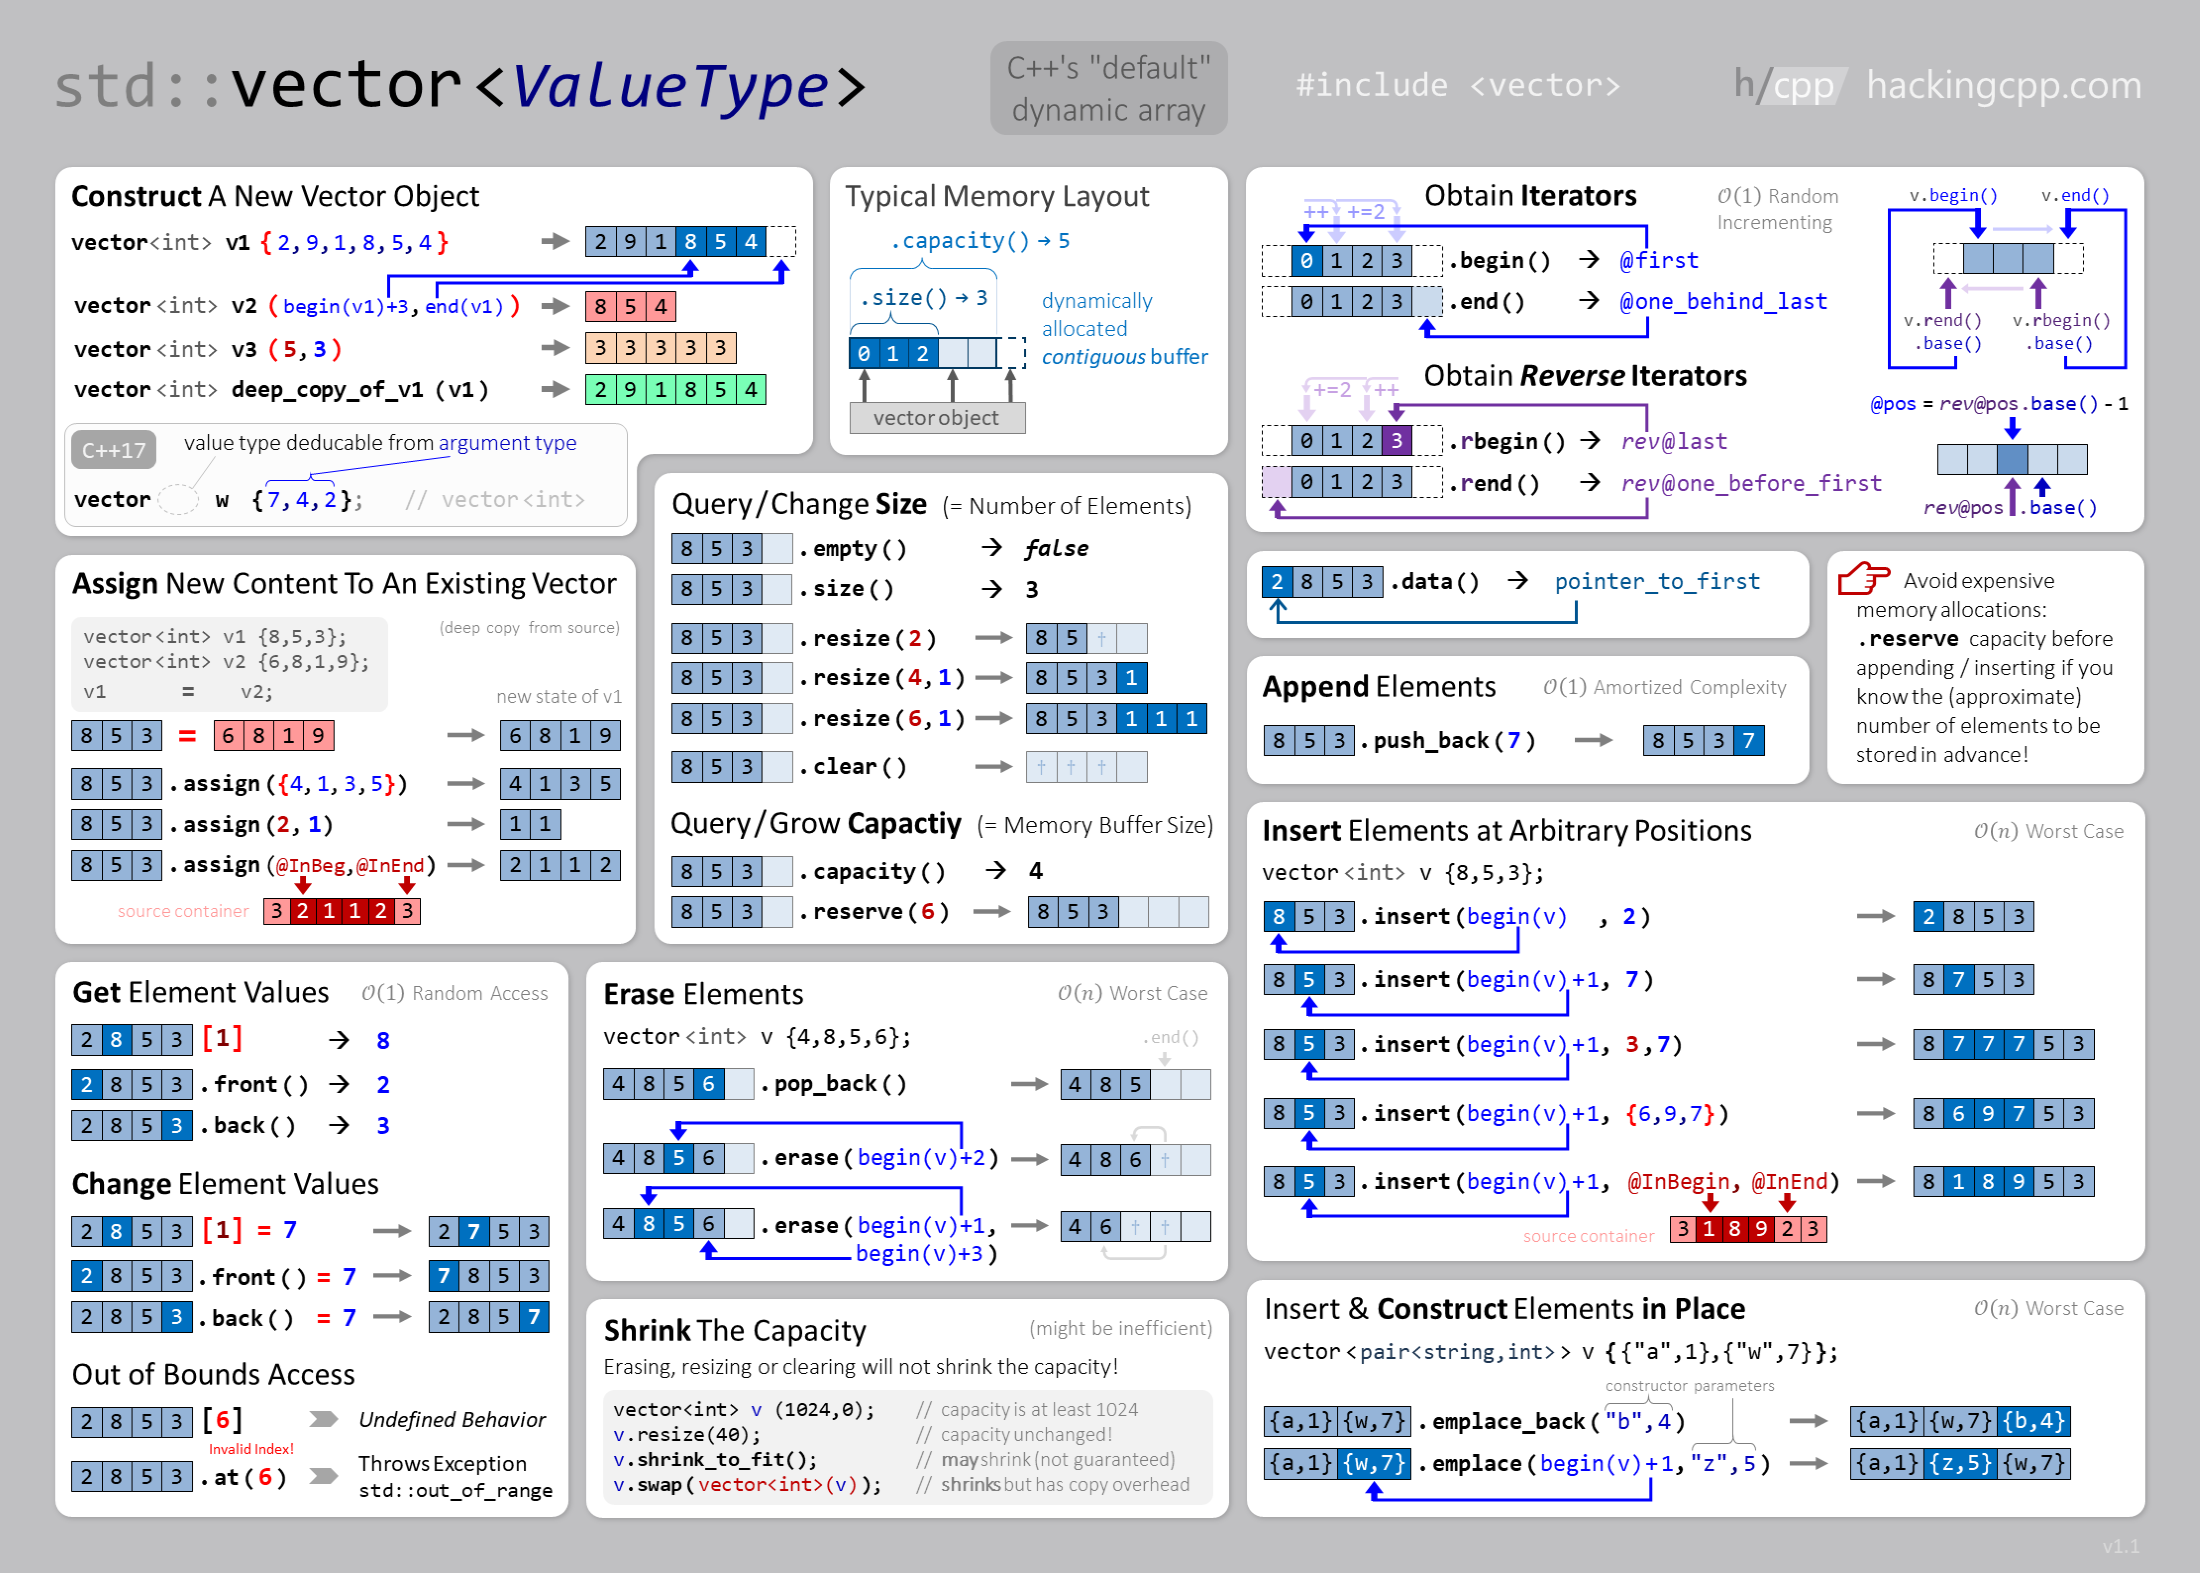
For a comprehensive visual summary of std::vector's capabilities, this cheat sheet is an excellent resource to keep handy.
Key Takeaways
std::vectoris a dynamic array from the C++ STL, used to manage collections of objects.- It automatically handles memory allocation and resizing.
- Key operations include
push_back()to add elements,size()to get the count, and[]for access. - Range-based
forloops withconstreferences (for (const auto& item : my_vector)) are the preferred way to iterate for read-only access. - In our ray tracer,
std::vectorwill be used to manage the list of objects in our scene. - For performance, you can use
reserve()to pre-allocate memory and avoid costly reallocations.
Next Steps
In the preview of the hittable_list, you saw std::vector<shared_ptr<hittable>>. We've covered std::vector, but what is std::shared_ptr? In the next lesson, we'll dive into smart pointers (std::unique_ptr and std::shared_ptr). You'll learn how they automate memory management, preventing memory leaks and making it much safer to work with collections of objects on the heap.