Hello! Welcome to the next lesson in your digital art journey.
In our last two lessons, you learned to deconstruct the hand into a manageable set of simple geometric forms and then use that construction to pose it dynamically. This method of simplifying complexity is a core skill for an artist, and it's a way of thinking that should feel familiar from your work in computer science—breaking a large problem down into smaller, logical components.
Today, we're applying that same methodology to another notoriously challenging part of the body: the foot. Our goal for this lesson is to construct the foot as a simple wedge or block form, noting the main arches. By the end of this session, you'll have a reliable structural model for the foot that will serve as the foundation for drawing it from any angle.
1. The Foot as a Simple Structure
Just like we started the hand with a simple block for the palm, we will begin by simplifying the foot's complex form into basic geometric shapes. The key is to see past the surface details and identify the major masses.
A great way to start is by breaking the foot into three main sections. Let's look at a clear, step-by-step guide for this.
How to Draw Feet – the Easy Step-by-Step Guide
The article 'How to Draw Feet – the Easy Step-by-Step Guide' by Gvaat provides an excellent method for simplifying the foot. We'll focus on the initial construction phase.
Please read the section titled 'Step One – Break Down the Foot Into Three Simple Parts'. Pay close attention to how the heel is treated as a distinct block that steps out from the leg. The images provide a very clear visualization of this concept.
This three-part breakdown (heel, mid-foot, toes) is a powerful starting point. Another, very similar way to conceptualize this structure is to think of the heel as a solid anchor block and the rest of the foot extending from it.
The video 'How to Draw Feet' from Proko's anatomy course offers a slightly different, but compatible, take on this block construction. It also introduces the crucial concept of the foot's arches, which we'll dive into next.
Watch the segment from 01:05 to 02:40. Focus on how the foot is built from a 'big block' for the heel, with the rest of the form extruding from it. Note the simple 'blocky footprint' analogy at the end of this segment (around 02:18)—it's a very effective simplification.
These two resources present the same core idea: the foot isn't one single, complicated shape. It's a composite object, an assembly of simpler forms.

2. The Arches: Giving Form to the Blocks
A simple block is a good start, but what gives the foot its unique, organic shape are its arches. Understanding these is the key to making your block construction look like a foot and not just a brick. The learning outcome specifically asks us to "note the main arches," and for good reason—they define the foot's form and function.
As mentioned in the Proko video you just watched, the foot has three primary arches:
- Medial Arch: This is the highest and most prominent arch, running along the inside of your foot (the big toe side). This is what creates the "hollow" or "cave" under the mid-foot.
- Lateral Arch: This is a much lower, flatter arch running along the outside of your foot (the pinky toe side). This side is more stable and stays in closer contact with the ground.
- Transverse Arch: This runs across the width of the foot, from the medial to the lateral side.
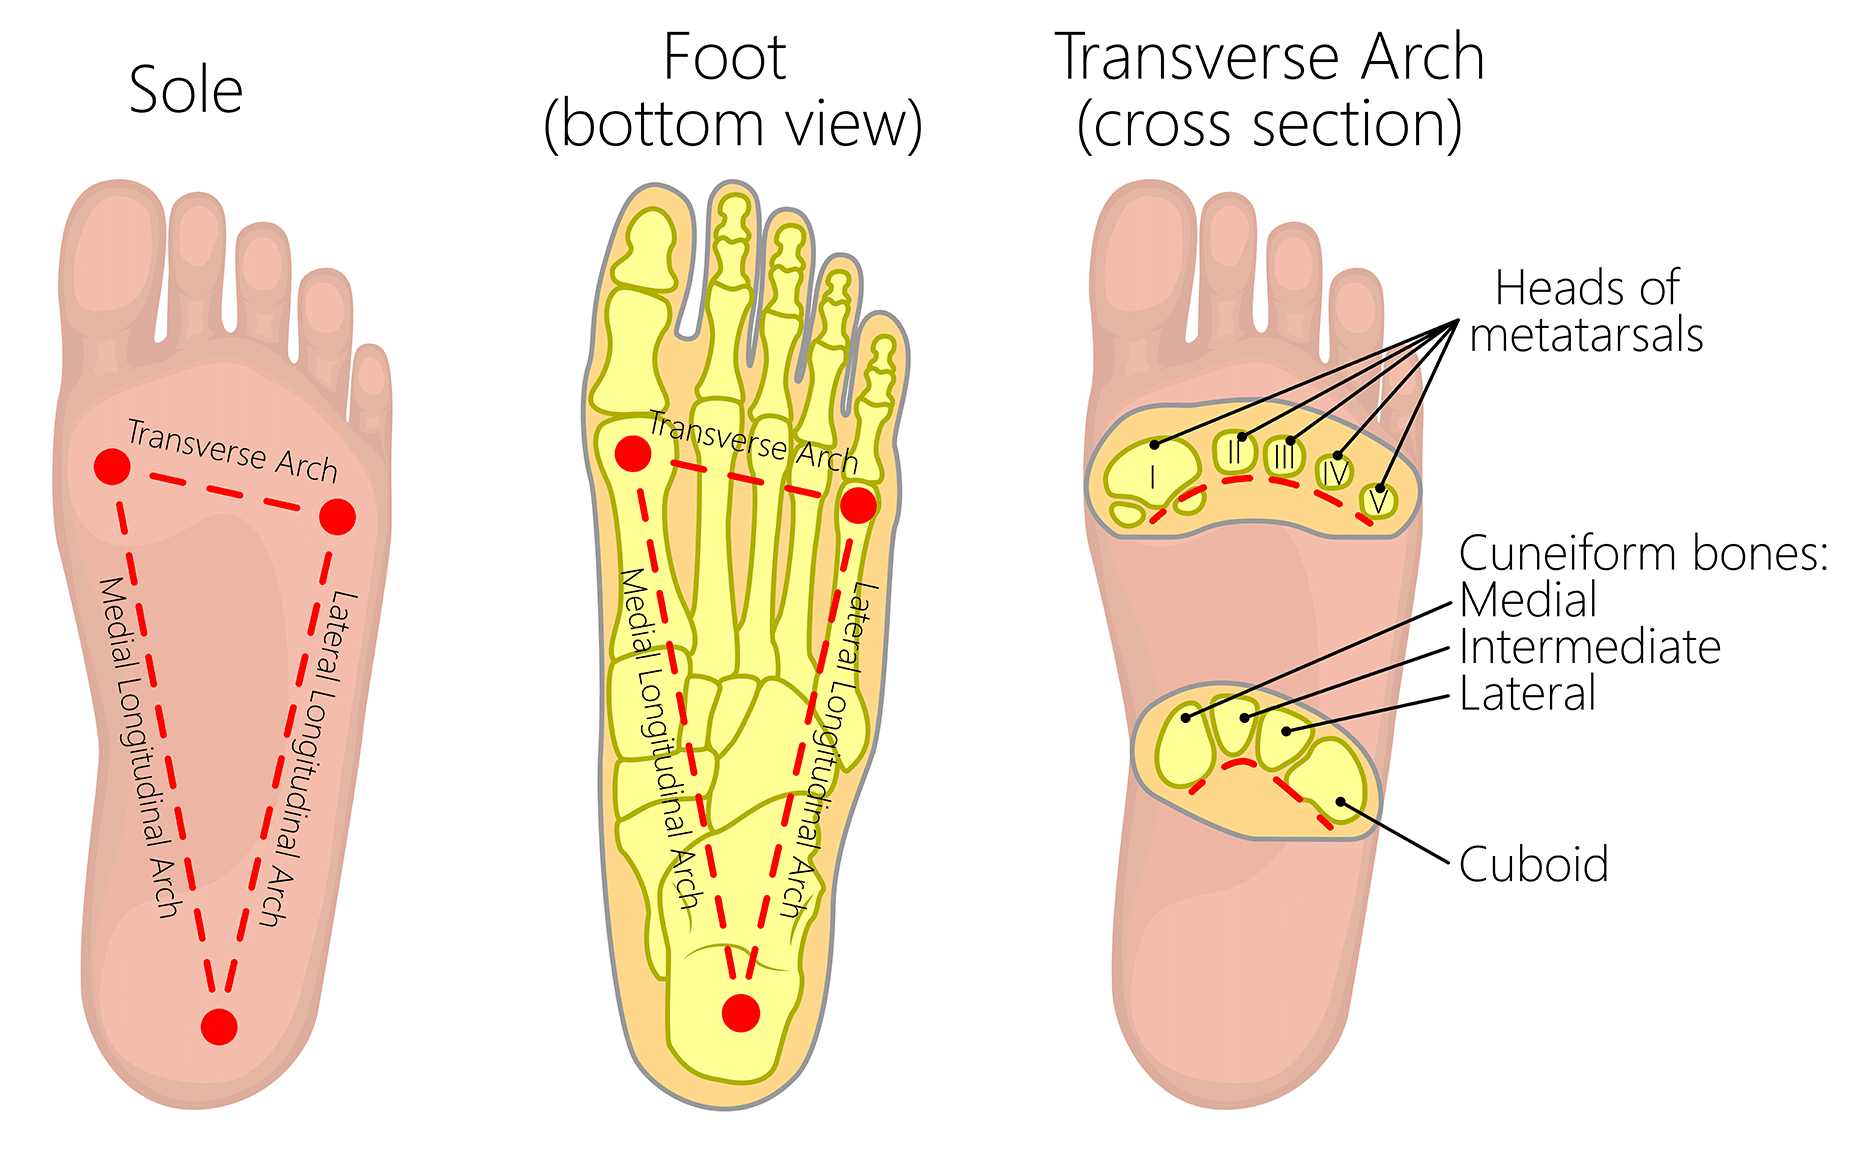
The Gvaat article also provides a great explanation for the purpose of the arch, which helps in remembering its shape.
How to Draw Feet – the Easy Step-by-Step Guide
Let's return to the Gvaat article to focus on the arch.
Read the section 'Step Two – Add the Arch to the Middle Section of the Foot'. The text explains that the arch functions as a shock absorber, which is why it has that spring-like, curved shape. Notice in the diagrams how the arch is most visible on the medial (inner) side.
When you are drawing your block model, the most important consequence of these arches is that the inner side of the foot is carved out, while the outer side is relatively flat.
3. Refining the Construction: Wedges and Angles
While a block model is a great foundation, you can often capture the gesture and form of the foot more quickly using wedges, which are essentially simplified blocks with slanted planes. This introduces more dynamism into the construction.
A good way to think about this is to see the foot as a simple triangle in profile view.
A Beginner's Tutorial to Drawing HANDS AND FEET!
The article 'A Beginner's Tutorial to Drawing HANDS AND FEET!' offers another useful simplification, thinking of the foot in terms of triangles and a 'peanut' shape from below.
Read the first five paragraphs of the 'FEET' section. Focus on the description of the side view: flat on the outside, curved on the inside. Also, note the 'peanut' shape when viewing the sole, which clearly shows the two main points of contact with the floor (heel and ball of the foot).
This idea of simplifying to a wedge or triangle is powerful because it forces you to think about the overall gesture. Let's see this in action.
Drawing Feet with Simple Shapes
In this video, 'Drawing Feet with Simple Shapes', the instructor demonstrates a very fast, gestural way to capture the foot's form using a triangular shape.
Watch two short segments: Profile View (06:40 - 07:10): Notice how the artist uses a simple, clean curve for the top and indicates the arch on the bottom. This is a perfect example of a wedge/triangle simplification. Front View 'Slide' (05:00 - 05:37): This is an excellent analogy. The top of the foot isn't flat; it's a descending plane, like a slide. This helps you visualize the wedge shape from the front.
4. Practice Exercise: Constructing the Foot (30 minutes)
Now it's time to put these ideas into practice in Procreate. Your goal is not to create a finished, detailed drawing, but to practice constructing the basic form of the foot using blocks and wedges, paying attention to the arches.
Use the "Foot Construction Methods" image above as your primary visual guide.
Your Task:
Create three separate construction drawings of a foot, each from a different basic angle:
- Side View (Medial): The view showing the inside of the foot, where the arch is most prominent.
- Top View.
- Three-Quarter View.
Follow these steps for each drawing:
- Layer 1: Block Construction. On a new layer, use a light-colored brush to build the foot.
- Start with the methods from Gvaat and Proko. Draw a block for the heel.
- Add a larger, wedge-like block for the main body of the foot.
- For the side view, explicitly carve out the shape of the medial arch.
- For the top view, remember the "slide" analogy—the top plane slopes down and away.
- Add a smaller, simplified block or wedge for the toes. Don't worry about individual toes yet.
- Layer 2: Refined Outline (Optional). Lower the opacity of your construction layer. On a new layer, draw a more organic contour around your block model. This will help you see how the geometric structure translates into a believable foot shape.
- Review and Repeat: Hide the layers for your first drawing and start the next one on a fresh set. The goal is to internalize the construction process.
Conclusion
Excellent work. You've successfully broken down the foot into a simple, repeatable structure. This process of starting with simple blocks or wedges is the key to drawing the foot confidently from any angle.
Key Takeaways:
- The foot can be simplified into a structure of connected blocks, typically starting with the heel as an anchor.
- The three arches—medial, lateral, and transverse—are what give the foot its characteristic organic shape. The high medial arch is especially important for defining the form.
- Thinking of the foot as a wedge or a simple triangle in profile is a fast and effective way to capture its gesture and major planes.
- The construction process (Blocks -> Arches -> Refined Shape) provides a reliable workflow for tackling this complex subject.
In our next lesson, we will build directly on this foundation. We will learn to draw the foot from side, front, and three-quarter views in more detail, focusing on refining the contours and placing the toes correctly onto our constructed form.