Hello! Welcome back to our still life project.
In the previous lesson, you did the important work of a stage director: you chose your objects, arranged them into a pleasing composition, and set up a single, dramatic light source. You now have a complete scene ready to be drawn.
Today, we move from director to architect. Your goal is to create a line drawing of the still life, focusing on accurate proportions and placement. This line drawing is the foundational blueprint for your final piece. Just as in software development where a solid data model or architecture is essential before writing code, a proportionally accurate line drawing is the critical structure upon which all subsequent rendering—shading, texture, and detail—will be built.
We'll focus on systematic techniques to measure and compare the elements of your scene, translating the 3D world onto your 2D canvas with precision.
1. Understanding and Measuring Proportions
Proportion is simply the relationship of size between different parts of an object, or between different objects in a scene. Our brains are constantly making these comparisons automatically, but when it comes to drawing, we need a more deliberate method.

The most common method for this is called comparative measurement or sighting. It involves using your pencil (or Apple Pencil) as a ruler to compare sizes and transfer those relationships to your drawing.
The following video provides an excellent, detailed demonstration of this technique. It will be the cornerstone of our process today.
Measuring & Proportion Introduction: The Art & Science of Drawing Class
This video from Brent Eviston's 'The Art & Science of Drawing' series will teach you the fundamentals of proportional measuring. Pay close attention to the physical posture required for accuracy.
Please watch from the beginning to 12:36. The video will cover: The definition of proportion. The correct posture: arm locked, one eye closed. How to capture a measurement (a 'unit') on your pencil. How to use that unit to create a proportional 'bounding box' on your paper.
The key takeaway from the video is to find a Basic Unit of Measurement (BUM). This is a clearly defined length on one of your objects (e.g., the width of a mug, the height of a piece of fruit) that you will use as a standard to measure everything else.
2. The "Big to Small" Workflow
A common mistake for beginners is to start drawing one object in great detail, finish it, and then realize it's the wrong size or in the wrong place, leaving no room for the other objects. To avoid this, we will work from big to small.
This means we first establish the overall dimensions of the entire composition before moving to individual objects, and then finally to their details. Think of it as creating the main layout of a web page before styling the individual components.
This approach is often called creating an "envelope" or a "bounding box."
How to Draw Accurate Proportions
The artist Proko explains this 'big to small' concept very effectively. Watch this segment to understand how starting with the largest shapes helps establish the major relationships first.
Watch the section from 06:57 to 09:25. Notice how he talks about starting with an 'envelope' that contains the whole subject, or with the largest individual shapes, before breaking them down.
3. Expanding Your Measurement Toolkit
While unit measurement is your primary tool, two other techniques are invaluable for checking your work and ensuring accurate placement.
Plumb Lines (Vertical & Horizontal Alignment)
Imagine a perfectly vertical or horizontal line running through your scene. What parts of your objects does it intersect? This helps you correctly align elements that aren't right next to each other. For example, a vertical line dropped from the left edge of one object might align perfectly with the center of an object below it.
Negative Space
Instead of looking at the objects themselves (the positive shapes), focus on the shapes of the empty spaces between and around them (the negative shapes). Often, a strange-looking gap between two objects in your drawing is the first sign that the proportion or placement of one of them is wrong.
How to Draw Accurate Proportions
Let's return to the Proko video to see these two techniques in action.
Watch the sections on 'Plumb lines' (02:51 - 03:41) and 'Negative shapes' (05:50 - 06:46). These are quick but powerful additions to your process.
For a good text-based summary of all these techniques that you can refer back to, the article "Lesson 4: How to Draw with Accurate Proportions" from RapidFireArt is a useful resource. Sections 2 and 4 specifically cover Plumb Lines and Negative Space.
4. Your Turn: Create the Line Drawing
Now it's time to apply these principles to your still life. Grab your iPad and open Procreate.
Estimated Time: 25-30 minutes
Objective: To create a light, accurate line drawing of your still life composition.
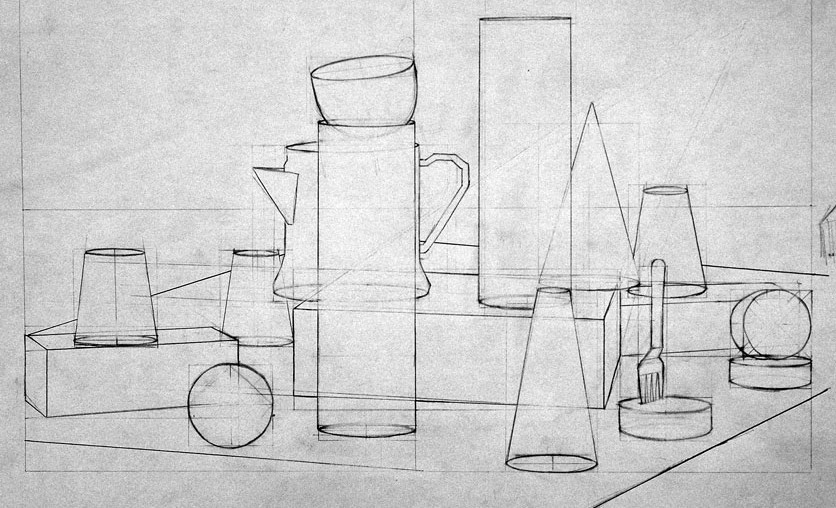
Follow these steps:
- Set Up: Sit in front of your still life. You must maintain the same position and point of view throughout the drawing process, as changing your position will change the proportions. Open Procreate and create a new layer for your drawing.
- Establish the Bounding Box: Use the sighting technique (arm locked, one eye closed) to measure the overall width of your entire scene. This is your first BUM. Now, compare that width to the overall height. Is the scene 1.5 times as wide as it is tall? Is it a perfect square? Lightly sketch a large rectangle on your canvas with this proportion. Everything will happen inside this box.
- Block in Major Shapes: Within your bounding box, lightly sketch the main objects using the simple 3D forms you practiced in Module 2 (cylinders, spheres, cubes). Don't draw details. Focus only on their size and position relative to one another. Use plumb lines to check their alignment.
- Refine Proportions with Your BUM: Pick a single, clear measurement from your scene to be your official Basic Unit of Measurement (e.g., the height of the smallest object). Use this BUM to check the proportions of everything else. "The large vase is three units tall. The apple is one unit wide." Adjust your simple forms based on these measurements.
- Check with Negative Space: Pause and look at the empty shapes between your objects. Do the triangular or trapezoidal gaps in your drawing match what you see in real life? Adjust your lines until they do.
- Develop the Contours: Once you are confident that the basic sizes and placements are correct, refine your simple forms into the true outlines (contours) of your objects. Convert the cylinder into a mug by adding a handle, or refine the sphere into the specific shape of an apple. Keep all your lines light—we're still in the construction phase. Use your eraser with a low opacity to gently fade incorrect lines rather than scrubbing them out completely.
5. Digital Self-Critique
One of the huge advantages of digital art is the ability to get instant, accurate feedback. Here’s a method to check your work.
- Take the reference photo you shot in the last lesson.
- In Procreate, tap the wrench icon > Add > Insert a photo, and select your still life photo. This will place it on a new layer.
- Drag this photo layer so it is above your drawing layer.
- Tap the 'N' on the photo layer and reduce the opacity to around 50%.
You can now see your drawing underneath the semi-transparent photo. Are your proportions and placements accurate? This is not for tracing, but for analysis. Note any major discrepancies, then hide the photo layer and make your corrections.
How to Draw Accurate Proportions
This final clip from Proko demonstrates a similar process in Photoshop. The principle is identical in Procreate and is an incredibly powerful way to train your eye.
Watch the 'Self-critique' section from 09:50 to 11:22.
Conclusion
Excellent work today. You have now created the solid foundation for your still life. This process of measuring and building from big to small might feel slow and mechanical at first, but it is the fastest path to accuracy. With practice, these checks will become second nature.
Key Takeaways:
- Always work from big to small, starting with a bounding box for the whole composition.
- Use comparative measurement with a Basic Unit of Measurement (BUM) to keep proportions consistent.
- Check your accuracy using plumb lines for alignment and by observing negative space.
- Keep your construction lines light; you are building a scaffold, not the final wall.
- Leverage digital tools like layer overlays to perform powerful self-critiques.
In our next lesson, we will move on to the first step of rendering: analyzing the scene to identify the light source, cast shadows, and form shadows. You'll begin to map out the value structure on top of the line drawing you created today.