Hello! Welcome to the first lesson of our second module, "Drawing Fundamentals."
In the last module, you mastered the essential tools of Procreate. We wrapped up by learning about the undo/redo gestures and the History panel, your digital safety net. You'll find that safety net invaluable today, as it allows you to practice and experiment without the fear of making permanent mistakes.
Today, we move from the tool to the technique. Our learning outcome is to draw confident, smooth lines using controlled movements originating from the shoulder. This is the most fundamental physical skill in drawing. Every shape, form, and figure you'll eventually create begins with a line. Developing good habits now will be the foundation for everything that follows, especially as we move towards your goal of drawing the human form.
1. What is a "Confident Line"?
Before we dive into the "how," let's clarify what we're aiming for. In drawing, a "confident" line is one that is smooth, clean, and drawn with a single, deliberate stroke. The opposite is a hesitant, scratchy, or "hairy" line, built up from many small, uncertain marks.
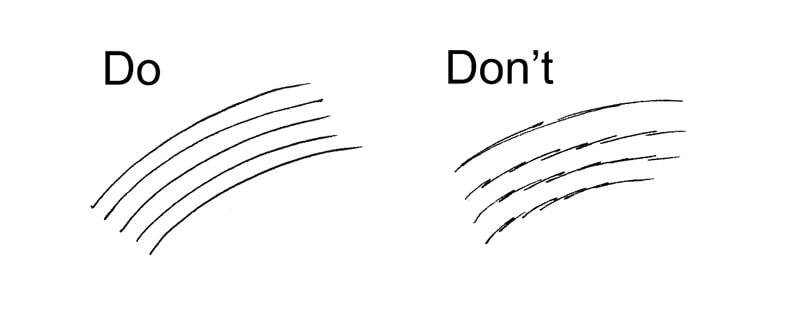
As a beginner, your lines will likely start out looking more like the "Don't" example, and that's perfectly normal. This lesson is about training your body to produce the lines on the left.
2. The Mechanics: Drawing from the Shoulder
The single most significant change you can make to improve your line quality is to change how you move your arm. Most of us are used to writing, which uses small, precise movements from the fingers and wrist. For drawing, this is limiting. We need to learn to draw using the larger, more stable joints: the elbow and, most importantly, the shoulder.
To understand why this is so critical, let's start with a video that explains the concept.
Drawabox Lesson 1: Drawing From Your Wrist and Shoulder
The video 'Drawabox Lesson 1: Drawing From Your Wrist and Shoulder' from the Uncomfortable channel provides an excellent explanation of why drawing from the shoulder is so important for creating smooth, flowing lines.
Please watch from 02:23 to 08:25. The video will first compare lines drawn from the wrist versus the shoulder, then demonstrate the motion from each joint, and finally explain what it means to 'drive' the motion from your shoulder.
Key takeaways from the video:
- Wrist: Good for small, tight details, but leads to wobbly and short lines over longer distances.
- Elbow: A good middle-ground that offers a longer range of motion than the wrist.
- Shoulder: Provides the widest, smoothest, and most consistent arc of motion. This is the joint we will focus on to build foundational muscle memory.
When you practice, the primary sensation you're looking for is that your entire arm is moving as one unit, pivoting from the shoulder. Your upper arm should be moving. If you find your elbow planted firmly on your desk (or lap), you are physically preventing yourself from using your shoulder.
3. Techniques for Control and Confidence
Knowing you should use your shoulder is the first step. The next is learning specific techniques to make your lines both smooth and accurate. This involves intention, practice, and a few key habits.
6 Habits for Good Line Quality
Proko's video '6 Habits for Good Line Quality' introduces several actionable techniques you can use immediately to improve your linework. It builds perfectly on the 'why' of shoulder drawing by showing you the 'how'.
Watch from 02:14 to 06:53. Pay close attention to the concepts of finding a comfortable speed, 'follow through,' and especially 'ghosting'.
The video introduced the idea of ghosting: rehearsing the path of a line by hovering your pen over the canvas before you commit to the stroke. This is arguably the most powerful technique for building both confidence and accuracy.
Let's break down the ghosting method into a clear, repeatable process. You can think of it as a three-step algorithm for making a mark.
Lesson 1: Lines, Ellipses and Boxes | Ghosted Lines
The article 'Ghosted Lines' from Drawabox.com provides a structured, in-depth guide to the ghosting technique, breaking it down into distinct phases.
Please read the sections 'Step 1: Planning', 'Step 2: Preparation' (including the part on 'Ghosting'), and 'Step 3: Execution'. This will give you a robust mental model for every line you draw.
To summarize this powerful method:
- Plan: Identify your start and end points. Know what the line is supposed to do.
- Prepare (Ghost): Move your entire arm from the shoulder, rehearsing the motion back and forth smoothly without touching the canvas. Build a short-term muscle memory for that specific movement.
- Execute: Without stopping the fluid motion from your ghosting, lower your pen and draw the line in one confident stroke. Trust the preparation. Don't try to correct or steer mid-line.
4. Practical Exercise (20 minutes)
It's time to put this all together in Procreate. Remember to use the two-finger tap to undo any line you're not happy with. The goal isn't a perfect page; it's the quality of the practice for each individual line.
Setup:
- Open a new canvas in Procreate.
- Select a simple, hard-edged brush like the "Studio Pen" from the Inking library.
- For these exercises, your priority is smoothness and fluidity over accuracy. It's better to have a smooth line that misses its target than a wobbly line that's perfectly placed.
Exercise 1: Parallel Lines
This exercise, inspired by the warm-ups in the Astropad article, builds basic control.
- Try to draw a series of long, parallel vertical lines down the page.
- Focus: Keep your wrist locked and drive the movement from your shoulder. Use the ghosting technique before each line.
- Rotate your canvas 90 degrees and draw a series of parallel horizontal lines. Pay attention to which direction feels more natural. As noted in the resources, you should always rotate your canvas to the most comfortable angle for your arm.
- Try drawing parallel diagonal lines.

Exercise 2: The Ghosted Line Drill
This exercise comes directly from the Drawabox lesson and is designed to perfect the ghosting method.
- On a new layer, draw two points somewhere on the canvas.
- Your task is to connect them with a single, straight, smooth line.
- Use the full method:
- Plan: Acknowledge the start and end points.
- Prepare: Ghost the line between the points several times, feeling the motion from your shoulder.
- Execute: Draw the line.
- Undo and repeat. Then, draw two new points and do it again. Fill the page with these lines, letting them overlap. Don't worry about making it look neat.
As the Drawabox article mentions, think of success in levels.
- Level 1: The line is smooth and not wobbly (Success!)
- Level 2: The line is smooth and follows the correct path, even if it overshoots the points. (Great!)
- Level 3: The line is smooth, straight, and starts and ends precisely on the points. (Excellent!)
Aim for Level 1 consistently before worrying about Level 3.
Conclusion
Excellent work today. This lesson is often a frustrating one for beginners because it involves retraining lifelong habits. But the control you build here is non-negotiable for becoming a skilled artist.
Key Takeaways:
- Confident lines are smooth and drawn in a single stroke, not built from hesitant, scratchy marks.
- Drawing from the shoulder provides the stability and range of motion necessary for smooth lines.
- The Plan -> Prepare (Ghost) -> Execute method is a powerful framework for drawing any intentional line with confidence.
- For now, prioritize a smooth, fluid stroke over perfect accuracy. Accuracy will come with time and practice.
In our next lesson, we will use this fundamental skill of line drawing to sketch basic 2D shapes like circles, squares, and triangles. These shapes are the next step in our journey, serving as the essential building blocks for constructing any object you want to draw.