Hello! Welcome back.
In our last lesson, you learned to analyze a scene and separate the two major types of shadows: form shadows (which describe an object's volume) and cast shadows (which anchor it in space). You practiced this by blocking in these shadow shapes with flat color.
Today, we'll bring those flat shapes to life. Our goal is to render basic 3D forms using smooth blending to create a light-to-dark gradient. This is the fundamental skill that transforms a flat circle into a sphere, or a flat rectangle into a convincing cylinder. Mastering this technique is essential for rendering the subtle, curved surfaces of muscles and anatomy later on.
We'll start by understanding the full "family" of light and shadow, then learn a powerful digital blending technique, and finally, put it all into practice by rendering some basic forms.
1. From Flat Shapes to a Spectrum of Light
On a curved surface, the transition from light to shadow is not an abrupt line. It's a gradual change, or gradient. Achieving this smooth transition is the key to creating the illusion of three-dimensionality.
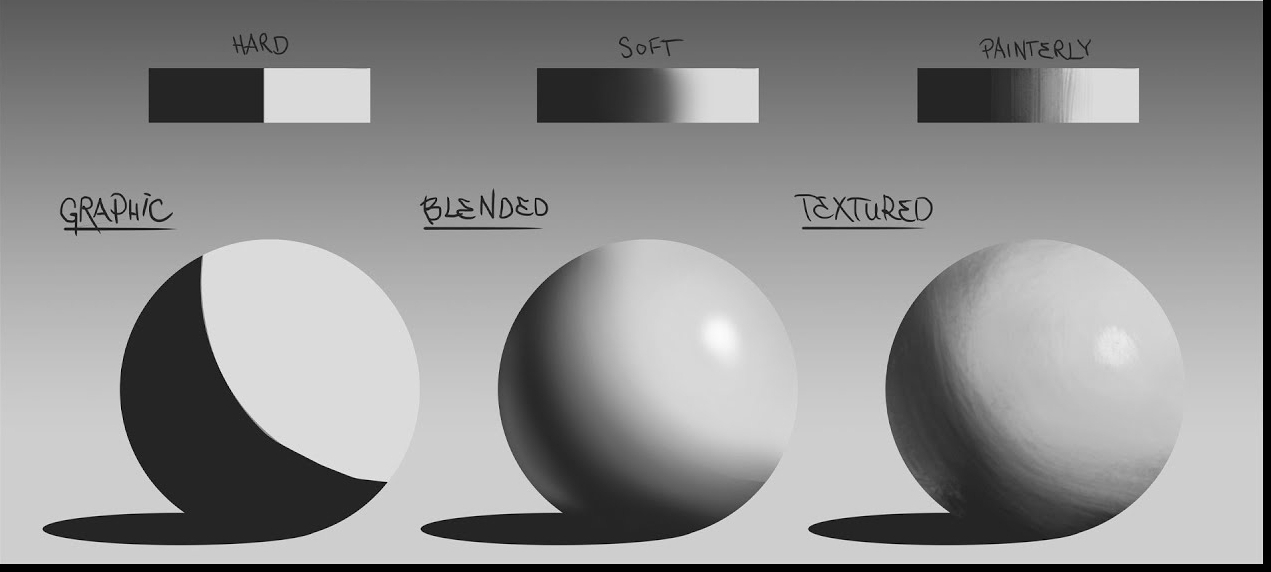
To create this blended effect realistically, we need to understand that the light and shadow areas are composed of several distinct parts.
A Beginners Guide to Light & Shadow - Part 1
Let's learn the terminology for this full spectrum of light. This article by Will Kemp provides excellent, clear definitions for all the key parts of a rendered form. Understanding these terms gives you a mental checklist when you're shading.
Read the section titled 'The 3 areas of a form'. It breaks down the light side, shadow side, and cast shadow into their components: Highlight, Halftones, Form Shadow Core, and Reflected Light. Don't worry about memorizing everything perfectly; the goal is to become familiar with the vocabulary.
To summarize the key terms you'll encounter:
- Light Side:
- Highlight: The brightest spot, where the light source reflects directly.
- Halftones: The transitional tones moving from the light area toward the shadow.
- Shadow Side:
- Terminator: The edge between the light and shadow sides.
- Core Shadow: The darkest part of the form shadow, usually right next to the terminator.
- Reflected Light: Light that bounces off the ground or other objects and illuminates the shadow side.
2. The Digital Blending Technique
So, how do we create these smooth gradients in Procreate? While using a soft airbrush is one way, a more controlled and powerful method for digital painters involves using the eyedropper tool to create your own transitional colors.
Given your background in computer science, you can think of this as manually performing an interpolation between two color values. You start with Value A (light) and Value B (dark), and you create Value C (mid-tone) to bridge the gap. Then you repeat the process between A and C, and C and B, adding more steps until the transition is seamless.
🤩 SHADING EXERCISES TO PAINT LIKE 3D RENDERS
Let's see this technique in action. Artist Marc Brunet demonstrates this simple but incredibly effective method for creating smooth blends.
Watch from 01:16 to 01:44. Notice how he lays down two colors, then uses the eyedropper (color picker) to select the value in the middle of the transition, and paints over it to smooth the gradient.
This is the core technique you'll use in today's exercise. It provides precision and control that a simple soft brush often lacks.
3. Walkthrough: Rendering a Sphere
Now let's see the full process of rendering a sphere from start to finish, incorporating the theory and techniques we've discussed.
How to Paint & Light a Realistic Sphere | Light & Shadow Rendering Basics Digital Painting Tutorial
This tutorial by The Geek Artist is a comprehensive walkthrough of rendering a sphere under direct light. It puts all the pieces together, from the initial block-in to the final details.
Watch from the beginning (00:00) to 08:10. You don't need to follow along and paint at the same time. Instead, focus on observing the process and connecting it to the terms we just learned: Initial shading (02:10): Notice how a large soft brush is used to establish the main shadow side. Halftones & Cast Shadow (03:12): See how darker tones are added on the light side near the terminator to create halftones. Refinements (04:23): Observe the addition of the occlusion shadow (a type of contact shadow) and bounce light (reflected light). Summary (06:20): The video ends with a fantastic diagram that labels all the parts we've discussed. Pay close attention to this summary.
This walkthrough gives you a complete picture of the goal. Now, you'll apply the principles yourself.
4. Practice: Rendering Basic Forms
It's time to put your skills to the test. Your task is to render three basic forms: a sphere, a cylinder, and a cone. The focus is on creating a smooth light-to-dark gradient using the color-picking technique.
Estimated Time: 25 minutes
-
Setup:
- In Procreate, create a new canvas.
- Draw the outlines of a sphere, a cylinder, and a cone. You can put each on its own layer.
- Establish a light source by drawing an arrow in one corner (e.g., top-right).
-
Sphere:
- Create a new layer above your sphere outline and set it as a Clipping Mask. This ensures you only paint inside the sphere's shape.
- Fill the shape with a light-to-mid gray color.
- Using a darker gray, block in the form shadow area with a hard-edged brush, opposite your light source. You should now have two distinct values.
- Now, apply the blending technique from the Marc Brunet video. Use a brush with some softness (the default "Round Brush" in Procreate's Painting set is good).
- Use the eyedropper tool to select the color where the light and dark areas meet. This will create a blended, intermediate color.
- Paint with this new color along the transition line (the terminator).
- Repeat this process—color pick the new transition, paint over it—until the gradient is smooth.
- On a layer underneath the sphere, paint a simple oval for the cast shadow.
-
Cylinder and Cone:
- Repeat the process for the cylinder and cone.
- Cylinder: Remember that the form shadow will run vertically down the side of the cylinder. The top circular face will be either fully lit or have its own gradient, depending on the light angle.
- Cone: The form shadow on a cone will be a triangular shape, with the point at the cone's tip.
- For all forms, the primary goal is achieving that smooth, blended transition on the form itself. Don't worry about perfect reflected light or highlights yet.

Conclusion
Excellent work. Today, you moved beyond simple shadow shapes and into the world of rendering. You've learned how to create the illusion of volume by blending values smoothly from light to dark.
Key Takeaways:
- Rendering curved forms requires creating a smooth gradient of values, not just a hard line between light and shadow.
- This gradient is composed of specific zones: highlights, halftones, a core shadow, and reflected light.
- The color-picking/eyedropper technique is a powerful and precise digital method for creating smooth blends.
You now have both the theoretical knowledge (the "what") and the practical skill (the "how") to shade basic forms. In our next lesson, we will focus on refining this skill. We'll concentrate on accurately identifying and placing the core shadow, halftone, and reflected light to make your renderings even more believable and three-dimensional.