Hello! Welcome to the first lesson in our new module, "Advanced Hooks and Global State."
In the last module, you mastered client-side routing, building a solid navigation structure for a single-page application. We ended by creating a "404 Not Found" page, an essential piece of any professional web application.
Now, we shift our focus from navigation to a more advanced way of managing the data that flows through your app. While useState is excellent for simple component-level state, applications often have more complex requirements. For example, in an e-commerce app, updating the product quantity in a cart might also need to update the subtotal and the total price. These pieces of state are connected, and managing them together with useState can become messy.
This is where the useReducer hook comes in. It provides a more structured and robust way to handle complex state logic. By the end of this lesson, you will be able to use the useReducer hook to manage complex state logic with actions and a reducer function.
1. The Core Idea: Separating Logic from Your Component
As a Laravel developer, you're familiar with the principle of separation of concerns—keeping your business logic (in models or services) separate from your presentation logic (in Blade templates). The useReducer hook brings a similar philosophy to React components.
Instead of putting all the state update logic directly inside your event handlers (like handleClick), you move it into a single, separate function called a reducer.
This flow has four key parts:
- State: The data for your component, just like with
useState. - Action: An object that describes what change you want to make. For example,
{ type: 'INCREMENT_COUNT' }. - Dispatch: A special function that you call to "send" an action to the reducer.
- Reducer: A pure function that takes the current
stateand anactionand returns the new state.
Here is a visual representation of how they work together:
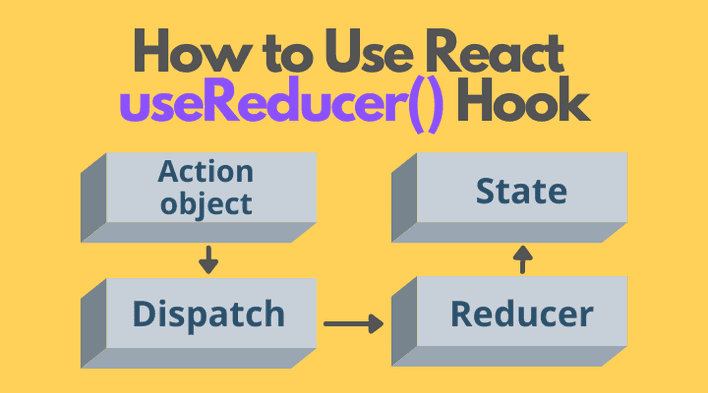
This pattern organizes your code, makes complex state transitions more predictable, and simplifies testing.
2. The useReducer Syntax and Terminology
Let's get familiar with the basic setup.
const [state, dispatch] = useReducer(reducer, initialState);
This looks similar to useState, but with a few key differences:
- It returns the current
stateand adispatchfunction (instead of a state setter). - It takes two required arguments:
reducer: The function that contains your state logic.initialState: The initial value of your state.
The video below gives a great introduction to the purpose of useReducer and its basic syntax.
Learn React Hooks: useReducer - Simply Explained!
Watch this first section of the video from Cosden Solutions to understand what useReducer is, how it compares to useState, and its basic syntax.
Watch from 00:53 to 03:42. The video introduces the concept and then shows how to import and initialize the hook. Pay attention to the two arguments it requires: the reducer function and the initial state.
3. Building Your First Reducer
The best way to understand useReducer is to build one. We'll start with a simple counter.
Step 1: Define the initialState and reducer function
First, we define the starting state and the reducer function outside our component. By convention, action types are often written as uppercase strings.
// Outside your component
const initialState = { count: 0 };

function reducer(state, action) {
  switch (action.type) {
    case 'INCREMENT':
      // Return a NEW state object
      return { ...state, count: state.count + 1 };
    case 'DECREMENT':
      return { ...state, count: state.count - 1 };
    default:
      // It's good practice to throw an error for unhandled actions
      throw new Error('Unhandled action type: ' + action.type);
  }
}
Crucially, the reducer must return a new state object. We never modify the existing state directly (a principle called immutability). The spread syntax (...state) is perfect for creating a copy and then overwriting the properties that need to change.
Step 2: Wire it up in the component
Inside your component, you call useReducer and use the dispatch function in your event handlers.
import React, { useReducer } from 'react';

// ... (initialState and reducer function from above)

function Counter() {
  const [state, dispatch] = useReducer(reducer, initialState);

  return (
    <div>
      <p>Count: {state.count}</p>
      <button onClick={() => dispatch({ type: 'DECREMENT' })}>-</button>
      <button onClick={() => dispatch({ type: 'INCREMENT' })}>+</button>
    </div>
  );
}
When a button is clicked, we dispatch an action object. React then calls our reducer with the current state and that action, calculates the new state, and re-renders the component.
The following video walks through this exact process. Note that the video uses TypeScript, which requires defining interface types. You can ignore that part; the JavaScript logic for the reducer and dispatch calls is the same.
Learn React Hooks: useReducer - Simply Explained!
This clip demonstrates how to build the reducer function with a switch statement and how to use the dispatch function to trigger state updates.
Watch from 05:21 to 09:08. Focus on how the switch statement uses the action.type and how the dispatch function is called from the button's onClick handler. The key takeaway is how the reducer returns a new state object.
4. Handling Complex, Related State
The counter example is simple, but what if our state logic was more complex? This is where useReducer truly shines.
Imagine we want to add rules to our counter: the count cannot go above 5 or below 0. If a user tries to, we should show an error message.
Our state now has two related pieces of data: the count and an error message.
const initialState = { count: 0, error: null };
All the logic for updating both of these can live inside the same reducer. This keeps our component clean and the logic centralized.
Learn React Hooks: useReducer - Simply Explained!
Now, let's see how to manage this more complex state. This part of the video is the most important for today's lesson, as it perfectly illustrates the power of useReducer.
Watch from 09:24 to 12:13. Observe how the reducer now manages both the count and error properties within the state. When the user tries to go past the limits, the reducer prevents the count from changing and sets an error message, all in one atomic update.
As you saw, the increment case in the reducer now looks something like this:
case 'INCREMENT': { // Braces create a new block scope
  const newCount = state.count + 1;
  const hasError = newCount > 5;
  return {
    ...state, // Copy existing properties
    count: hasError ? state.count : newCount, // Only update if no error
    error: hasError ? 'Maximum reached' : null // Set or clear the error
  };
}
With a single dispatched action { type: 'INCREMENT' }, the reducer handles all the complex conditional logic and returns a completely new, consistent state object. Trying to do this with useState would likely involve multiple useState calls and more complex logic inside the event handler itself.
5. When to Use useReducer vs. useState
So, should you replace all your useState hooks with useReducer? No. The choice depends on the complexity of your state.
Choosing between useReducer and useState in React
This article from the Saeloun Blog provides clear, concise guidelines for choosing between the two hooks. It's a great summary to help you build a mental model.
Please read the section titled "Thumb rules to decide when to use useState or useReducer". It provides a simple checklist for each hook.
To summarize the article's points:
- Prefer
useStatewhen:- State is a simple primitive (string, number, boolean).
- The state logic is very simple.
- You are managing multiple, unrelated pieces of state.
- Prefer
useReducerwhen:- State is a complex object or array.
- The next state value depends on the previous one.
- Multiple state values are related and should be updated together.
Conclusion
You've just learned one of the most powerful hooks in the React library. It allows you to write cleaner, more scalable, and more maintainable state logic.
Key Takeaways:
useReduceris a hook for managing complex state logic by separating it from your component.- It works with a
reducerfunction that takes the currentstateand anactionobject, and returns a new state. - You trigger state updates by calling the
dispatchfunction with an action (e.g.,dispatch({ type: 'ADD_ITEM' })). useReduceris ideal when your state is a complex object or when multiple pieces of state are interdependent.
Preview of the Next Lesson:
useReducer is fantastic for managing complex state within a single component. But what if multiple, distant components need to access or modify that same state (like a shopping cart)? Passing props down through many layers ("prop drilling") is cumbersome.
In our next lesson, we will solve this by learning how to create a React Context. We'll then see how to combine useReducer and useContext to create a powerful, scalable global state management solution—a key pattern for building your e-commerce project.