Hello! Welcome back to our journey through modern JavaScript.
In our last lesson, we mastered the sort() method and learned how to use custom comparator functions to order arrays of objects. A key takeaway was that sort() is a mutating method—it changes the original array directly. This concept of mutation is fundamental in JavaScript, as it dictates how we safely manage and update data.
Today, we're diving deeper into this idea by tackling two of the most commonly confused array methods: slice() and splice(). Their names are deceptively similar, but their behavior is worlds apart. The goal of this lesson is to help you distinguish between the mutating splice() and non-mutating slice() methods. Understanding this difference is crucial for writing predictable, bug-free code, especially when you start managing application state in your future e-commerce project.
1. slice(): Taking a "Slice" Without Changing the Original
First, let's look at slice(). As its name suggests, this method lets you take a "slice" of an array and returns that slice as a new array. The most important thing to remember is that it does not modify the original array. It's a non-mutating, or non-destructive, method.
The slice() method can take two arguments:
slice(startIndex): Extracts fromstartIndexto the end of the array.slice(startIndex, endIndex): Extracts fromstartIndexup to (but not including)endIndex.
The following video provides an excellent walkthrough of how slice() works.
Array Slice vs. Splice in JavaScript: A HUGE DIFFERENCE
Watch this first section of the video from dcode to see how slice() creates a new array from a portion of an existing one, leaving the original intact.
Watch from 00:35 to 04:30. Pay close attention to the syntax, the use of negative indices, and the final log statements that prove the original array is unchanged.
Let's solidify this with an example relevant to your e-commerce goal. Imagine you have a full list of products and you want to feature just the first three on your homepage.
const allProducts = ['Laptop', 'Mouse', 'Keyboard', 'Monitor', 'Webcam'];

// Get the first three products for a "Featured" section
const featuredProducts = allProducts.slice(0, 3);

console.log(featuredProducts); // Output: ['Laptop', 'Mouse', 'Keyboard']
console.log(allProducts);      // Output: ['Laptop', 'Mouse', 'Keyboard', 'Monitor', 'Webcam']
As you can see, allProducts remains completely unchanged. slice() gives you a new array to work with, which is perfect for when you need to read or copy data without side effects.
2. splice(): Performing "Surgery" on the Array
Now for splice(). If slice() is like taking a photo, splice() is like performing surgery. It mutates the original array by adding, removing, or replacing elements.
The syntax for splice() is more complex and is a common source of confusion:
array.splice(startIndex, deleteCount, item1, item2, ...)
startIndex: The index where the change begins.deleteCount: The number of elements to remove fromstartIndex.item1, item2, ...: (Optional) The new elements to add to the array atstartIndex.
This next segment of the video explains how splice() modifies an array in place.
Array Slice vs. Splice in JavaScript: A HUGE DIFFERENCE
Now, watch the second half of the same video to understand the mutating behavior of splice().
Watch from 04:30 to 09:49. The key here is to understand that the second argument is a count of items to delete, not an end index. Also, notice what the method returns: an array of the deleted items.
Let's use a shopping cart example.
let shoppingCart = ['Apples', 'Bread', 'Milk'];

// The user decides to remove 'Bread'
// Start at index 1, remove 1 item
const removedItems = shoppingCart.splice(1, 1);

console.log(removedItems); // Output: ['Bread']
console.log(shoppingCart); // Output: ['Apples', 'Milk'] -> The original array is changed!

// Now, let's add 'Juice' and 'Eggs' where 'Bread' used to be
// Start at index 1, remove 0 items, and add the new ones
shoppingCart.splice(1, 0, 'Juice', 'Eggs');

console.log(shoppingCart); // Output: ['Apples', 'Juice', 'Eggs', 'Milk']
splice() is powerful for direct manipulation, like adding or removing items from a list that the user is actively managing.
3. A Side-by-Side Comparison
The core difference is mutation. One changes the original array, the other doesn't. This visual might help clarify it.
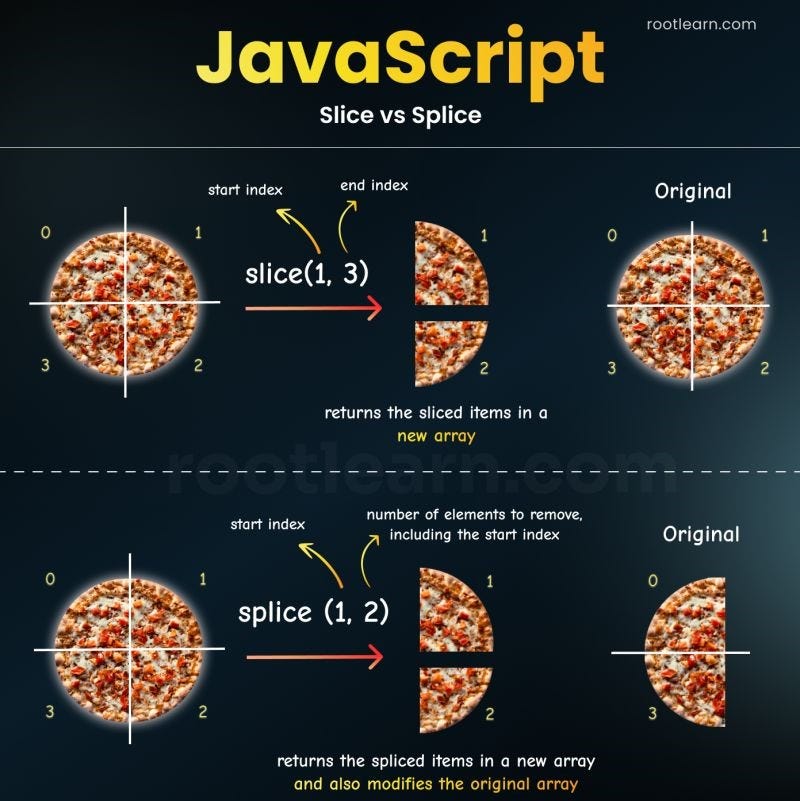
For a detailed breakdown, please study the following article, focusing on the clear explanations and especially the summary table.
A Deep Dive into .slice() and .splice()
This article provides a concise and clear comparison between the two methods. Pay special attention to the summary table.
Read sections 1, 2, and 3, which cover .slice(), .splice(), and then provide a direct comparison. The table in section 3, 'Key Differences', is an excellent summary.
Here is that excellent comparison table from the article for quick reference:
| Feature | .slice() |
.splice() |
|---|---|---|
| Purpose | Extracts a portion of an array | Modifies an array by adding, removing, or replacing elements |
| Mutation | Does not modify the original array | Mutates the original array |
| Return Value | Returns a new array with the selected elements | Returns an array of the removed elements |
| Arguments | (start, end) |
(start, deleteCount, ...items) |
A simple way to remember is that splice has a "p," which you can think of as "put in" or "pluck out" elements, actions that change the original array.
4. Practice Exercise
Let's apply this knowledge. You are managing a user's playlist.
let playlist = ['Song A', 'Song B', 'Song C', 'Song D', 'Song E'];
Your Tasks:
- A user wants to listen to a preview of their playlist, containing only 'Song B' and 'Song C'. Create a new array called
playlistPreviewwith these two songs, without changing the originalplaylist. - The user decides to delete 'Song D' from their playlist. Modify the
playlistarray directly to remove it. - After removing 'Song D', the user wants to add 'Song F' and 'Song G' right after 'Song C'. Modify the
playlistarray to reflect this change.
Try to solve these on your own first.
Click to see the solution
let playlist = ['Song A', 'Song B', 'Song C', 'Song D', 'Song E'];

// Task 1 Solution: Use slice()
// Extracts from index 1 up to (but not including) index 3
const playlistPreview = playlist.slice(1, 3);
console.log('Preview:', playlistPreview); // Expected: ['Song B', 'Song C']
console.log('Original Playlist:', playlist); // Expected: ['Song A', 'Song B', 'Song C', 'Song D', 'Song E']

// Task 2 Solution: Use splice() to remove
// 'Song D' is at index 3. We want to remove 1 item.
const deletedSong = playlist.splice(3, 1);
console.log('Removed:', deletedSong); // Expected: ['Song D']
console.log('Updated Playlist:', playlist); // Expected: ['Song A', 'Song B', 'Song C', 'Song E']

// Task 3 Solution: Use splice() to add
// After 'Song C' (at index 2), we want to add new songs.
// Start at index 3, delete 0 items, and add the new ones.
playlist.splice(3, 0, 'Song F', 'Song G');
console.log('Final Playlist:', playlist); // Expected: ['Song A', 'Song B', 'Song C', 'Song F', 'Song G', 'Song E']
Conclusion
Great job today! You've tackled a common point of confusion for many JavaScript developers and are now equipped to use these methods correctly.
Key Takeaways:
slice()is for reading: It returns a new array and leaves the original untouched. Use it when you need a copy or a subset of data.splice()is for writing: It mutates the original array by adding, removing, or replacing elements. It returns an array of the elements that were removed.- The second argument of
slice()is anendIndex, while the second argument ofsplice()is adeleteCount.
In our next lesson, we'll build on everything we've learned so far. You'll learn how to chain multiple array methods like map(), filter(), slice(), and sort() together to perform complex, multi-step data transformations in a clean and readable way. This is where the true power of functional array methods begins to shine.