Hello! Let's dive into the next topic in our exploration of asynchronous JavaScript.
Introduction
In our last lesson, we saw how to handle sequential asynchronous tasks by chaining Promises with .then(). This pattern is powerful, but the nested callbacks and .then() syntax can sometimes feel a bit unnatural. We ended with a preview of an even cleaner approach.
Today, your goal is to learn how to use async/await syntax to write cleaner, more readable asynchronous code. async/await is a modern feature built on top of Promises that allows you to write asynchronous logic that looks and behaves very much like synchronous, top-to-bottom code. Given your background in Laravel, this procedural style should feel quite intuitive, making it a powerful tool in your JavaScript toolkit.
By the end of this lesson, you'll be able to transform a .then()-based promise chain into its more elegant async/await equivalent.
From Promise Chains to async/await
At its core, async/await is what we call "syntactic sugar" over Promises. It doesn't replace them; it simply gives us a much cleaner syntax for consuming them. This new syntax is based on two keywords:
-
async: When you place theasynckeyword before a function definition, it does two things:- It enables the use of the
awaitkeyword inside that function. - It ensures the function automatically returns a Promise. If you return a value like
return 'Done!', the function will return a promise that is already fulfilled with that value.
- It enables the use of the
-
await: This keyword can only be used inside anasyncfunction. When you placeawaitin front of an expression that returns a Promise (like afetchcall), it pauses the execution of theasyncfunction until that Promise settles (is fulfilled or rejected).- If the Promise is fulfilled,
await"unwraps" it and gives you the resolved value. - If the Promise is rejected,
awaitthrows an error, which we'll learn to handle shortly.
- If the Promise is fulfilled,
Let's watch a video that shows a direct, side-by-side comparison of refactoring a promise chain into an async/await function.
This video by Web Dev Simplified clearly demonstrates how to convert a .then() chain into the async/await syntax. Notice how the code becomes flatter and reads more like a series of synchronous steps.
Watch from 03:06 to 05:23. Pay close attention to how the variable response directly receives the resolved value from the makeRequest promise, eliminating the need for a .then() callback.
As you saw, the logic is identical, but the async/await version is much more direct. Instead of this:
makeRequest('Google')
  .then(response => {
    console.log('Response Received');
    return processRequest(response);
  })
  .then(processedResponse => {
    console.log(processedResponse);
  });
You can now write this:
async function doWork() {
  const response = await makeRequest('Google');
  console.log('Response Received');
  const processedResponse = await processRequest(response);
  console.log(processedResponse);
}

doWork();
Handling Errors with try...catch
So, what happens if a promise is rejected? In a .then() chain, control jumps to the nearest .catch() block. With async/await, a rejected promise throws an exception. This means we can use a very familiar construct for error handling: the try...catch block.
You wrap your "happy path" code (the code you expect to run successfully) in a try block. If any await-ed promise within that block rejects, the execution immediately stops and jumps to the catch block, where you can handle the error.
Let's see how this works.
Let's continue with the same video. The next segment shows how to wrap the async/await code in a try...catch block to gracefully handle promise rejections.
Watch from 05:23 to 06:34. Notice how the try...catch block provides a clean and standard way to separate the success logic from the error-handling logic.
The updated code now looks like this, which is a complete and robust pattern for most use cases:
async function doWork() {
  try {
    const response = await makeRequest('Facebook'); // This will reject
    console.log('Response Received');
    const processedResponse = await processRequest(response);
    console.log(processedResponse);
  } catch (err) {
    console.log(err); // Handles the rejection from makeRequest
  }
}

doWork();
This pattern is often preferred because it keeps the code for both success and failure in one place, rather than chaining a separate .catch() method at the end.
A Practical Example: Fetching API Data
Let's apply this to a very common task: fetching data from an API. The fetch function is a perfect candidate because it returns a promise. A typical fetch operation involves two asynchronous steps:
- Making the network request itself.
- Parsing the response body (e.g., as JSON).
The following article provides excellent side-by-side examples of this exact scenario.
When to Use Async/Await vs Promises in JavaScript - freeCodeCamp
This freeCodeCamp article, 'When to Use Async/Await vs Promises', gives clear examples of fetching data from a public API. It will help you see the readability improvements in a real-world context.
First, read the introduction and the section 'What Is Async/Await?'. Then, focus on 'Example 1: Making API Calls' and compare the 'Using Promises' version with the 'Using Async/Await' version.
Here is a complete, well-structured example inspired by that article. This is a great template for your own projects:
// A reusable function to fetch user data from a public API
async function fetchUserData(userId) {
  try {
    // 1. Await the fetch call
    const response = await fetch(`https://jsonplaceholder.typicode.com/users/${userId}`);

    // Check if the response was successful (status code 200-299)
    if (!response.ok) {
      throw new Error(`Network response was not ok. Status: ${response.status}`);
    }

    // 2. Await the parsing of the JSON body
    const userData = await response.json();

    console.log('User data:', userData);
    return userData;

  } catch (error) {
    // This will catch network errors or the error we threw above
    console.error('Failed to fetch user data:', error);
    // Depending on the app, you might want to re-throw the error or return null
    throw error;
  }
}

// Call the function to see it in action
fetchUserData(1);
Summary of Differences
To wrap up, this table gives a concise overview of how async/await compares to traditional promise chains.
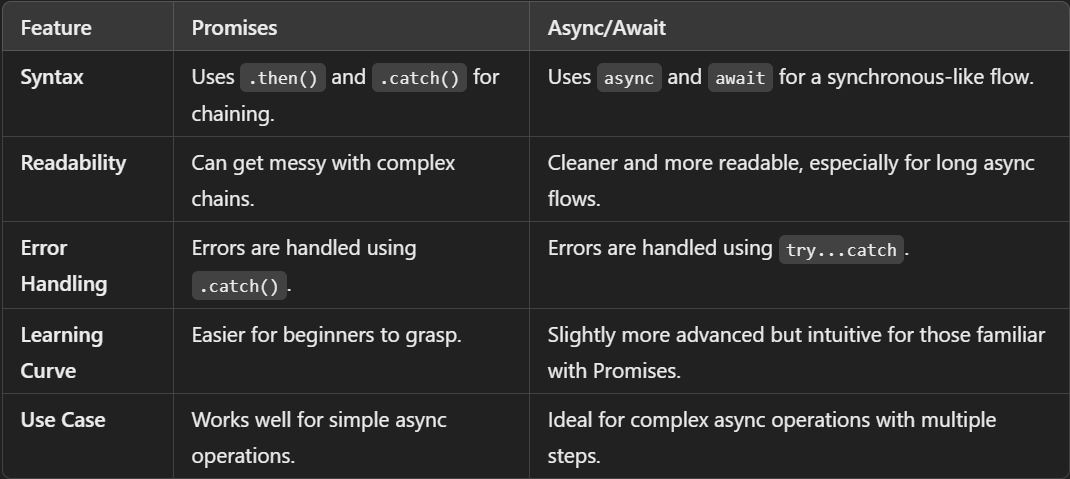
Conclusion
You've now learned the modern, preferred way to handle asynchronous operations in JavaScript. While understanding .then() and .catch() is crucial (since async/await is built upon them), you will likely find yourself writing async/await far more often in new code.
Key Takeaways:
async/awaitprovides a cleaner, more readable syntax for consuming Promises.- The
asynckeyword makes a function return a Promise and allows the use ofawaitinside it. - The
awaitkeyword pauses function execution until a Promise settles, then provides its resolved value. - Error handling in
asyncfunctions is done with standardtry...catchblocks, which catch rejected Promises. - This syntax lets you write asynchronous code that reads like synchronous code, which is often easier to reason about.
Preview of Next Lesson:
You now have a solid foundation in async/await. In the next lesson, we will put this to practical use and focus specifically on the Fetch API. You'll learn how to use async/await to make different kinds of requests to a server (GET and POST), a critical skill for connecting your future React front-end to a Laravel backend.