Hello! Welcome back. In our last lesson, we successfully implemented a stateless JWT authentication filter. Your application can now verify a user's identity based on a token, answering the question: "Who is this user?"
Today, we'll address the next crucial question in security: "What is this user allowed to do?" This is the domain of authorization.
Your learning outcome for this lesson is to implement method-level security using @PreAuthorize. This is a powerful technique for applying fine-grained access control directly to your business logic. For senior-level interviews, demonstrating a deep understanding of both request-level and method-level security, and knowing when to use each, is a key differentiator.
1. Two Layers of Authorization: HttpSecurity vs. @PreAuthorize
In Spring Security, you have two primary ways to configure authorization:
-
Request-Level Security: Configured in your
SecurityFilterChainbean usinghttp.authorizeHttpRequests(...). This is ideal for broad, URL-based rules. You've already used this to make your login endpoint public (.requestMatchers("/api/auth/**").permitAll()) and secure everything else (.anyRequest().authenticated()). This is the first line of defense. -
Method-Level Security: Applied directly to your service or controller methods using annotations like
@PreAuthorize. This is perfect for fine-grained rules that depend on the user's role, specific permissions, or even the data being passed into the method.
A key interview topic is understanding the trade-offs.
Spring Method Security with PreAuthorize
This article from the Okta Developer Blog provides an excellent summary of the differences between these two approaches. Understanding this distinction is crucial for designing a layered security model.
Read the section titled 'Differentiate Between Spring Security’s @PreAuthorize and HttpSecurity'. Focus on the two main differences discussed: when the authorization check happens in the request lifecycle, and the benefit of co-locating security rules with the code they protect.
In short:
HttpSecurityrules are applied globally and early in the filter chain, based on URL patterns.@PreAuthorizerules are applied specifically and just before the method executes, allowing for more complex, context-aware logic.
In a robust system, you use both. HttpSecurity sets the baseline (e.g., all /api/** endpoints require authentication), and @PreAuthorize enforces the specific rules (e.g., only users with the ADMIN role can call the deleteUser() method).
2. Enabling and Understanding Method Security
To start using method-level security, you first need to enable it.
In your main security configuration class (the one with the @Configuration and @EnableWebSecurity annotations), add the @EnableMethodSecurity annotation.
@Configuration
@EnableWebSecurity
@EnableMethodSecurity // Add this annotation
public class SecurityConfig {
    // ... your SecurityFilterChain bean and other configs
}
That's it! This annotation tells Spring to look for security annotations on your beans and wrap them with the necessary security logic.
How does it work internally? This is a frequent deep-dive interview question.
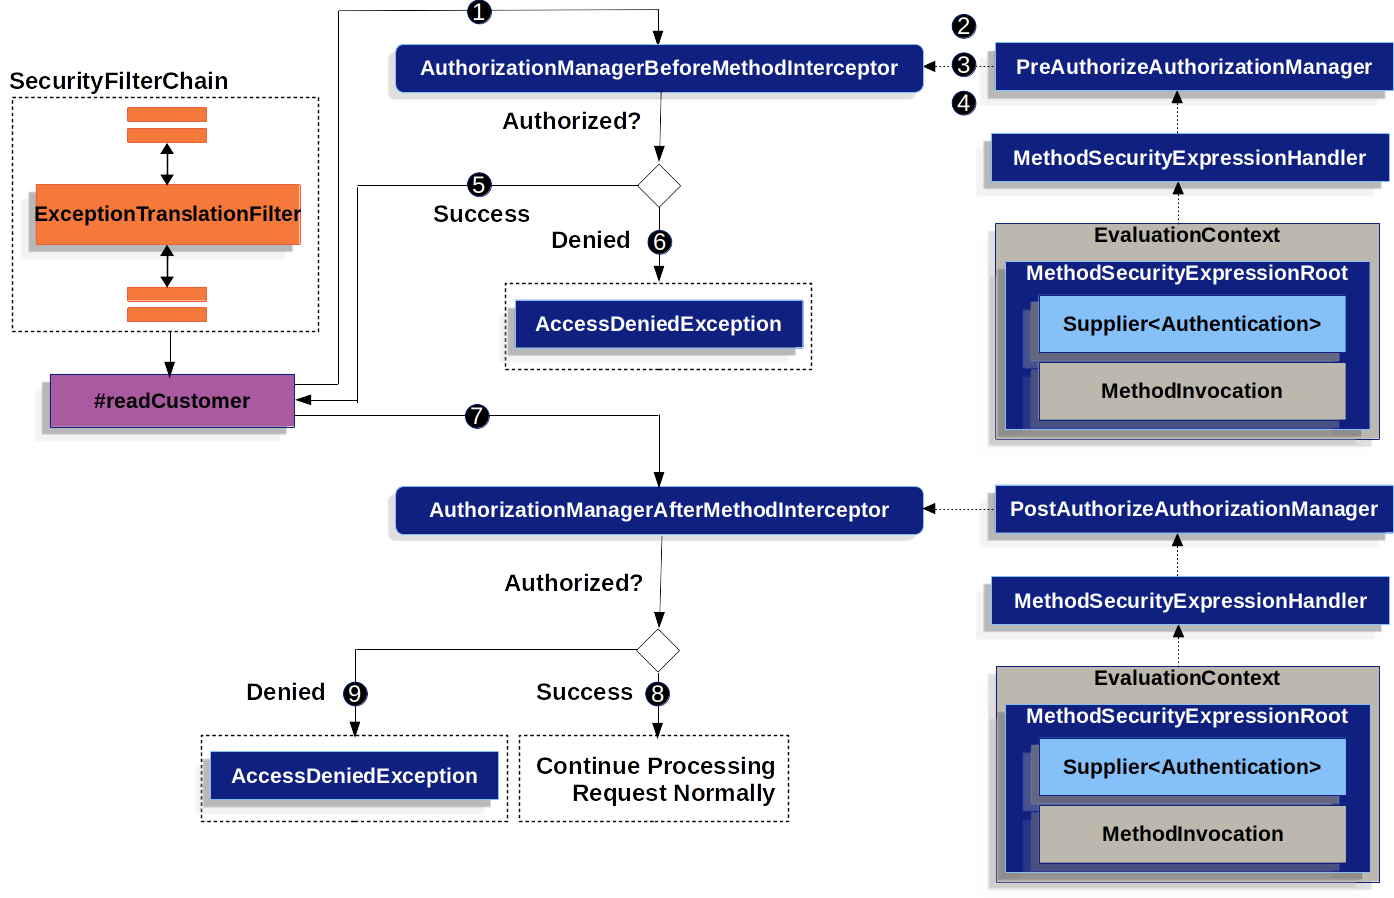
When you call a method annotated with @PreAuthorize, you aren't calling your code directly. Here’s the flow:
- Because of
@EnableMethodSecurity, Spring creates a proxy around your bean (e.g., your controller or service). - Your method call is intercepted by this proxy, which triggers a Spring AOP (Aspect-Oriented Programming) interceptor called
AuthorizationManagerBeforeMethodInterceptor. - This interceptor gets the expression from your annotation (e.g.,
"hasRole('ADMIN')"). - It uses a
MethodSecurityExpressionHandlerto parse and evaluate this Spring Expression Language (SpEL) expression against the currentAuthenticationobject (which your JWT filter from the last lesson placed in theSecurityContextHolder). - If the expression evaluates to
true, the interceptor calls your actual method. - If it evaluates to
false, the interceptor throws anAccessDeniedException, which Spring'sExceptionTranslationFiltercatches and translates into an HTTP403 Forbiddenresponse. Your method is never executed.
This diagram and the accompanying video segment provide an excellent visualization of this flow.
🔐 Spring Security - Method Security Explained | @PreAuthorize, @PostAuthorize
To see this process in action, let's watch a clip from the 'CodeSnippet' channel. It breaks down the internal mechanism with clear diagrams and explanations.
Watch from 03:07 to 07:20. Pay close attention to the roles of the AOP interceptor, the AuthorizationManager, and the MethodSecurityExpressionHandler in making the authorization decision before the target method is ever called.
3. Implementing @PreAuthorize
Now, let's put this into practice. Let's assume your JWT contains a claim for authorities (or roles) like USER_READ, USER_WRITE, etc.
You can now secure your controller methods based on these authorities. The Spring Security documentation provides a list of the built-in expressions you can use.
Before writing code, familiarize yourself with the common SpEL expressions provided by Spring Security. This official documentation is the source of truth.
Review the section 'Expressing Authorization with SpEL', specifically the subsection 'Using Authorization Expression Fields and Methods'. Note the descriptions for hasAuthority, hasRole, hasAnyAuthority, and hasAnyRole.
The two most common expressions are:
hasAuthority('PERMISSION_NAME'): Checks if the user has the specified authority.hasRole('ROLE_NAME'): A shortcut forhasAuthority('ROLE_ROLE_NAME'). It automatically prefixesROLE_to the name you provide.
Let's apply this to a hypothetical UserController.
@RestController
@RequestMapping("/api/v1/users")
public class UserController {

    // Accessible to any authenticated user
    @GetMapping("/me")
    public ResponseEntity<User> getMyProfile() {
        // ... logic to get current user's profile
    }

    // Only accessible to users with 'ADMIN_READ' or 'SUPER_USER' authority
    @GetMapping
    @PreAuthorize("hasAnyAuthority('ADMIN_READ', 'SUPER_USER')")
    public ResponseEntity<List<User>> getAllUsers() {
        // ... logic to list all users
    }

    // Only accessible to users with the 'ADMIN' role
    @DeleteMapping("/{id}")
    @PreAuthorize("hasRole('ADMIN')")
    public ResponseEntity<Void> deleteUser(@PathVariable Long id) {
        // ... logic to delete a user
    }
}
Hands-on Demonstration
The following video demonstrates this entire process, from adding @EnableMethodSecurity to testing the secured endpoints with Postman.
🔐 Spring Security - Method Security Explained | @PreAuthorize, @PostAuthorize
This video provides a practical, step-by-step implementation of what we've just discussed. Following along will solidify your understanding.
Watch from 07:20 to 14:59. The video will walk you through: Adding the @EnableMethodSecurity annotation. Applying @PreAuthorize with hasAuthority to GET, POST, and DELETE endpoints. Testing the endpoints with tokens for a regular user and an admin user to confirm that the security rules are enforced.
Test your understanding!
An interviewer presents you with this requirement: "We need an endpoint to transfer funds between accounts. The caller must have the FUNDS_TRANSFER permission. Additionally, for security logging, the transfer can only be initiated from an IP address that is on a pre-approved corporate whitelist."
How would you use @PreAuthorize to express this complex rule? You don't need to write the full implementation, just the annotation. Assume you have a bean named ipWhitelistService with a method boolean isAllowed(String ipAddress).
Show answer
You can combine multiple conditions using and and call other Spring beans using the @ syntax. The annotation would look something like this:
@PreAuthorize("hasAuthority('FUNDS_TRANSFER') and @ipWhitelistService.isAllowed(request.getRemoteAddr())")
public void transferFunds(...) {
    // ...
}
This demonstrates the power of SpEL to go beyond simple role checks and incorporate dynamic, context-aware business rules directly into your authorization logic.
4. Beyond @PreAuthorize: Post-Invocation Checks with @PostAuthorize
Spring also provides @PostAuthorize, which works similarly but performs the authorization check after the method has been executed. This is useful when the authorization decision depends on the method's return value.
A classic use case is checking for data ownership.
@GetMapping("/{id}")
@PostAuthorize("returnObject.ownerUsername == authentication.name")
public Account getAccountDetails(@PathVariable Long id) {
    // This logic runs first...
    Account account = accountService.findById(id);
    return account;
    // ...then, Spring checks if the owner of the returned 'account' object
    // is the same as the currently authenticated user. If not, AccessDeniedException.
}
This is incredibly powerful for preventing users from accessing data that doesn't belong to them, even if they have the general permission to read accounts. The CodeSnippet video you watched also has a great section on this (14:59 - 19:20) if you'd like to see a live example.
Conclusion
You have now learned how to implement a second, more granular layer of security in your application. By combining request-level and method-level authorization, you can build a robust, secure, and maintainable system.
Key Takeaways for Your Interview Prep:
- Layered Security: Use
HttpSecurityfor broad, URL-based rules and@PreAuthorizefor fine-grained, business-logic-specific rules. - Enablement: Method security is activated with
@EnableMethodSecurity. - Mechanism: It works via Spring AOP proxies that intercept method calls and evaluate SpEL expressions before execution.
hasRolevs.hasAuthority:hasRole('ADMIN')is a shortcut forhasAuthority('ROLE_ADMIN'). Be clear about this distinction.@PreAuthorizevs.@PostAuthorize: Use@PreAuthorizefor checks based on input parameters and user permissions. Use@PostAuthorizefor checks based on the method's return value (e.g., ownership).- SpEL is Powerful: Mention that you can reference method arguments, the
authenticationobject, and even other Spring beans within your expressions to create highly dynamic authorization rules.
Preview of the Next Lesson:
So far, we've handled authentication and authorization within our own application's ecosystem. But what if you need to let users log in with Google, GitHub, or another company's identity system? In the next lesson, we will explore the core concepts of OAuth2 and OpenID Connect (OIDC), the industry-standard protocols for delegated authorization and federated identity.