Hello! Welcome to the next lesson in our "Spring Security & REST API Design" module.
In our previous session, we successfully configured authentication against a database by implementing a custom UserDetailsService. This approach, which relies on Spring's session management, is powerful but inherently stateful. The server creates and maintains a session for each logged-in user, which can introduce challenges in distributed environments like microservices where you need to scale horizontally.
Today, we shift our focus to a modern, stateless approach. Your learning outcome is to explain the structure of a JSON Web Token (JWT) and its role in stateless authentication. Understanding JWTs is crucial for building secure, scalable REST APIs and is a very common topic in senior-level technical interviews. We'll explore the "what" and "why" of JWTs, paving the way for our next lesson where we'll implement them in Spring Boot.
1. From Stateful Sessions to Stateless Tokens
Before we dive into JWTs, let's clarify the problem they solve by comparing them to the session-based authentication we've used so far.
| Aspect | Session-Based (Stateful) | Token-Based (Stateless) |
|---|---|---|
| State Storage | The server stores session information (e.g., in memory or a database). A session ID is sent to the client as a cookie. | No user session data is stored on the server. All necessary information is in a token held by the client. |
| Scalability | Harder to scale. In a multi-server setup, you need "sticky sessions" (routing a user to the same server) or a distributed session cache, adding complexity. | Easier to scale. Any server can handle a request as long as it can validate the token. This is ideal for microservices and load balancing. |
| Server Load | Each request may require a lookup to the session store to validate the user, increasing I/O. | The token is self-contained. The server can validate it cryptographically without a database/cache lookup, reducing I/O. |
| Coupling | The client and server are coupled through the server-side session. | Decoupled. As long as the token is valid, the client can access any authorized resource. This works well for SPAs, mobile apps, and server-to-server communication. |
JSON Web Token (JWT) has emerged as the industry standard for implementing stateless, token-based authentication. It's a compact, URL-safe means of representing claims to be transferred between two parties.
What is JWT? Understand JSON Web Tokens
To start, let's get a clear, high-level overview of what a JWT is and why it's so beneficial in modern application architectures. This article from SuperTokens provides a great introduction.
Read the introductory section up to 'What is a JWT?' and the section titled '✅ Advantages'. Focus on how JWTs solve the scaling challenges of traditional session-based authentication in distributed systems.
2. The Anatomy of a JWT
A JWT isn't just a random string; it has a specific, three-part structure, with each part separated by a dot (.).
xxxxx.yyyyy.zzzzz
This corresponds to: Header.Payload.Signature
Let's break down each component. This video gives a great visual and conceptual walkthrough of the structure.
Top 3 JWT Interview Questions and Answers| JWT Token structure explained | Code Decode |
The 'Code Decode' channel provides a clear, interview-focused explanation of the three parts of a JWT. Watch this segment to understand what each part contains and its purpose.
Watch the video from timestamp 02:59 to 06:07. Pay close attention to the contents of the Header, the concept of 'claims' in the Payload, and how the Signature is generated.
Here's a summary of the three parts, which you can see visualized in the diagram below:
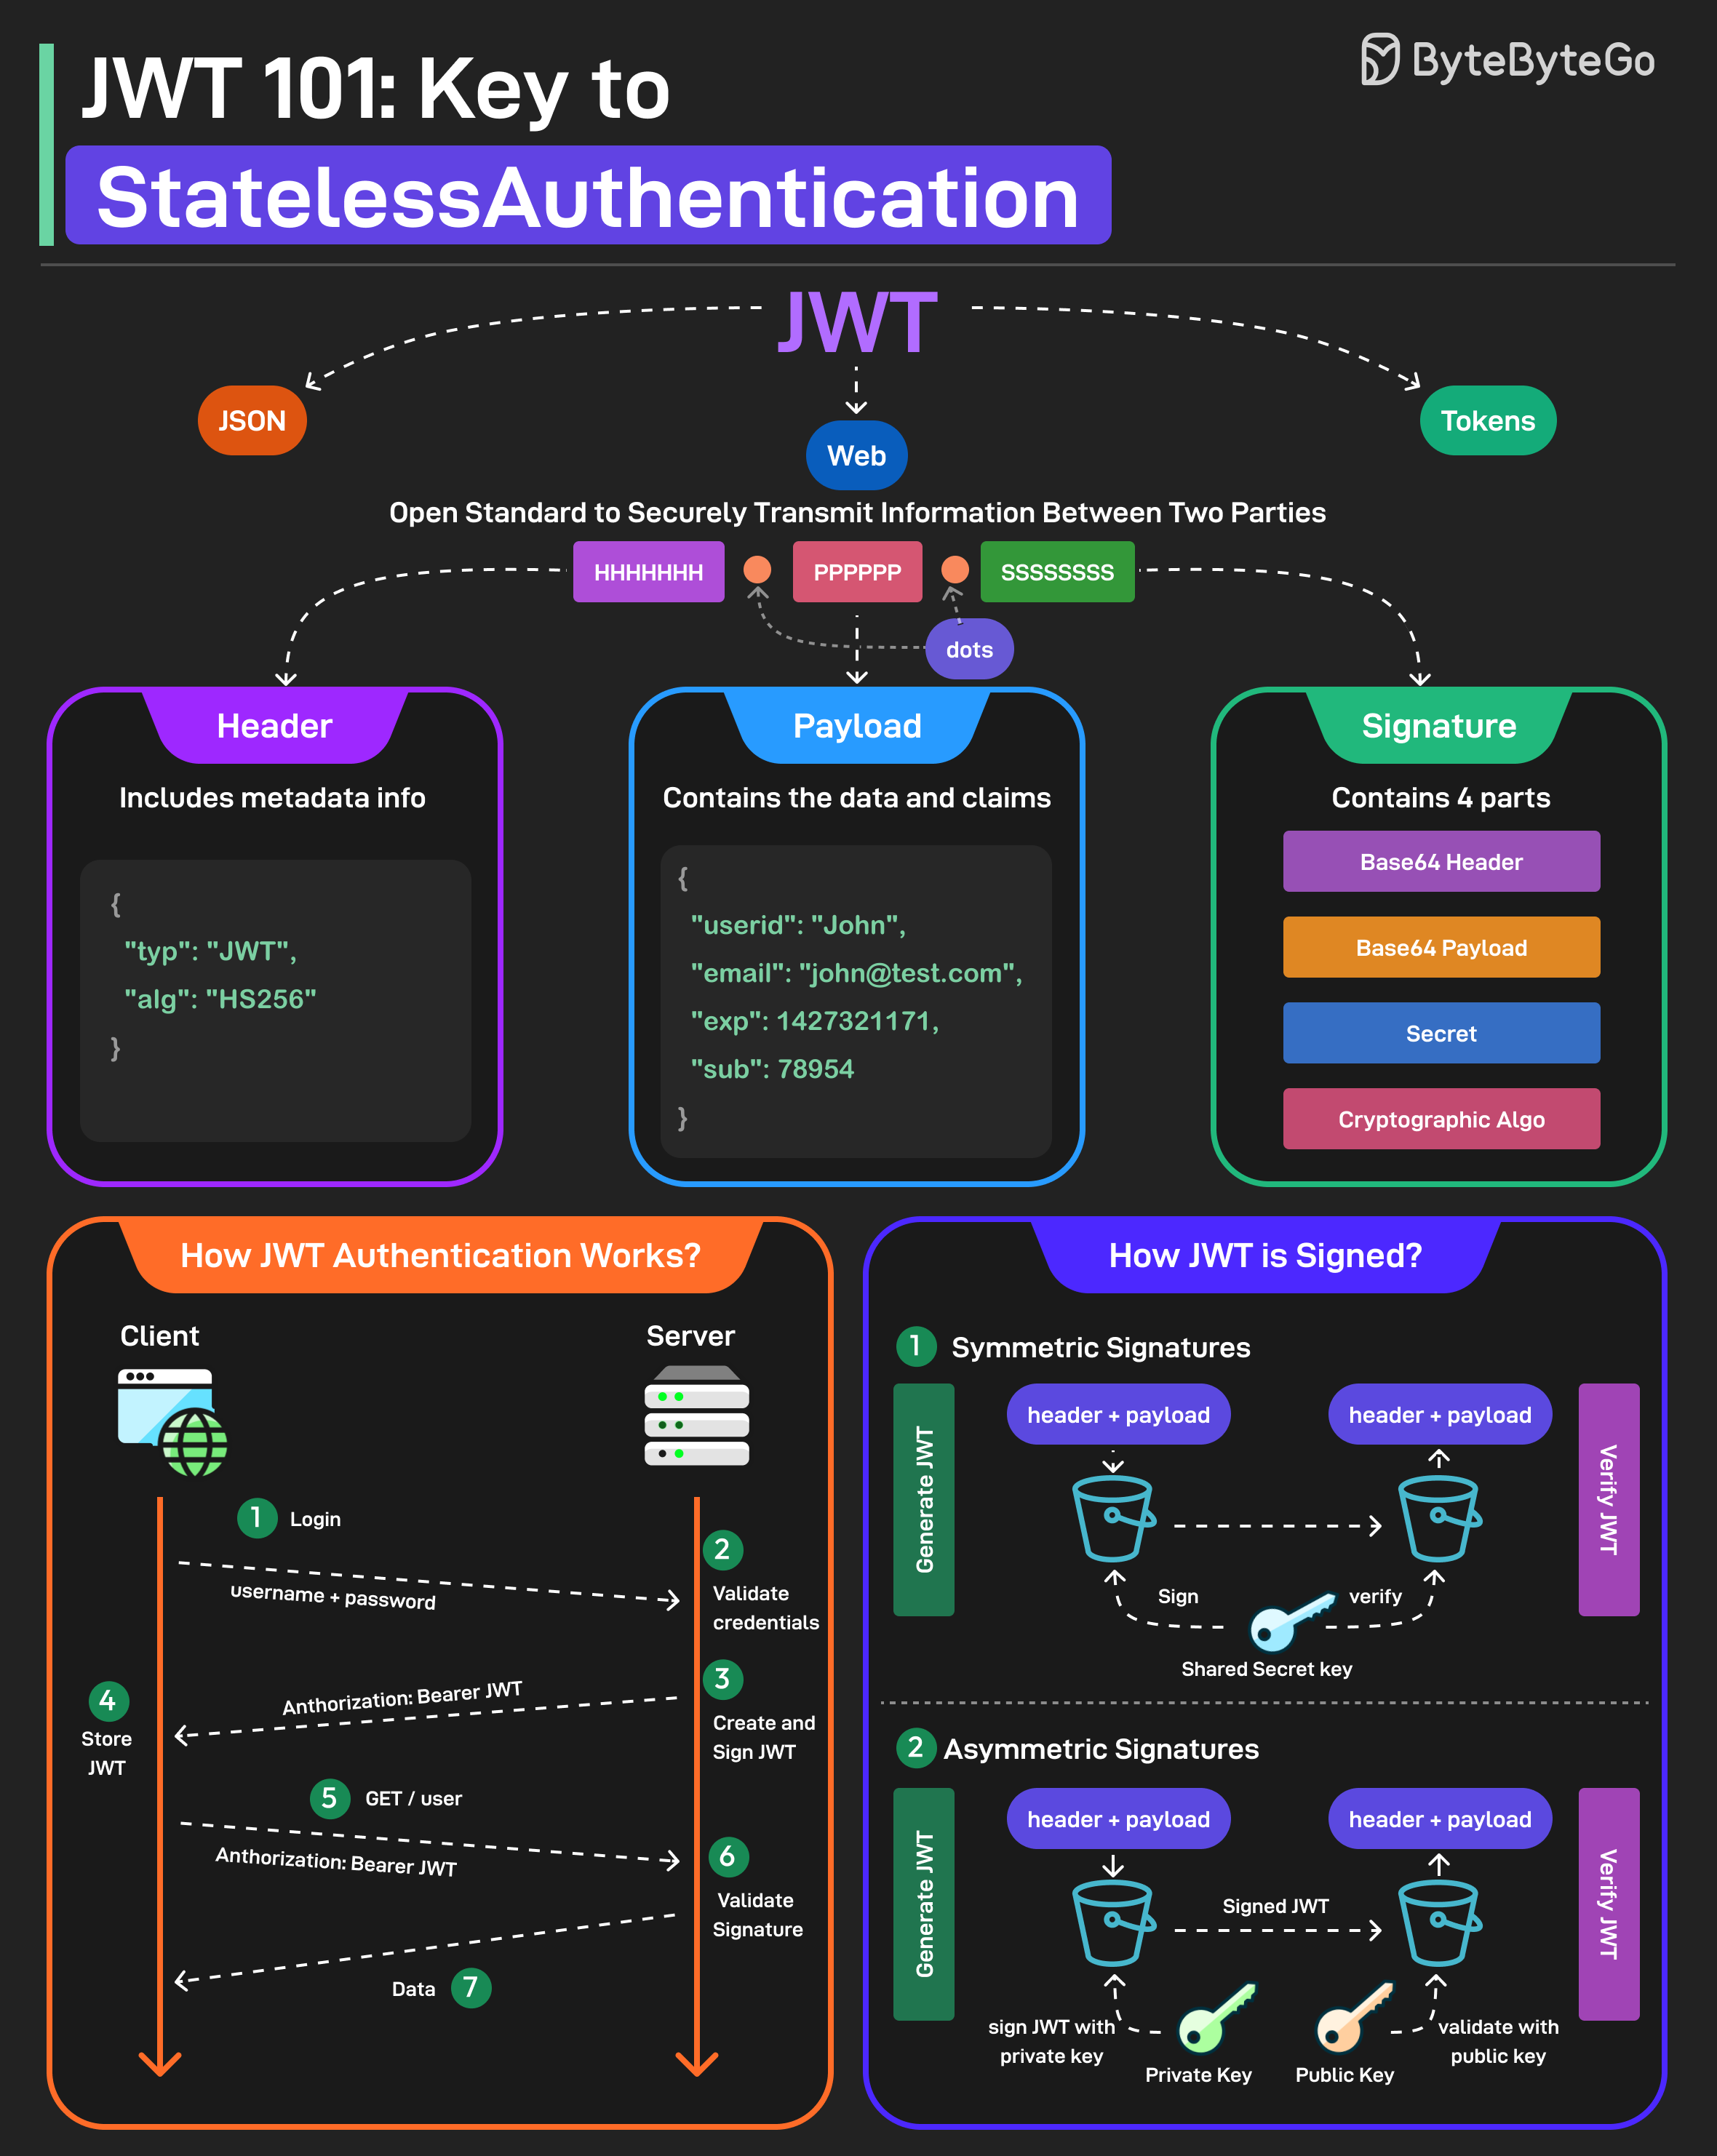
Part 1: The Header
The header is a JSON object that provides metadata about the token itself. It typically consists of two parts:
typ(Type): The type of the token, which isJWT.alg(Algorithm): The signing algorithm being used to generate the signature, such asHS256(HMAC using SHA-256) orRS256(RSA).
Example Header:
{
  "alg": "HS256",
  "typ": "JWT"
}
This JSON is then Base64Url encoded to form the first part of the JWT.
Part 2: The Payload
The payload is a JSON object that contains the claims. Claims are statements about an entity (typically the user) and additional data. The server uses these claims to know who the user is and what they are allowed to do.
There are three types of claims:
- Registered Claims: These are a set of predefined claims recommended by the JWT standard (RFC 7519) to ensure interoperability. Common examples include:
sub(Subject): The user ID.iss(Issuer): Who issued the token.exp(Expiration Time): The timestamp when the token expires.iat(Issued At): The timestamp when the token was issued.aud(Audience): The intended recipient of the token (e.g., your API).
- Public Claims: These are custom claims defined by you, but they should be defined in the IANA JSON Web Token Registry or be a URI to avoid collisions.
- Private Claims: These are custom claims created to share information between parties that agree on using them and are not registered or public. This is where you would typically put application-specific data like user roles (e.g.,
"roles": ["ADMIN", "USER"]).
Example Payload:
{
  "sub": "1234567890",
  "name": "John Doe",
  "roles": ["USER"],
  "iat": 1516239022,
  "exp": 1516242622
}
Like the header, the payload is Base64Url encoded to form the second part of the JWT.
A Crucial Security Note: Base64Url encoding is not encryption. It's a reversible encoding scheme. Anyone who intercepts a JWT can easily decode the header and payload and read their contents. You must never store sensitive information like passwords or personal identifiable information (PII) in the JWT payload.
Part 3: The Signature
The signature is what makes a JWT secure. It's used to verify that the sender of the JWT is who it says it is and to ensure that the message wasn't changed along the way.
The signature is created by taking the encoded header, the encoded payload, a secret, and signing them with the algorithm specified in the header. For example, using the HS256 algorithm, the signature is created like this:
HMACSHA256(base64UrlEncode(header) + "." + base64UrlEncode(payload), secret)
The secret is a key known only to the server. If an attacker modifies the payload (e.g., changing "roles": ["USER"] to "roles": ["ADMIN"]), the signature will no longer be valid when the server re-calculates it.
Test your understanding!
An interviewer asks: "I've intercepted a JWT sent from your server to a client. Can I read the user's ID from the payload without having the secret key? If so, why is the signature important?"
Show answer
Yes, you can read the user's ID. The payload is only Base64Url encoded, which is easily reversible. It is not encrypted.
The signature is crucial for integrity and authenticity. It allows the server to verify that the payload (including the user ID and roles) has not been tampered with since it was issued by a trusted source. Without a valid signature, the server will reject the token, preventing an attacker from elevating their privileges or impersonating another user.
3. The Stateless Authentication Flow in Action
Now, let's connect these pieces to see how stateless authentication works with JWTs:
- Login: The user sends their credentials (e.g., username and password) to an authentication endpoint on your server.
- Verification & Token Issuance: The server validates the credentials against the database. If they are correct, the server generates a JWT containing claims (like user ID and roles), signs it with its secret key, and sends the JWT back to the client.
- Client Storage: The client stores the JWT. A common and secure practice is to store it in an
HttpOnlycookie to prevent access from JavaScript (mitigating XSS attacks). - Authenticated Requests: For every subsequent request to a protected API endpoint, the client includes the JWT in the
Authorizationheader, using theBearerschema:Authorization: Bearer <token>. - Server-side Verification: When the server receives the request, it performs the following steps to validate the token locally, without any database lookups:
- Extracts the token from the
Authorizationheader. - Verifies the signature: It uses the header, payload, and its own secret key to re-calculate the signature. If it matches the signature on the token, the token is authentic.
- Verifies the claims: It checks the
expclaim to ensure the token hasn't expired, and may check other claims likeissoraud.
- Extracts the token from the
If both verification steps pass, the server trusts the claims within the token and processes the request. This entire verification happens in-memory, making it extremely fast and scalable.
The ByteByteGo channel offers an excellent, concise explanation of the different signing algorithms and the pros and cons of JWTs, which are key considerations in a system design context.
Watch the segment from 02:09 to 03:03 to understand the difference between symmetric (shared secret) and asymmetric (public/private key) signing. Then, watch from 03:32 to 04:50 to review the limitations and best practices of using JWTs.
Conclusion
In this lesson, we've deconstructed the JSON Web Token and established its vital role in modern stateless authentication. This knowledge is not only foundational for the next practical lesson but also a key talking point in interviews for demonstrating your understanding of secure and scalable system architecture.
Key Takeaways:
- Stateless vs. Stateful: JWTs enable stateless authentication, which is highly scalable and well-suited for microservices, unlike stateful session-based authentication.
- JWT Structure: A JWT consists of three parts: a Header (metadata), a Payload (claims), and a Signature (for integrity and authenticity).
- Encoding vs. Encryption: The Header and Payload are Base64Url encoded (readable by anyone), not encrypted. Sensitive data should never be stored in them.
- The Power of the Signature: The cryptographic signature guarantees that the token has not been tampered with and was issued by a trusted party.
- Local Verification: The server verifies the token's signature and claims locally, eliminating the need for database or session store lookups on each request.
Preview of the Next Lesson:
Now that we have a solid theoretical understanding of what a JWT is and how it works, it's time to put it into practice. In our next lesson, we will implement a stateless JWT authentication filter in a Spring Boot application. We will create a filter that intercepts incoming requests, validates the JWT, and sets up the Spring Security context, bringing our stateless API to life.