Hello! Welcome to your next lesson in the "Spring Data & Transaction Management" module.
In our previous lesson, we explored the JPA entity lifecycle and the crucial role of the persistence context. We saw that the persistence context is a "staging area" for our entities and that its lifetime is typically tied to a database transaction. We also saw how JPA's "dirty checking" automatically updates the database for us, but only for entities in a managed state within an active transaction.
Today, we'll build directly on that foundation. Our goal is to implement declarative transaction management using @Transactional and explain key propagation levels (e.g., REQUIRED, REQUIRES_NEW). This is a core competency for any Spring developer and a frequent topic in senior-level interviews. You'll learn how Spring abstracts away the complexities of transaction management, allowing you to focus on business logic while ensuring data integrity.
1. From Programmatic to Declarative Transactions
Before Spring, managing database transactions in Java required explicit, often repetitive, code. You would manually get a connection, disable auto-commit, wrap your database operations in a try/catch block, and then explicitly call commit() or rollback().
Connection connection = null;
try {
    connection = dataSource.getConnection();
    connection.setAutoCommit(false); // Start transaction

    // ... execute your SQL statements ...

    connection.commit(); // Commit transaction
} catch (SQLException e) {
    if (connection != null) {
        try {
            connection.rollback(); // Rollback on error
        } catch (SQLException ex) {
            // log rollback failure
        }
    }
    // handle exception
} finally {
    if (connection != null) {
        try {
            connection.close();
        } catch (SQLException e) {
            // log close failure
        }
    }
}
This is called programmatic transaction management. As you can imagine, this boilerplate code clutters your business logic and is prone to error.
Spring introduced declarative transaction management, where you simply declare that a method should run inside a transaction, and Spring handles the rest. The primary tool for this is the @Transactional annotation.
Spring Transaction Management: @Transactional In-Depth
To understand the fundamentals of this approach, please read the introductory sections of the article 'Spring Transaction Management: @Transactional In-Depth' by Marco Behler.
Read the sections 'How to use Spring’s @Transactional annotation' and the following code block showing what it translates to. Focus on how the annotation simplifies the code and how Spring Boot automatically enables this functionality for you.
2. How @Transactional Works: A Look Under the Hood
This declarative approach feels like magic, but for an interview, you need to explain the mechanism behind it. The magic is accomplished through Aspect-Oriented Programming (AOP) and dynamic proxies.
When Spring detects a bean with a @Transactional annotation on a public method, it doesn't just create an instance of your class. Instead, it creates a proxy object that wraps your bean. When another component calls your method, it's actually calling the proxy.
The proxy's job is to:
- Intercept the method call.
- Begin a transaction (by interacting with a
PlatformTransactionManager). - Invoke the actual method on your bean.
- If the method completes successfully, the proxy commits the transaction.
- If the method throws a runtime exception, the proxy rolls back the transaction.
Spring Transaction Management: @Transactional In-Depth
The same article from Marco Behler provides one of the clearest explanations of this proxy-based mechanism. It's essential reading for a deep understanding.
Read the sections 'CGlib & JDK Proxies - @Transactional under the covers' and 'For what do you need a Transaction Manager'. Pay close attention to the diagram illustrating the proxy. This explains why calls to @Transactional methods from within the same class can behave unexpectedly—a classic interview question we'll cover later.
This video also provides a great conceptual walkthrough of the proxy's logic.
Transaction Management in hibernate in spring boot Interview questions | with Example | Code Decode
Let's watch a segment from the 'Code Decode' channel that visually explains what the proxy does.
Watch the clip from 12:20 to 13:45. The presenter illustrates how Spring conceptually wraps your method call in a try-catch block to handle commit and rollback. This is exactly what the proxy does.
3. Understanding Transaction Propagation
Now we get to the core of this lesson. What happens when a @Transactional method calls another @Transactional method? Does it join the existing transaction, or start a new one? This behavior is controlled by the propagation level.
First, it's vital to distinguish between a physical and a logical transaction.
- Physical Transaction: The actual transaction with the database, controlled by the JDBC connection (
connection.commit(),connection.rollback()). - Logical Transaction: Spring's concept of a transactional scope, defined by the boundaries of a
@Transactionalmethod.
One physical transaction can span multiple logical transactions. The propagation level determines how these logical transaction scopes relate to each other and to the underlying physical transaction.
Propagation.REQUIRED (The Default)
This is the most common propagation level. Its rule is simple:
Support a current transaction; create a new one if none exists.
If methodA() calls methodB(), and both are marked @Transactional(propagation = Propagation.REQUIRED):
- If
methodA()was called and started a new physical transaction,methodB()will join that same physical transaction. - If
methodA()did not have a transaction, a new physical transaction would have been created for it, andmethodB()would join it.
The entire operation commits or rolls back as a single unit. If methodB() fails, the entire transaction started by methodA() is marked for rollback.
Transaction Management in hibernate in spring boot Interview questions | with Example | Code Decode
The 'Code Decode' video demonstrates this with a service that saves an employee and then calls another service to save an address.
Watch from 17:46 to 18:54. Notice how the inner method call uses the existing transaction from the outer method. The database is only updated when the entire outer method completes.
Propagation.REQUIRES_NEW
This propagation level is used for operations that need to be independent. Its rule is:
Create a new transaction, and suspend the current transaction if one exists.
If methodA() calls methodB(), and methodB() is marked @Transactional(propagation = Propagation.REQUIRES_NEW):
- The transaction of
methodA()is paused (suspended). - A completely new physical transaction is started for
methodB(). methodB()executes. Its transaction either commits or rolls back, completely independently ofmethodA().- The transaction of
methodA()is resumed.
Interview Insight: A common use case for REQUIRES_NEW is for non-critical, secondary operations like auditing or logging. You want to log an action to the database even if the main business transaction fails. If the logging fails, you don't want it to cause the main business transaction to roll back.
Transaction Management in hibernate in spring boot Interview questions | with Example | Code Decode
Let's see a demonstration of REQUIRES_NEW. The same video walks through this scenario.
Watch from 18:54 to 22:54. The example is a bit complex due to foreign key constraints, but focus on the key takeaway: the inner method (addAddress) gets its own transaction and commits its data to the database before the outer method (addEmployee) is finished.
Visualizing Propagation Levels
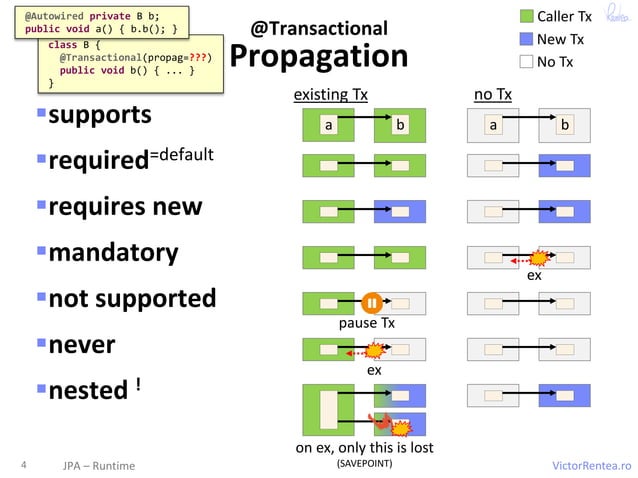
This can be tricky to visualize, so here is an excellent diagram that summarizes the behavior of different propagation levels. Focus on REQUIRED and REQUIRES_NEW.
Other Propagation Levels
While REQUIRED and REQUIRES_NEW are the most common, you should be aware that others exist:
SUPPORTS: Executes within a transaction if one is present, otherwise executes non-transactionally.MANDATORY: Throws an exception if there is no active transaction.NOT_SUPPORTED: Executes non-transactionally, suspending any current transaction.NEVER: Throws an exception if a transaction is active.NESTED: Starts a "nested" transaction using JDBC savepoints if a transaction is active, otherwise behaves likeREQUIRED. This allows for partial rollbacks within a larger transaction.
Test your understanding!
An interviewer asks: "I have a method placeOrder() that saves an order and then calls another method, sendNotification(), to send an email notification. I want the order to be saved successfully even if sending the notification fails. However, if saving the order fails, I don't want to attempt to send a notification. Which propagation levels would you apply to placeOrder() and sendNotification()?"
Show answer
placeOrder(): This should use the defaultPropagation.REQUIRED. It's the primary business operation and needs to be transactional.sendNotification(): This is a perfect candidate forPropagation.REQUIRES_NEW. By giving it a new, independent transaction, its success or failure does not affect the outcome of theplaceOrdertransaction. IfsendNotificationfails and its transaction rolls back, theplaceOrdertransaction can still commit successfully. IfplaceOrderfails first,sendNotificationis never called, satisfying the second requirement.
4. Interview Focus: The Self-Invocation Pitfall
One of the most common interview traps related to @Transactional is the self-invocation problem.
Consider this code:
@Service
public class MyService {

    public void methodA() {
        // ... some logic ...
        this.methodB(); // Calling another method in the SAME class
    }

    @Transactional(propagation = Propagation.REQUIRES_NEW)
    public void methodB() {
        // ... database logic ...
    }
}
You might expect methodB to run in a new transaction. It will not.
Why? Remember the proxy? The transactional behavior is added by the proxy that wraps MyService. When an external class calls myService.methodA(), it goes through the proxy. However, when methodA() calls this.methodB(), it's making a direct internal call to the original object, completely bypassing the proxy. Since the proxy is bypassed, there is no code to intercept the call and apply the REQUIRES_NEW propagation behavior.
Spring Transaction Management: @Transactional In-Depth
Marco Behler's article has an excellent section dedicated to this exact pitfall.
Read the section 'The most common @Transactional pitfall'. The diagram there makes the reason for this behavior crystal clear.
This is a hallmark of a deep understanding of Spring's inner workings and a great point to bring up in an interview to demonstrate your expertise.
Conclusion
Today you've learned how Spring's declarative transaction management simplifies data integrity and how to control its behavior with propagation levels. This is a fundamental skill that separates robust, predictable applications from brittle ones.
Key Takeaways:
- Declarative vs. Programmatic:
@Transactionalallows you to declare transactional boundaries, which is far cleaner and safer than managing them programmatically. - Proxies are the Key: Spring uses AOP and dynamic proxies to wrap your beans and inject transactional logic (begin, commit, rollback) around your method calls.
- Propagation Controls Behavior: The propagation level dictates what happens when one transactional method calls another.
REQUIRED(default): Joins the current transaction or starts a new one. All work is part of one atomic unit.REQUIRES_NEW: Always starts a new, independent transaction. Useful for isolating operations like auditing or logging.
- Beware of Self-Invocation: Calling a
@Transactionalmethod from within the same class (this.someMethod()) bypasses the proxy, meaning the transactional annotation on the called method will have no effect.
Preview of the Next Lesson:
We've now mastered how to define the scope (@Transactional) and propagation of our transactions. But what happens when multiple transactions try to access the same data at the same time? In our next lesson, we will dive into transaction isolation levels and their critical role in preventing concurrency issues like dirty reads, non-repeatable reads, and phantom reads.