Hello!
In our last few lessons, we've successfully built a robust authentication and authorization system. We can issue JSON Web Tokens (JWTs) to identify users and use Django's built-in RBAC framework to control what they are allowed to do. However, like any powerful tool, JWTs have security considerations that are critical to understand.
This lesson confronts the inherent risks of using JWTs, moving from implementation to security hardening. We'll explore how attackers try to break this mechanism and what we, as developers, must do to prevent it. This directly addresses the learning outcome: Discuss common JWT security pitfalls, including secret key management and strategies for token revocation.
We'll dissect two major areas of concern:
- Signature & Key Management Vulnerabilities: How attackers forge tokens by exploiting weaknesses in how signatures are verified and how secret keys are managed.
- Token Revocation: The fundamental challenge of invalidating a token before it expires, a crucial feature for any real-world application.
By the end of this lesson, you'll have a much deeper, security-conscious understanding of the JWTs you're issuing.
The Foundation of JWT Security: The Signature
Let's quickly revisit the structure of a JWT. It's a "bearer token," meaning whoever possesses it (bears it) can use it. Its security hinges entirely on the cryptographic signature.
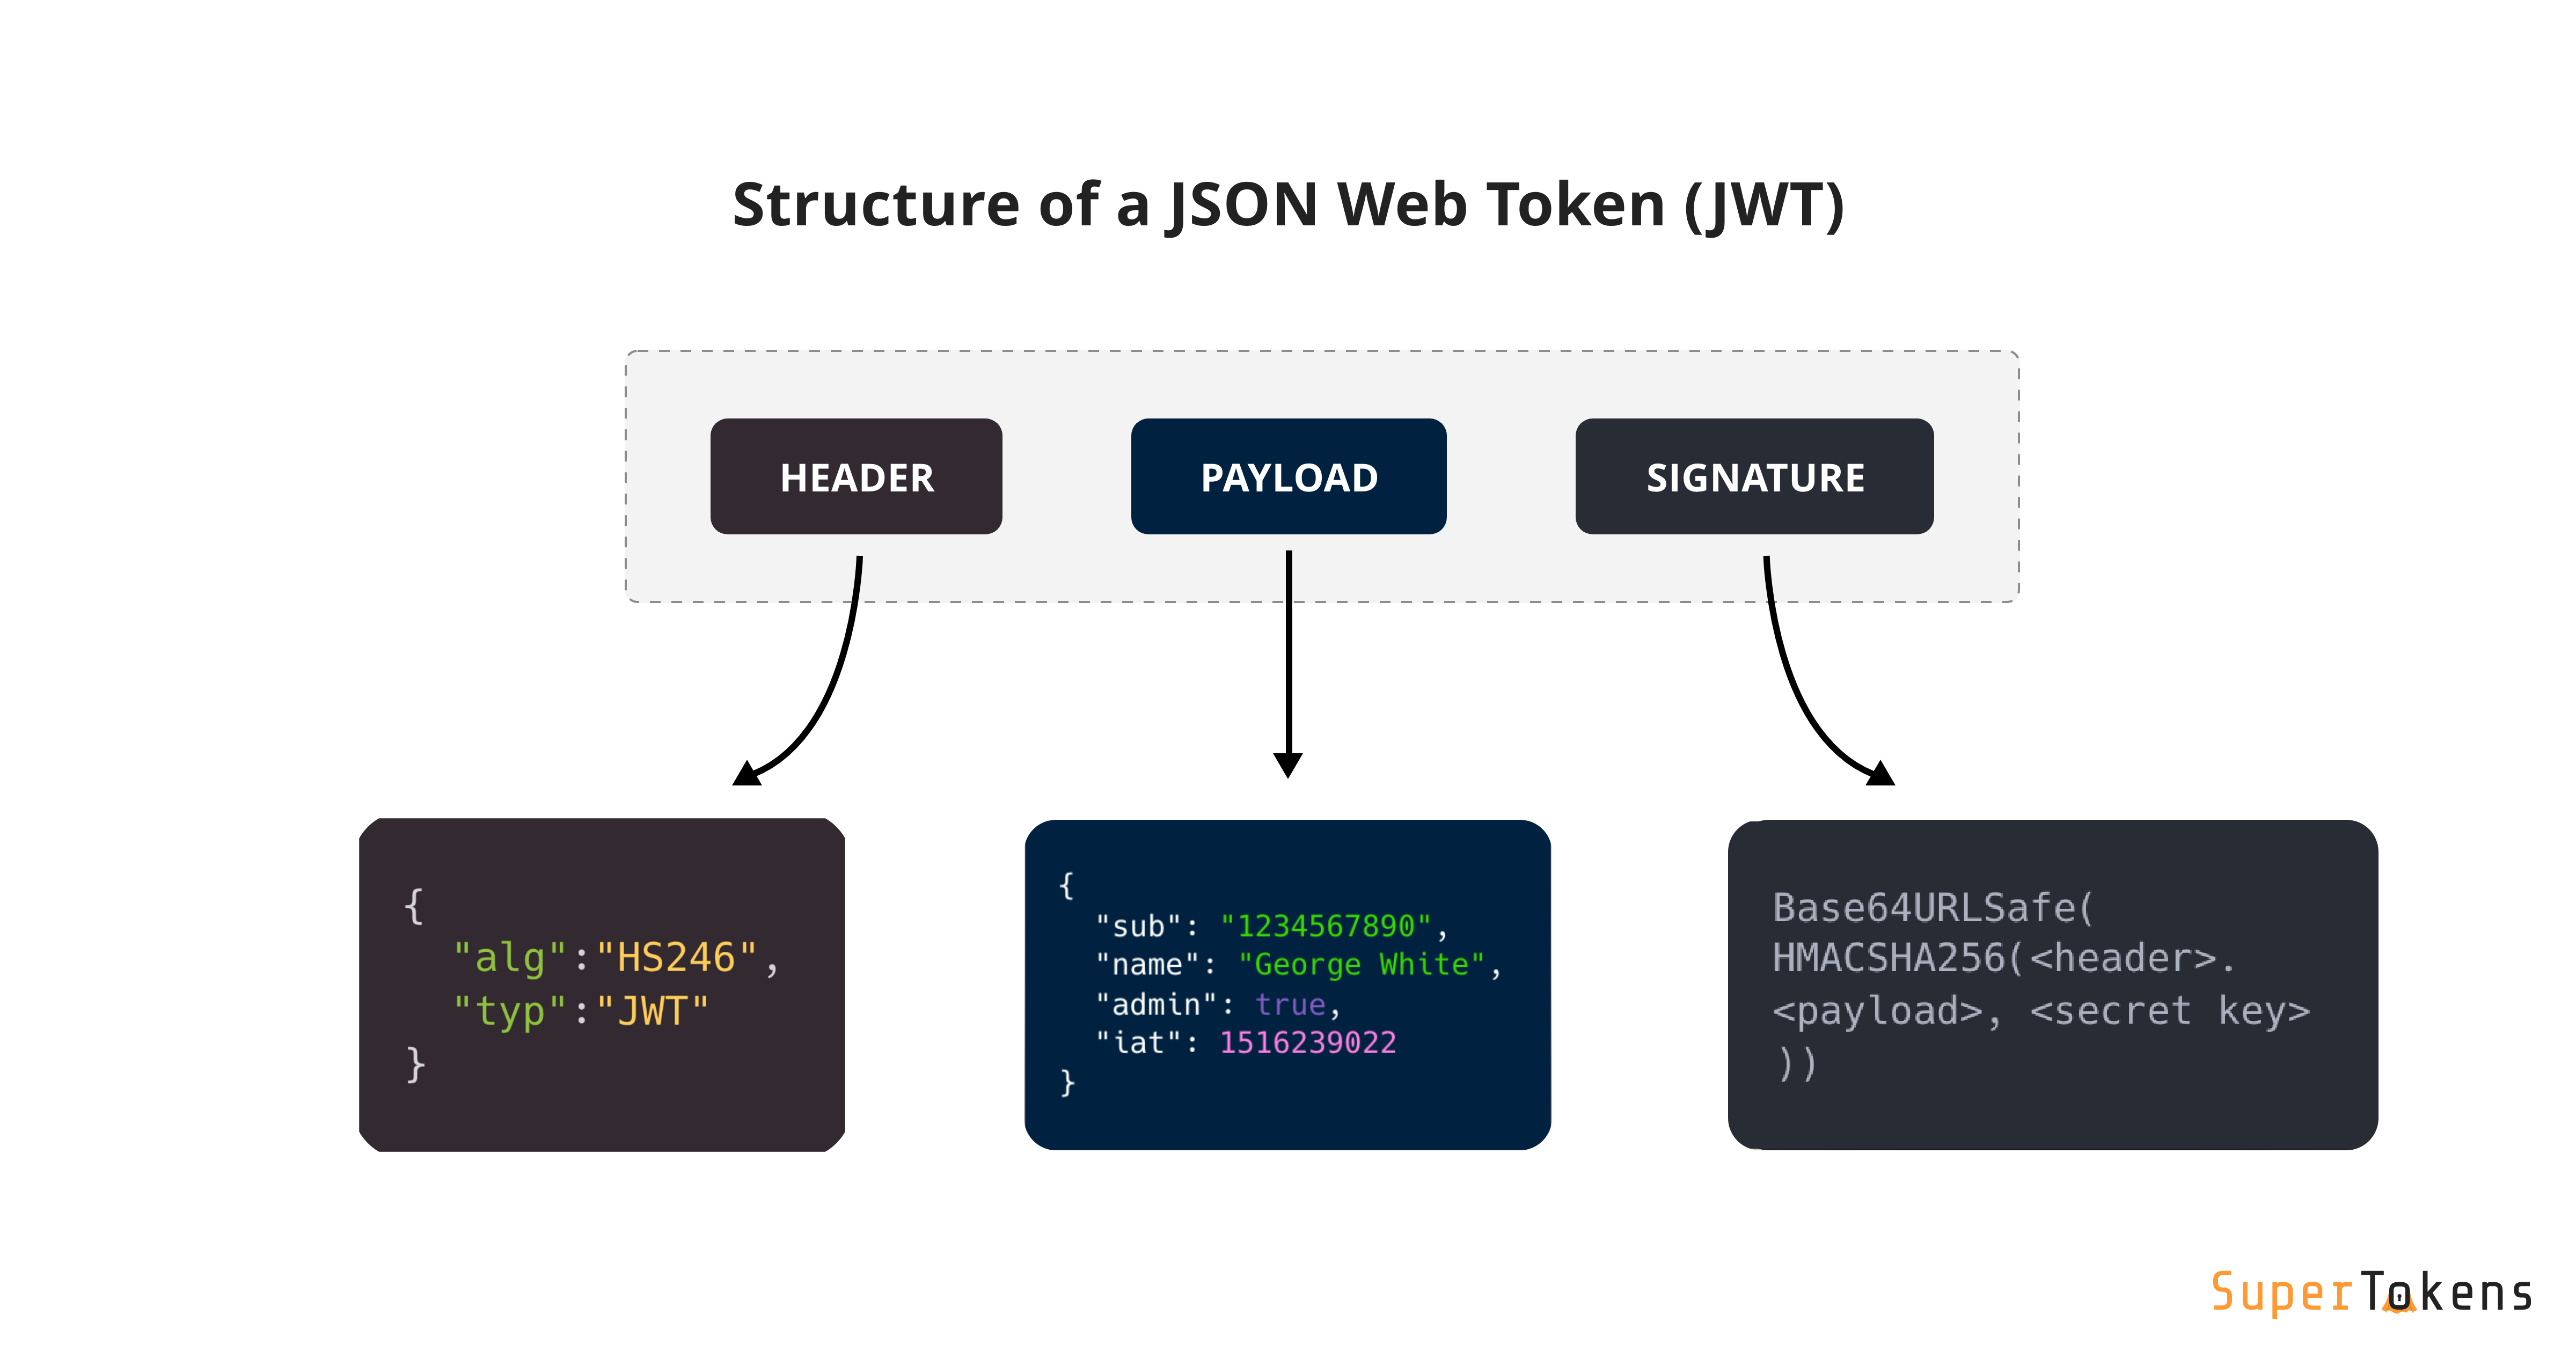
Any attack against a JWT-based system fundamentally boils down to one of two things:
- Stealing a valid token.
- Forging a new token with a valid signature.
While we can mitigate theft with HTTPS and other measures, many vulnerabilities arise from flaws that allow an attacker to forge a token.
Part 1: Common Pitfalls in Key Management and Signature Verification
Let's dive into the common mistakes and attack vectors. The following article from PortSwigger's Web Security Academy provides an excellent, detailed overview of these vulnerabilities. We'll refer to it as we break down each pitfall.
JWT attacks | Web Security Academy
This article, 'JWT attacks' from PortSwigger, is a comprehensive guide to common JWT vulnerabilities. It covers everything from flawed signature verification to attacks that exploit weak secret keys and misconfigured header parameters.
For now, just have this article open as a reference. I will guide you to specific sections as we discuss each vulnerability. We will focus on the sections covering flawed signature verification, brute-forcing secret keys, and header parameter injections.
The video below, by security expert Philippe De Ryck, provides a fantastic deep dive into the more nuanced aspects of JWT security that are often overlooked in tutorials.
The Parts of JWT Security Nobody Talks About | Philippe De Ryck, Google Developer Expert
This talk, 'The Parts of JWT Security Nobody Talks About', goes beyond the basics to discuss the real-world challenges of using JWTs securely, particularly in distributed systems.
We will watch this video in segments. It's a rich source of information that directly addresses your goal of going to the 'deepest level possible'. We'll start with the introduction to classic vulnerabilities and the critical distinction between symmetric and asymmetric keys.
Pitfall 1: Weak Secret Keys (Symmetric Signatures)
When using a symmetric algorithm like HS256 (HMAC-SHA256), the same secret key is used to both sign and verify the token. If this key is weak or exposed, an attacker can generate their own valid tokens for any user with any claims they desire.
- The Vulnerability: Developers might use weak, guessable secrets (
secret,password,123456), forget to change default secrets from a library, or even copy-paste a hardcoded key from an online tutorial. - The Attack: An attacker can use a wordlist of common secrets to brute-force the key offline. Since the signature algorithm is public, they can take a valid token, try signing its payload with each secret in the wordlist, and compare the result to the token's original signature. If it matches, they've found the key.
Please read the section "Brute-forcing secret keys" in the PortSwigger article (LINK) for more details on this attack.
Pitfall 2: Algorithm Confusion and alg:none Attack
The JWT header contains an alg parameter that tells the server which algorithm to use for verification. This is data provided by the client. Trusting it blindly is a major security flaw.
-
The
alg:noneAttack: The JWT specification allows for analgvalue ofnone, indicating an unsecured token. An attacker can take a token, modify the payload (e.g., set"isAdmin": true), change thealgin the header tonone, and remove the signature. A poorly configured server or an old library might accept this token without verifying any signature at all. -
Symmetric vs. Asymmetric Key Confusion: This is a more subtle attack. Let's say a server is configured to use an asymmetric algorithm like
RS256, where it signs with a private key and makes its public key available for verification.- An attacker gets the public key (as it's public).
- They forge a token, but change the
algheader toHS256(a symmetric algorithm). - The vulnerable server sees
alg: HS256and looks for the symmetric secret key. But it's configured forRS256, so it mistakenly uses the public key as theHS256secret. - Since the attacker also has the public key, they can sign their forged token using the public key as the
HS256secret, and the server will validate it.
To understand these initial vulnerabilities and begin our deep dive, please watch the first part of Philippe De Ryck's talk.
The Parts of JWT Security Nobody Talks About | Philippe De Ryck, Google Developer Expert
Let's start the video. This first segment introduces the classic none algorithm vulnerability and the confusion between symmetric and asymmetric signatures, setting the stage for why key management is so critical.
Watch from the beginning (00:35) to 13:59. Pay close attention to: The explanation of the alg:none vulnerability. The fundamental difference between how HMAC (symmetric) and RSA (asymmetric) signatures work. The critical security reason why you should almost always prefer asymmetric signatures (RS256) in any system with more than one service.
The key takeaway is that symmetric keys (HS256) are only suitable for very simple, monolithic services where the same service both issues and consumes its own tokens. For anything else, asymmetric keys (RS256) are the standard because they allow you to share the public verification key without compromising the private signing key.
Pitfall 3: Malicious Header Injection (jwk, jku, kid)
Even when using secure asymmetric keys, vulnerabilities can arise from other header parameters that influence key selection. The server must use the correct public key to verify the token, but how does it find it? The token itself can suggest a key using headers like:
jwk(JSON Web Key): Embeds the public key directly in the token header.jku(JWK Set URL): Provides a URL where the server can fetch a set of public keys.kid(Key ID): An identifier for the key, used to look it up from a set of keys the server already knows.
The Vulnerability: A misconfigured server might blindly trust these headers.
jwkInjection: An attacker signs a token with their own private key and embeds their public key in thejwkheader. The server naively uses the provided key to verify the token and accepts it.jkuInjection: An attacker provides ajkuheader pointing to a URL they control, which hosts their public key. The server fetches the key from the malicious URL and validates the token.kidInjection: If thekidis used to construct a file path (e.g.,/path/to/keys/{kid}.pem), it could be vulnerable to directory traversal (kid: ../../../dev/null), allowing an attacker to control which file is used as the key.
The Fix: Never blindly trust these headers. The server must maintain a strict whitelist of allowed public keys, trusted jku domains, or known kid values.
Now, let's continue with the video, where these advanced key management topics are covered in excellent detail.
The Parts of JWT Security Nobody Talks About | Philippe De Ryck, Google Developer Expert
This part of the video explains how key management works in JWTs and how protocols like OpenID Connect solve these problems securely.
Watch from 13:59 to 27:54. Focus on: How kid helps manage key rotation. The purpose of jku and jwk for dynamic key distribution. The critical attack vector where an attacker provides their own key via these headers. How to defend against this by whitelisting trusted key sources. How OpenID Connect's discovery mechanism provides a real-world, secure solution to this problem.
Part 2: The Intractable Problem of Token Revocation
We now understand how to prevent an attacker from forging a token. But what happens if a valid token is stolen, or if a user logs out?
Because JWTs are stateless and self-contained, the issuing server keeps no record of them. A token, once issued, is valid until its expiration time (exp claim). There is no built-in way to "un-issue" or revoke it. This is a significant design trade-off for the scalability that statelessness provides.
So, how do we handle logout or a compromised account? We must introduce some state back into the system. The following video clearly explains the common strategies.
How to revoke a JWT token | The JWT lifetime, blacklist and not-before policy
This short video from Hacker University gets straight to the point, explaining why you can't truly 'revoke' a JWT and what to do instead.
Watch the entire video (4 minutes, 51 seconds). It efficiently covers the main strategies for handling JWT 'revocation'.
Let's summarize and expand on these strategies.
Strategy 1: Short-Lived Access Tokens (The Standard Approach)
This is the most common and recommended pattern. It balances security and performance.
- Access Tokens: Have a very short lifetime (e.g., 5-15 minutes).
- Refresh Tokens: Have a long lifetime (e.g., days or weeks) and are stored securely on the client.
- Revocation Flow: When a user logs out or their session needs to be terminated, you invalidate the refresh token on the server side (e.g., by deleting it from a database table). The user can no longer get a new access token. The old, short-lived access token will expire on its own within minutes, minimizing the window of exposure.
Strategy 2: Maintain a Denylist (or Blacklist)
This approach provides immediate revocation but adds overhead.
- How it Works: Each token is issued with a unique identifier (
jticlaim). When a token is revoked, itsjtiis added to a denylist stored in a fast database like Redis. - On Each Request: In addition to verifying the signature, the server must check if the token's
jtiis present in the denylist. - Trade-off: You re-introduce state and a database lookup for every single API request, which can impact performance. The denylist can also grow very large if not managed properly.
Strategy 3: Maintain an Allowlist
This is the inverse of a denylist and gives you more granular control.
- How it Works: When a user logs in and a token is issued, its
jtiis stored in an allowlist, typically mapped to the user ID. - On Each Request: The server verifies that the token's
jtiis present in the allowlist for that user. - Revocation Flow: To revoke a session, you simply remove the
jtifrom the allowlist. This is highly effective and can also be used to enforce single-session-per-user policies.

Strategy 4: Key Rotation (The "Nuclear" Option)
This is a drastic measure for emergencies.
- How it Works: You generate a new private/public key pair for signing tokens.
- Effect: All tokens signed with the old private key immediately become invalid because signature verification with the new public key will fail.
- Use Case: This is not for individual user logouts. It's for a suspected system-wide breach where you need to invalidate all active sessions at once.
Conclusion: JWT Security Best Practices
You now have a deep understanding of the common pitfalls and countermeasures associated with JWTs. Here are the key takeaways to guide your work:
- Use Asymmetric Keys (
RS256): Unless your application is a simple monolith, use public/private key pairs. This prevents a compromise of one service from compromising the entire system's ability to issue tokens. - Strong, Securely Stored Secrets: Your private signing key is the most critical secret in your authentication system. Store it securely in a dedicated secrets manager (like HashiCorp Vault or AWS Secrets Manager), not in your code or configuration files.
- Validate, Don't Trust: Always validate the
iss(issuer),aud(audience), andexp(expiration) claims. Never blindly trust headers likealg,jku, orjwkto determine how to validate a token. Use a strict whitelist of trusted keys and sources. - Use a Modern Library: Use a well-maintained, up-to-date JWT library that defaults to secure behavior and protects you from classic vulnerabilities like the
alg:noneattack. - Plan for Revocation: For most applications, the short-lived access token + refresh token pattern is the best approach. For applications requiring instant revocation, an allowlist/denylist is necessary, but be mindful of the performance costs.
Preview of the Next Lesson
We just discussed using a fast, in-memory store like Redis to maintain a token denylist. This is just one of many uses for such a tool. In our next lesson, "Explain why application-level caching improves performance, and define cache hit, cache miss, and hit ratio," we will explore how to use Redis for its primary purpose: application-level caching. This will not only show you how to dramatically speed up your backend but also build on the concepts we introduced today.