Hello! Welcome to the next lesson in our deep dive into backend systems.
In our last few lessons, we've built a solid theoretical foundation for application-level caching. We've explored the cache-aside pattern, different eviction policies, and crucial cache invalidation strategies. You learned that keeping a cache fresh is one of the "hard problems" in computer science.
Today, we're moving from theory to practice. This lesson is all about applying those concepts to a real backend application. Our goal is to implement application-level caching in a Python backend to cache database query results using Redis.
We will build this caching layer step-by-step within a Django project. You will learn how to:
- Set up and configure Redis as a caching backend for Django.
- Use Django's built-in tools to quickly cache API endpoint responses.
- Implement a robust, event-driven invalidation strategy using Django Signals to ensure your cache stays fresh.
- Look beyond framework helpers to understand how to implement the cache-aside pattern manually for more control.
By the end of this lesson, you'll have a practical, working example of a high-performance caching system. Let's get started.
Setting Up the Caching Environment
To build our caching layer, we need two main components: our Python application (we'll use Django) and a Redis server. Redis is an excellent choice for a cache because it's an in-memory data store, which makes it incredibly fast for read and write operations.

For a detailed walkthrough of setting up the environment, we'll use a comprehensive video guide. It covers spinning up Redis with Docker and installing the necessary Python packages.
Caching with Redis and Django!
The video 'Caching with Redis and Django!' by BugBytes will be our main guide for this practical session. It clearly demonstrates each step of the implementation.
Watch the video from 00:39 to 04:06. This covers: Setting up Redis using Docker (00:39 - 02:03): The presenter uses a docker run command to start a Redis container. Pay attention to the port mapping (-p 6379:6379), which makes Redis accessible to your Django application. Installing Libraries and Configuring Django (02:03 - 04:06): The presenter installs django-redis and configures the CACHES dictionary in settings.py. We'll dissect this configuration next.
Dissecting the Django Cache Configuration
After following the video, you will have a CACHES block in your settings.py file that looks something like this:
CACHES = {
    "default": {
        "BACKEND": "django_redis.cache.RedisCache",
        "LOCATION": "redis://127.0.0.1:6379/1",
        "OPTIONS": {
            "CLIENT_CLASS": "django_redis.client.DefaultClient",
        }
    }
}
Let's break this down:
"default": This is the name of the cache alias. Django supports multiple cache backends, and "default" is the one used unless you specify another."BACKEND": This tells Django which cache client to use. We're usingdjango-redis, which provides more features than Django's built-in client (as we'll soon see)."LOCATION": This is the connection string for your Redis server.redis://: The protocol.127.0.0.1:6379: The host and port of the Redis server. This matches the port you exposed with Docker./1: This specifies the Redis database number. Redis isn't a relational database, but it provides 16 numbered, sandboxed databases (0-15) by default. Using a separate database like1for caching is a good practice to isolate cache data from other potential uses of Redis (like a task queue broker, which we'll cover later).
Caching a View with @cache_page
With our configuration in place, we can start caching. Django provides a very convenient decorator, @cache_page, for caching the output of an entire view.
This is a high-level abstraction. It caches the final, rendered HTTP response. When a new request comes in for the same URL, Django serves the cached response directly from Redis without even touching your view code.
Caching with Redis and Django!
Let's continue with the video to see @cache_page in action. The presenter will apply it to a Django REST Framework list view and demonstrate the performance impact.
Watch from 04:06 to 09:33. Focus on these key points: A time.sleep(2) is added to the get_queryset method to simulate a slow database query. The @cache_page(60 * 15) decorator is applied to the view's list method. The first request to the API endpoint is slow (it takes ~2 seconds) because it's a cache miss. Subsequent requests are instantaneous because they are cache hits, served directly from Redis. Notice how requests to different URLs (e.g., with different query parameters for ordering) create separate cache entries.
You've just seen the power of caching in action. A two-second database query has been reduced to a few milliseconds. However, this introduces the problem we discussed in the last lesson: what happens when the underlying product data changes? The cache will serve stale data until the 15-minute TTL expires.
Smart Invalidation with Django Signals
To solve the stale data problem, we'll implement an event-based invalidation strategy. We want to clear the relevant cache entries immediately after a product is created, updated, or deleted.
Django's signals framework is perfect for this. It allows different parts of an application to get notified when certain actions occur. We will listen for the post_save and post_delete signals on our Product model.
This is a far superior approach to simple TTL-based invalidation.
Let's implement this.
Caching with Redis and Django!
The final part of the video walks through setting up signal handlers to automatically invalidate the cache.
Watch the rest of the video, from 09:33 to 18:08. This is the most important part of the lesson. It covers: Creating signals.py: A function invalidate_product_cache is registered as a receiver for the post_save and post_delete signals from the Product model. Using cache.delete_pattern: Inside the signal handler, this powerful function from django-redis is used to delete all cache keys that match a specific pattern (e.g., "*product_list*"). This is crucial because @cache_page creates multiple cache entries for different URL variations (pagination, ordering, etc.), and this command clears them all in one go. Registering the signals: The signals.py module is imported in the ready() method of the app's apps.py file. Testing: A new product is added in the admin panel. Observe that the very next request to the API is slow again (a cache miss), but it correctly includes the new product. The cache has been successfully invalidated and then repopulated with fresh data.
This pattern—combining @cache_page with signal-based invalidation—is a robust and common way to implement caching in Django. For further reading and to see this exact pattern described in a real-world case study, the following article is excellent.
From Zero to Cached: Building a High-Performance Housing Portal ...
The article 'From Zero to Cached' provides a fantastic written explanation of the same signal-based invalidation pattern.
Read 'Part C: Pillar 2 — Smart Invalidation with Django Signals' and 'Part D: Testing the Smart Invalidation'. This will reinforce what you just saw in the video, explaining the role of signals.py, apps.py, and how to test the invalidation flow. Note that the author uses cache.clear(), which is simpler but less precise than the cache.delete_pattern shown in the video.
A Deeper Look: Manual Cache-Aside Implementation
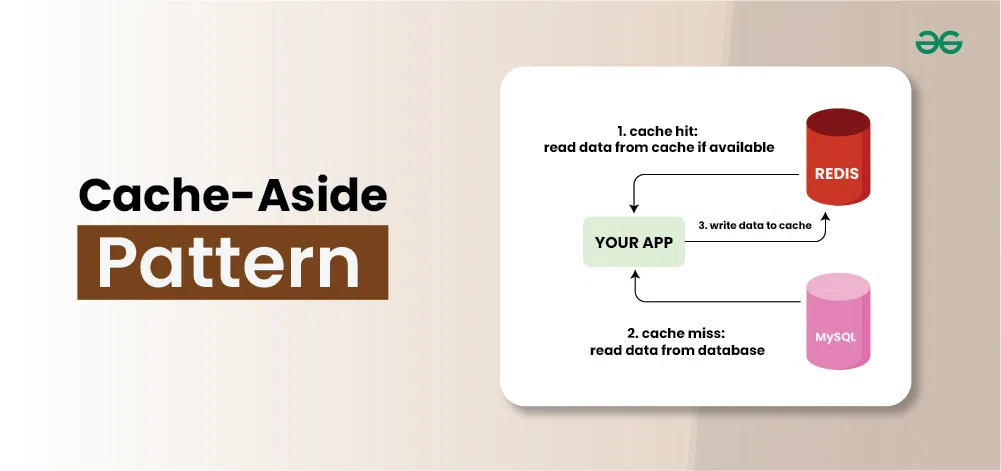
The @cache_page decorator is convenient, but it's also a bit of a black box. It caches the entire rendered HTTP response, which might not always be what you want. For more flexibility—for instance, if you only want to cache the raw Python objects from a database query—you can implement the cache-aside pattern manually.
This approach gives you full control over what gets cached and how the cache keys are constructed. Since your goal is to understand the root level of backend flows, this is a vital concept.
The logic is simple:
- Construct a cache key.
- Try to get data from the cache using this key.
- If it's a cache hit, return the data.
- If it's a cache miss:
- Fetch the data from the database.
- Store the data in the cache with the key.
- Return the data.
The following resource shows how to implement this pattern in pure Python, first as a simple function and then as a reusable decorator.
How to Implement Cache-Aside Pattern with Redis - OneUptime
The article 'How to Implement Cache-Aside Pattern with Redis' by OneUptime provides clean, framework-agnostic Python code for this pattern.
Read the sections 'Basic Implementation in Python' and 'Reusable Cache-Aside Decorator'. Study the code to understand how the core logic of 'check cache -> fallback to DB -> populate cache' is implemented. This is the fundamental pattern that powers most application-level caching.
This manual approach is more work than using @cache_page, but it's more powerful. It allows you to cache intermediate data, share cached results between different parts of your code, and build more complex caching logic.
Conclusion
In this lesson, you've bridged the gap between caching theory and practice. You now have a complete, working model for implementing a high-performance caching layer in a Django application.
Key Takeaways:
- Setup is Key: Properly configuring Django to use Redis via
django-redisis the first step. Using a separate Redis database for your cache is good practice. - High-Level vs. Low-Level:
- Django's
@cache_pageis a high-level tool for quickly caching entire view responses. It's easy and effective for many use cases. - Implementing the cache-aside pattern manually provides granular control, allowing you to cache raw data and build more complex, reusable caching logic.
- Django's
- Invalidation is Crucial: A cache without a good invalidation strategy is a source of bugs. Using Django Signals to trigger cache invalidation on data changes is a robust, event-driven pattern that ensures data freshness.
delete_patternis Powerful: When using decorators like@cache_pagethat generate multiple cache keys for one endpoint, a function likedelete_patternis essential for comprehensive invalidation.
Preview of the Next Lesson
We've successfully built a caching layer, but caching is not a "free" performance win. It introduces new complexities and potential pitfalls. In our next lesson, we will step back from implementation and analyze the trade-offs. The learning outcome is: "Analyze the trade-offs of caching, including data consistency issues and increased system complexity." We'll discuss challenges like the "thundering herd" problem in more depth, race conditions in invalidation, and how to decide what is—and is not—worth caching.