Welcome to the next stage of your project! Having established and evaluated a strong baseline for text-based complaint classification, it's time to turn our attention to the second major data modality: images. Your project plan involves using computer vision to analyze photos of midday meals, specifically for recognizing food items and estimating their portions. This is a classic object detection task.
In this lesson, we will explore the core concepts behind YOLO (You Only Look Once), the state-of-the-art object detection algorithm you'll be using. Our goal is to understand how YOLO works at a conceptual level—how it goes from an image of a meal to identifying and locating the different food items within it. This foundational knowledge will be essential for the next lesson, where you'll put this theory into practice.
From Classification to Detection
In a previous module, you fine-tuned a ResNet model for image classification. This task answers the question: "What is in this image?" For example, does this image show a "Good," "Adequate," or "Poor" quality meal?
Object detection takes this a step further. It answers two questions simultaneously: "What is in this image, and where is it?" Instead of a single label for the whole image, the output is a set of bounding boxes, each with an associated class label. For your project, this means drawing a box around the portion of rice and labeling it "rice," another around the dal and labeling it "dal," and so on.
The video below provides an excellent introduction to this concept, showing how object localization extends image classification by adding bounding box coordinates to the model's output.
What is YOLO algorithm? | Deep Learning Tutorial 31 (Tensorflow, Keras & Python)
This video from the codebasics channel provides a clear, step-by-step introduction to the theory behind YOLO.
Watch the initial segment that distinguishes between image classification and object localization, and shows how a neural network's output can be structured to predict bounding box coordinates alongside class labels for a single object.
The YOLO Philosophy: A Single-Shot Approach
Older object detection methods, like the R-CNN family (Regions with CNN features), used a two-stage approach. First, they would propose several potential regions in the image that might contain objects. Second, they would run a separate classifier on each of these regions. This is effective but computationally expensive and slow.
YOLO revolutionized the field by framing object detection as a single regression problem, straight from image pixels to bounding box coordinates and class probabilities. It processes the entire image in a single forward pass through a neural network, which is why it's called a "single-shot detector." This design makes YOLO incredibly fast and suitable for real-time applications.
To understand the core idea, let's explore this article from DigitalOcean.
Object Detection with YOLOv8 Advanced Capabilities | DigitalOcean
This article provides a good high-level overview of object detection and the significance of YOLO's single-shot approach.
First, read the brief overview of object detection to formalize the task. Then, read the section on the YOLO approach, paying attention to the distinction it makes between single-shot and two-stage detectors.
How YOLO Works: The Grid System
The central innovation of YOLO is how it processes the image. Instead of proposing arbitrary regions, YOLO divides the input image into an grid. Each grid cell is then responsible for detecting objects whose center point falls within that cell.
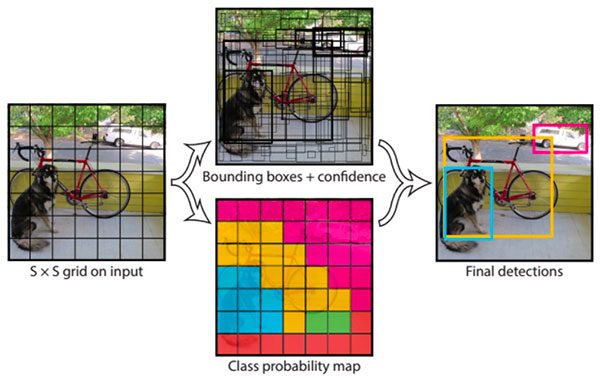
For each grid cell, the model predicts a fixed-size tensor containing all the necessary information:
- Bounding Box Predictions: Each grid cell predicts a number of potential bounding boxes.
- Confidence/Objectness Score: For each bounding box, it predicts a score that represents the probability that the box actually contains an object.
- Class Probabilities: For each grid cell, it predicts the probability of the object belonging to each of the possible classes (e.g., rice, dal, vegetable).
This process is explained exceptionally well in the following video and article.
What is YOLO algorithm? | Deep Learning Tutorial 31 (Tensorflow, Keras & Python)
Let's return to the codebasics video to see a visual explanation of the grid system.
Watch the segment explaining how YOLO handles multiple objects by dividing the image into a grid. Focus on how each grid cell is associated with a specific output vector that encodes the bounding box and class information for an object centered in that cell.
YOLO Object Detection Explained: A Beginner's Guide
This DataCamp article provides another clear explanation of the YOLO pipeline, reinforcing the concepts from the video.
Read the section titled "How Does YOLO Perform Object Detection?". Focus on the first two parts: Residual blocks (this is a slight misnomer, the key concept here is the grid division) and Bounding box regression. This will clarify the components of the prediction vector: p_c (objectness), b_x, b_y, b_h, b_w (box coordinates), and c_1, c_2, ... (class probabilities).
So, if you have a grid, and for each cell, you predict 2 bounding boxes and have 3 classes (rice, dal, vegetable), the final output of the network is a large tensor of size . The '5' comes from 4 bounding box coordinates () plus 1 objectness score. This unified prediction is what makes YOLO so efficient.
Refining Raw Predictions: NMS and IoU
The raw output from the grid contains hundreds of potential bounding boxes. Many of these will be redundant (multiple boxes for the same object) or have very low confidence. Two post-processing steps are crucial to clean this up.
-
Confidence Thresholding: A simple first step is to discard any predicted boxes whose confidence score is below a certain threshold (e.g., 0.25).
-
Non-Maximum Suppression (NMS): After thresholding, you might still have multiple overlapping boxes for the same object. NMS is a greedy algorithm that selects the best box and eliminates the redundant ones. It works as follows:
- Select the box with the highest confidence score.
- Calculate its Intersection over Union (IoU) with all other boxes. IoU is a metric from 0 to 1 that measures the extent of overlap between two boxes.
- Remove any boxes that have a high IoU (e.g., > 0.5) with the selected box.
- Repeat the process with the remaining boxes.
This ensures that for each object, you are left with only one, high-quality detection.
What is YOLO algorithm? | Deep Learning Tutorial 31 (Tensorflow, Keras & Python)
The codebasics video provides an intuitive explanation of why NMS is needed and how it works with IoU.
Watch the part of the video that discusses the problem of multiple detections and how Intersection over Union (IoU) and Non-Maximum Suppression (NMS) are used to solve it.
A Final Detail: Anchor Boxes
There's one last problem: what if a single grid cell contains the centers of multiple objects? Or what if an object has an unusual aspect ratio (e.g., a long, thin breadstick)? The original YOLO had difficulty with this.
The solution is anchor boxes. Instead of having each grid cell predict bounding boxes from scratch, it predicts offsets from a set of predefined default box shapes of various sizes and aspect ratios. A grid cell can be assigned multiple anchor boxes, allowing it to detect multiple objects that are centered there. This makes the model much better at handling objects of different shapes and sizes.
What is YOLO algorithm? | Deep Learning Tutorial 31 (Tensorflow, Keras & Python)
To complete our conceptual overview, let's see how anchor boxes solve the problem of multiple objects in one cell.
Watch this final clip from the codebasics video, which explains the motivation for anchor boxes and how they modify the output vector to allow for multiple detections per grid cell.
Conclusion
In this lesson, we've unpacked the conceptual framework behind the YOLO object detection algorithm. You've seen how it builds upon classification to provide localization and how its unique single-shot architecture makes it remarkably fast and efficient.
Here are the key takeaways:
- Object detection combines classification ("what") with localization ("where").
- YOLO is a single-shot detector, processing an image in one pass for high speed.
- The core idea is to divide the image into an grid, with each cell responsible for detecting objects centered within it.
- Each grid cell predicts bounding boxes, an objectness/confidence score, and class probabilities.
- Post-processing steps like confidence thresholding and Non-Maximum Suppression (NMS), which uses Intersection over Union (IoU), are essential to refine the raw predictions into a clean set of detections.
- Anchor boxes help the model detect multiple objects within a single grid cell and handle objects with varied shapes.
You now have the theoretical foundation needed to start working with YOLO. In our next lesson, we will move from concept to code. You will set up the Ultralytics YOLOv8 library and run a powerful, pretrained model on your meal images to see object detection in action.