Welcome back! In our previous lesson, we established the architectural blueprint for our project, deciding on a late fusion strategy. This approach allows us to leverage the specialized models you've already built for images and text in a modular and efficient way.
Today, we transition from theory to practice. We will implement the core of your multimodal system by building and training the fusion model itself. Your learning outcome for this lesson is to build and train a fusion model in PyTorch that concatenates image, text, and metadata feature vectors to predict violation severity. This is the step where you finally integrate the different data streams into a single, more powerful predictive model, directly addressing your goal of understanding how all the project components fit together.
The Fusion Model Architecture
Before we write code, let's visualize the model we're about to build. At this stage, your fine-tuned ResNet and BERT models act as fixed feature extractors. We will no longer train them. Instead, we feed them data in evaluation mode (.eval()) to generate high-level feature vectors. Our new fusion model is a separate, smaller network that learns how to interpret the combination of these features.
This new model will take three inputs:
- The image feature vector from ResNet.
- The text feature vector (CLS token embedding) from BERT.
- The numerically encoded metadata vector (school type, season, etc.).
It will then concatenate these vectors into a single, long vector and pass it through a simple classifier—a Multi-Layer Perceptron (MLP)—to make the final prediction.
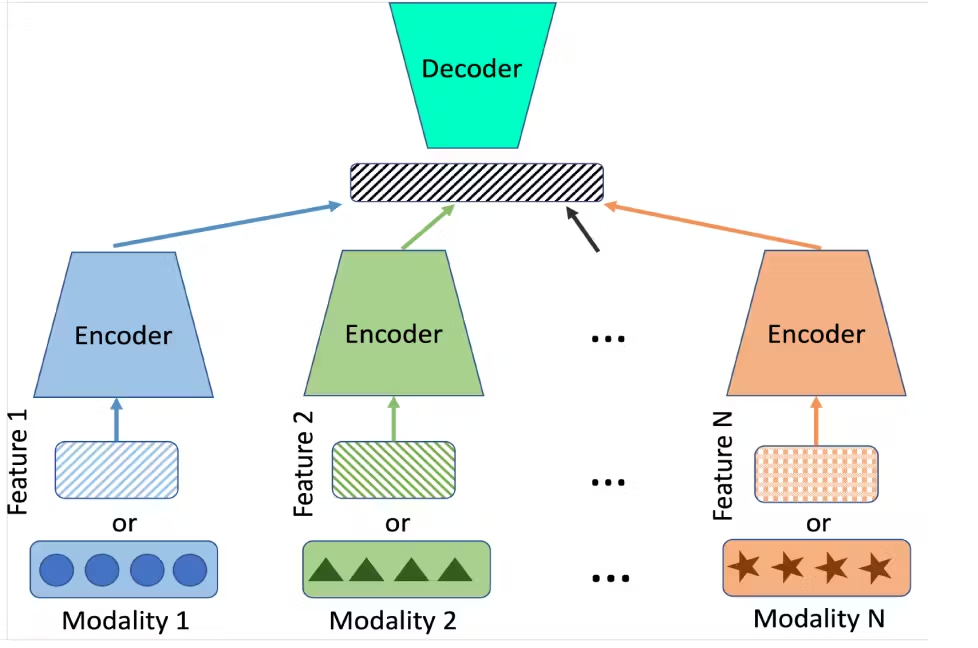
The structure of the MLP itself is quite standard. It combines different types of features, much like how you might process separate categorical and continuous data streams before feeding them into a final prediction layer.

Building the Fusion Model in PyTorch
The most elegant way to implement this in PyTorch is by creating a custom class that inherits from torch.nn.Module. This class will define the layers of our fusion MLP and specify how data flows through them in the forward method.
The key operation will be torch.cat(), which concatenates a sequence of tensors along a given dimension. This is how we'll merge the feature vectors from our different modalities.
Deep Learning with PyTorch Full Course | Master PyTorch, Tensors, and Neural Networks
This video from DataCamp provides an excellent walkthrough of creating multi-input models in PyTorch. It demonstrates exactly the pattern we need: defining a custom nn.Module that accepts multiple inputs, concatenates their representations, and passes them to a final classifier.
Please watch the section on building multi-input models, starting from the introduction to the concept. Pay close attention to how the forward method takes multiple inputs (image and alphabet), processes them through separate paths, and then uses torch.cat to combine them before the final classification layer. Your model will follow the same logic, but with three inputs.
Inspired by that video, let's outline the structure of your FusionModel.
1. Defining the FusionModel Class
Your model's __init__ method will define the layers of the MLP. You need to know the size of the input feature vectors to calculate the input dimension for your first linear layer.
- Image Features: Your fine-tuned ResNet model likely produces a vector of size 2048 (if using the standard ResNet-50).
- Text Features: A base BERT model produces a
[CLS]token embedding of size 768. - Metadata Features: The size of this vector depends on your encoding scheme (e.g., number of categories in one-hot encoding). Let's assume it's 10 for this example.
The total input dimension for your MLP will be the sum: .
Your forward method will accept the three feature tensors, concatenate them, and pass them through the MLP layers. Here is a Python-like pseudocode structure for your class:
import torch
import torch.nn as nn

class FusionModel(nn.Module):
    def __init__(self, num_image_features, num_text_features, num_meta_features, num_classes, hidden_size=512):
        super().__init__()


        # Calculate the total input size after concatenation
        total_input_features = num_image_features + num_text_features + num_meta_features


        # Define the fusion MLP
        self.fusion_layer = nn.Sequential(
            nn.Linear(total_input_features, hidden_size),
            nn.ReLU(),
            nn.Dropout(0.3),
            nn.Linear(hidden_size, num_classes)
        )

    def forward(self, image_features, text_features, metadata_features):


        # Concatenate features along the feature dimension (dim=1)
        # Assumes batch dimension is dim=0
        fused_features = torch.cat([image_features, text_features, metadata_features], dim=1)


        # Pass the concatenated vector through the fusion MLP
        output = self.fusion_layer(fused_features)

        return output
The Lightly.ai article below also provides a concrete code example that, while labeled "Early Fusion," demonstrates the exact torch.cat mechanism we're using to combine pre-extracted feature vectors.
The 101 Introduction to Multimodal Deep Learning - Lightly AI
This article includes a concise PyTorch example that's highly relevant.
Focus on the Code Example section under Early Fusion. Notice how it takes image_features and text_features, flattens them, and uses torch.cat to create a fused_features vector. This is precisely what you will do in your forward method, but with an additional metadata vector.
Data Pipeline for the Fusion Model
Running the large ResNet and BERT models for every training step of our small fusion MLP would be incredibly inefficient. A much better approach is to pre-compute the feature vectors.
Your workflow should be:
- Set your trained ResNet and BERT models to evaluation mode (
model.eval()) and disable gradient calculations (with torch.no_grad():). - Iterate through your entire dataset (train, validation, and test splits).
- For each sample, pass the image through ResNet and the text through BERT to get the corresponding feature vectors.
- Save these feature vectors to disk, along with their corresponding metadata and labels. A good way to organize this is to save a dictionary (
{'image_feat': ..., 'text_feat': ..., 'meta_feat': ..., 'label': ...}) for each sample usingtorch.save(). - Create a new
torch.utils.data.Datasetclass, let's call itFusionDataset, that simply loads these pre-computed files in its__getitem__method.
This way, training your fusion model becomes very fast, as the DataLoader will only be loading small, pre-processed tensors from disk instead of running massive neural networks.
The Training Loop
The training loop for the fusion model follows the standard PyTorch pattern you've implemented before. The main difference is that in each iteration, you will be loading a batch of three feature tensors and one label tensor from your FusionDataLoader.
Here's a summary of the steps inside the loop:
- Get a batch of data:
image_features,text_features,metadata_features, andlabels. - Move all tensors to the correct device (GPU).
- Clear the gradients:
optimizer.zero_grad(). - Perform the forward pass:
outputs = model(image_features, text_features, metadata_features). - Calculate the loss (e.g., using
nn.CrossEntropyLoss):loss = criterion(outputs, labels). - Perform the backward pass:
loss.backward(). - Update the model's weights:
optimizer.step().
You can refer back to the detailed training loop implementation in the BERT fine-tuning tutorial you used previously as a robust template.
BERT Fine-Tuning Tutorial with PyTorch - Chris McCormick
You've used this resource before, but it's worth revisiting for its well-structured training loop.
Review the section titled Training Loop. The code structure provided there—including the inner loop for batches, forward pass, loss calculation, backpropagation, and validation steps—is exactly what you need to adapt for training your new FusionModel. The primary change will be unpacking three feature tensors instead of two (input_ids and attention_mask).
Conclusion
In this lesson, you have learned the practical steps to build and train a late fusion model in PyTorch. This is a major milestone in your project, marking the point where individual components are integrated into a cohesive, multimodal system.
The key takeaways are:
- Model Implementation: A fusion model can be defined as a custom
nn.Moduleclass containing a simple MLP to process concatenated features. - Feature Concatenation: The
torch.cat()function is the core mechanism for merging feature vectors from different modalities. - Efficient Data Handling: Pre-computing and saving feature vectors from your large models is a critical optimization that makes training the final fusion classifier fast and efficient.
- Standard Training: The training loop follows the same fundamental PyTorch pattern of forward pass, loss calculation, backpropagation, and optimization.
In our next lesson, we will complete this module by evaluating your newly trained fusion model. You will compare the multimodal model's performance against the single-modality baselines to quantify the benefit of fusion. This will be the moment of truth, where you see if combining image, text, and metadata truly leads to a better violation detection system.