Hello and welcome back!
In our last few lessons, we've built templates for collection pages and the shopping cart. In doing so, you might have noticed we wrote very similar markup in two different places to display a product's image, title, and price. In your experience with frameworks like React, you know this violates the "Don't Repeat Yourself" (DRY) principle and is a perfect use case for a reusable component.
This lesson directly addresses that issue. Our learning outcome is to create reusable UI components like product cards using snippets. We'll explore how Shopify uses snippets to solve the problem of code duplication, making themes more modular, maintainable, and efficient—a core concept for any professional developer.
1. The "Why": Thinking in Components with Snippets
At its heart, a snippet is a piece of reusable Liquid code. You can think of it as a partial in an MVC framework or, more aptly for your background, a functional component in React. It's a self-contained block of markup and logic that can be rendered anywhere in your theme.
Using snippets is not just a convenience; it's a fundamental architectural pattern for building robust Shopify themes.
How to Add Snippets in Shopify in Just 3 Steps
This article, 'How to Add Snippets in Shopify', provides an excellent overview of what snippets are and, more importantly, why they are essential. It draws a direct parallel to React components, which should resonate with your experience.
Please read the 'Introduction', 'What Are Snippets in Shopify?', and 'What Makes Snippets in Shopify Essential?' sections. Focus on the four key benefits outlined: Isolation, Reusability, Performance, and Team Scalability.
The key takeaway is that snippets allow you to encapsulate a piece of UI, like a product card, into its own file. You can then call this file wherever you need to display that UI, ensuring consistency and making updates trivial—change the code in one file, and it updates everywhere.
2. Anatomy of a Snippet: Creating and Rendering
Snippets are simple to create and use.
- Location: They all live in the
snippetsdirectory of your theme. - Creation: You create a new file with a
.liquidextension (e.g.,product-card.liquid). - Rendering: You use the
rendertag to include it in a template or section:{% render 'product-card' %}.
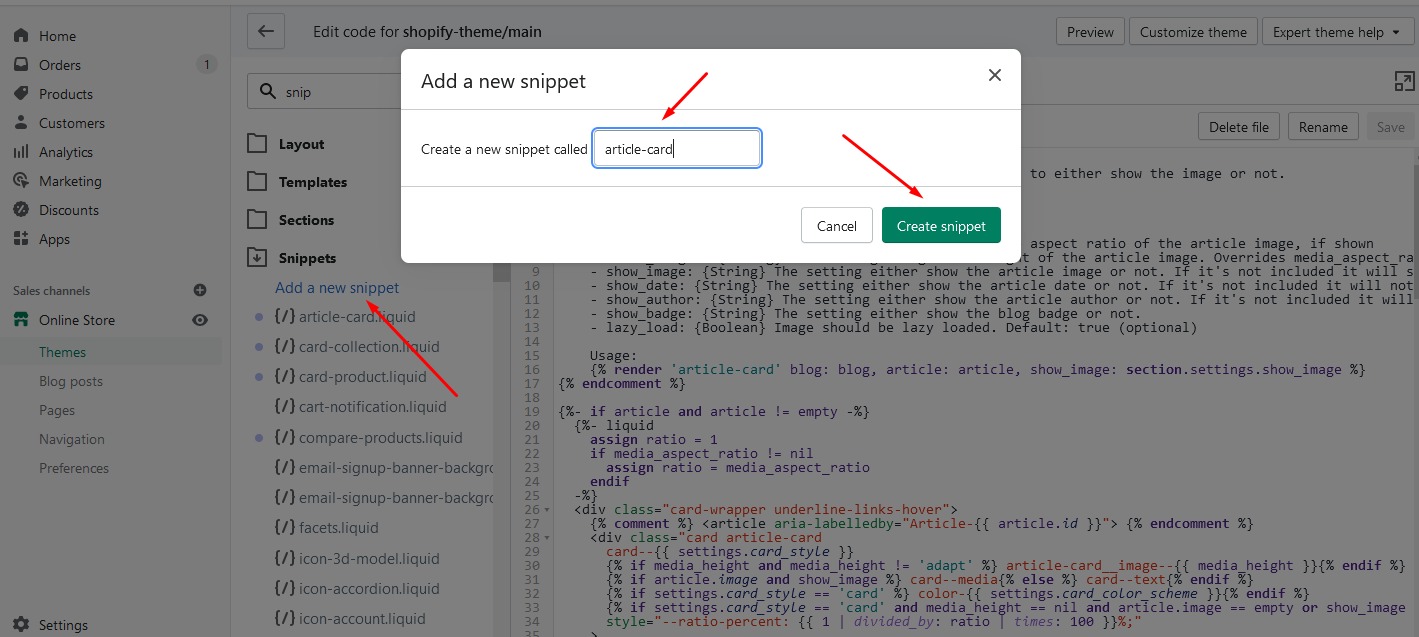
It's important to always use the {% render %} tag. You may see older themes using {% include %}, but render is the modern, recommended approach because it offers better performance and isolated variable scope, preventing unintended side effects.
3. Making Snippets Dynamic with Parameters
A static, hard-coded snippet has limited use. The real power comes from passing data to it, just as you would pass props to a React component. This allows you to use the same snippet to render different content.
You pass parameters as key-value pairs in the render tag.
{% comment %} In a collection template {% endcomment %}
{% render 'product-card', product_object: product, show_vendor: true %}
Inside the snippet (product-card.liquid), the passed variables are available directly.
<div>
  <img src="{{ product_object.featured_image | image_url: width: 400 }}" alt="">
  <h3>{{ product_object.title }}</h3>
  {% if show_vendor %}
    <p>{{ product_object.vendor }}</p>
  {% endif %}
</div>
Notice that variables from the parent template (like the product object in a for loop) are not automatically available inside the snippet. They must be passed in explicitly. This enforces encapsulation and makes snippets more predictable.
Shopify Theme Development - Liquid Theme Architecture
This video gives a clear demonstration of the fundamental architecture of snippets, including how to create them and pass parameters.
Please watch from 03:10 to 05:19. The video will walk you through: Creating a basic snippet and rendering it with the render tag. Passing single and multiple parameters to the snippet. Accessing those parameters from within the snippet's code.
Documenting Your Snippets
For professional work, especially in a team, documenting your snippets is crucial. A simple comment block at the top of the file explaining its purpose and the parameters it expects can save hours of debugging.

4. Practical Application: Building a Reusable Product Card
Let's apply these concepts. Our goal is to create a product-card.liquid snippet and use it on our collection page. This process involves:
- Locating the existing product grid loop in our collection template.
- Extracting the markup for a single product into a new snippet file.
- Replacing the old markup with a
rendertag inside the loop, passing the product object to our new snippet.
The following video demonstrates this exact workflow in Shopify's default Dawn theme. While it also covers adding a metafield (which we will discuss in more detail later), the core process of finding, modifying, and parameterizing a snippet is perfectly illustrated.
Add a Subtitle in Product Cards on Collection pages - Shopify Coding Tutorial
This tutorial is a masterclass in the practical, day-to-day work of a theme developer. It shows you how to trace code, modify existing snippets, and make them configurable.
Watch the following segments carefully: Finding the Snippet (03:13 - 06:08): Pay close attention to the process of starting from the page, identifying the section (main-collection-product-grid.liquid), finding the for loop, and discovering that it renders another file: the card-product.liquid snippet. This detective work is a key skill. Making a Test Change (06:08 - 07:04): Notice how he adds simple text to confirm he's in the right file. This is a simple but effective debugging technique. Making the Snippet Configurable (13:42 - 17:22): This is a brilliant demonstration of how different parts of a theme work together. He adds a setting (a checkbox) to the section's schema, then passes that setting's value as a parameter to the render call for the snippet. Inside the snippet, he uses an if statement to conditionally show content based on that parameter. This illustrates the relationship between sections (for merchant control) and snippets (for reusable code).
This video shows how a product-card snippet allows you to define the card's structure once. By passing in the product object within a loop, you can generate an entire grid of products, each with identical structure but different data.
Test your understanding!
A client wants a "Featured Product" block on the homepage. The marketing team needs to be able to easily change which product is featured directly from the theme customizer, without touching any code.
Should you build this primarily as a snippet or a section? Why?
Show answer
You should build this as a section.
The key requirement is that the merchant needs to edit the content (in this case, select a product) through the theme customizer. Sections have a {% schema %} tag that allows you to define settings—like a product_picker—that appear in the theme editor. Snippets do not have schemas and are not directly configurable by merchants.
Your implementation would likely involve a section that contains a product_picker setting. In the section's Liquid code, you would then render your product-card snippet, passing the selected product object to it: {% render 'product-card', product_object: section.settings.featured_product %}. This is a perfect example of sections and snippets working together.
Conclusion
You've now learned how to apply component-based thinking to Shopify theme development using snippets. This is a massive step towards writing professional, scalable, and maintainable theme code.
Here are your key takeaways:
- Snippets are reusable components: They follow the DRY principle, making your code cleaner and easier to manage.
- Use
{% render %}to include them: This is the modern, performant method with isolated scope. - Pass data via parameters: This makes snippets dynamic and versatile, much like passing props in React.
- Snippets for logic, Sections for merchant control: Snippets are for reusable code blocks. If a merchant needs to edit content or settings via the theme customizer, that functionality belongs in a section.
- Real-world development is detective work: A key skill is tracing how data and control flow from a template, to a section, and into a snippet.
In our previous lessons, we built individual templates and now, a reusable component. But how do all these files—layouts, templates, sections, and snippets—fit together to form a complete page?
In our next lesson, we will zoom out and explore the template hierarchy, explaining how Shopify combines these different files, from the main layout down to specific page templates, to render what the user sees.