Hello again! Welcome back.
In our last lesson, we focused on building the "internal" face of our app—the user interface that lives inside the Shopify Admin. We learned how to fetch data from our Node.js backend to populate Polaris components, creating a seamless experience for the merchant within their dashboard.
Today, we're breaking out of that box. We'll explore how an app can inject functionality and UI elements directly onto the merchant's live storefront. This is a critical skill for many freelance projects, from adding review widgets and announcement banners to creating complex product customizers.
This brings us to the core of your "first principles" curiosity: If an app is a separate entity, how does it safely and reliably add its features to a theme it didn't build? The answer lies in Theme App Extensions.
By the end of this lesson, you will be able to explain the concept of Theme App Extensions and how they inject app functionality into themes.
The "Why": Solving the Theme Integration Problem
Before Online Store 2.0, integrating an app with a theme was often a messy and fragile process. Your background in software development will make the drawbacks of the old methods immediately apparent.
The Old Way (Pre-Theme App Extensions):
- Direct Code Injection: Apps would use the Shopify Asset API to programmatically find and modify a theme's Liquid files. This was like performing remote surgery on a live system without a clean API.
- Manual Snippets: Apps would instruct merchants to copy and paste code snippets into their theme files. This put the burden on non-technical users, leading to errors, support requests, and anxiety.
- Brittle Integrations: If a theme developer updated their theme, it could break the app's integration.
- Messy Uninstalls: When a merchant uninstalled an app, the injected code was often left behind, bloating the theme and sometimes causing lingering issues.
This approach created significant maintenance overhead for developers and a poor experience for merchants. Shopify needed a better way.
How to Level Up Your App with Theme App Extensions
This Shopify Partners blog post, 'How to Level Up Your App with Theme App Extensions,' provides an excellent overview of the problem and the solution. The diagrams are particularly useful for visualizing the shift in architecture.
Please read the sections 'How apps integrate with Shopify themes' and 'Benefits of using theme app extensions'. Focus on the two diagrams that contrast the workflow 'Without theme app extensions' and 'With theme app extensions'. This will solidify the 'why' behind this entire framework.
As the article highlights, Theme App Extensions solve these problems by creating a standardized, secure, and merchant-friendly bridge between your app and any Online Store 2.0 theme. The core idea is that your app's storefront UI is packaged with the app but rendered by the theme. The theme files are never modified.
The "How": App Blocks and App Embed Blocks
Theme App Extensions provide two primary ways to inject functionality into a theme. The method you choose depends on what your app needs to do.
1. App Blocks
Think of App Blocks as UI components that live inside the theme's layout. They are for content or functionality that a merchant would want to place and reorder alongside their theme's native content.
- Use Cases: Product reviews, star ratings, "Back in Stock" forms, Instagram feeds, custom pricing buttons.
- Merchant Experience: The merchant adds, removes, and reorders these blocks within a section using the familiar theme editor, just like any native theme block.

2. App Embed Blocks
App Embed Blocks are for functionality that is detached from the theme's layout. They either have no visual component at all or are designed to float or overlay on top of the page.
- Use Cases:
- Floating Elements: Chat bubbles, pop-up modals, "Terms and Conditions" banners.
- Invisible Scripts: Analytics services (like Google Analytics), tracking pixels (like the Facebook Pixel), or scripts for SEO optimization.
- Merchant Experience: Instead of being placed in a specific section, App Embeds are enabled or disabled globally for the entire theme from a dedicated "App embeds" panel in the theme settings.
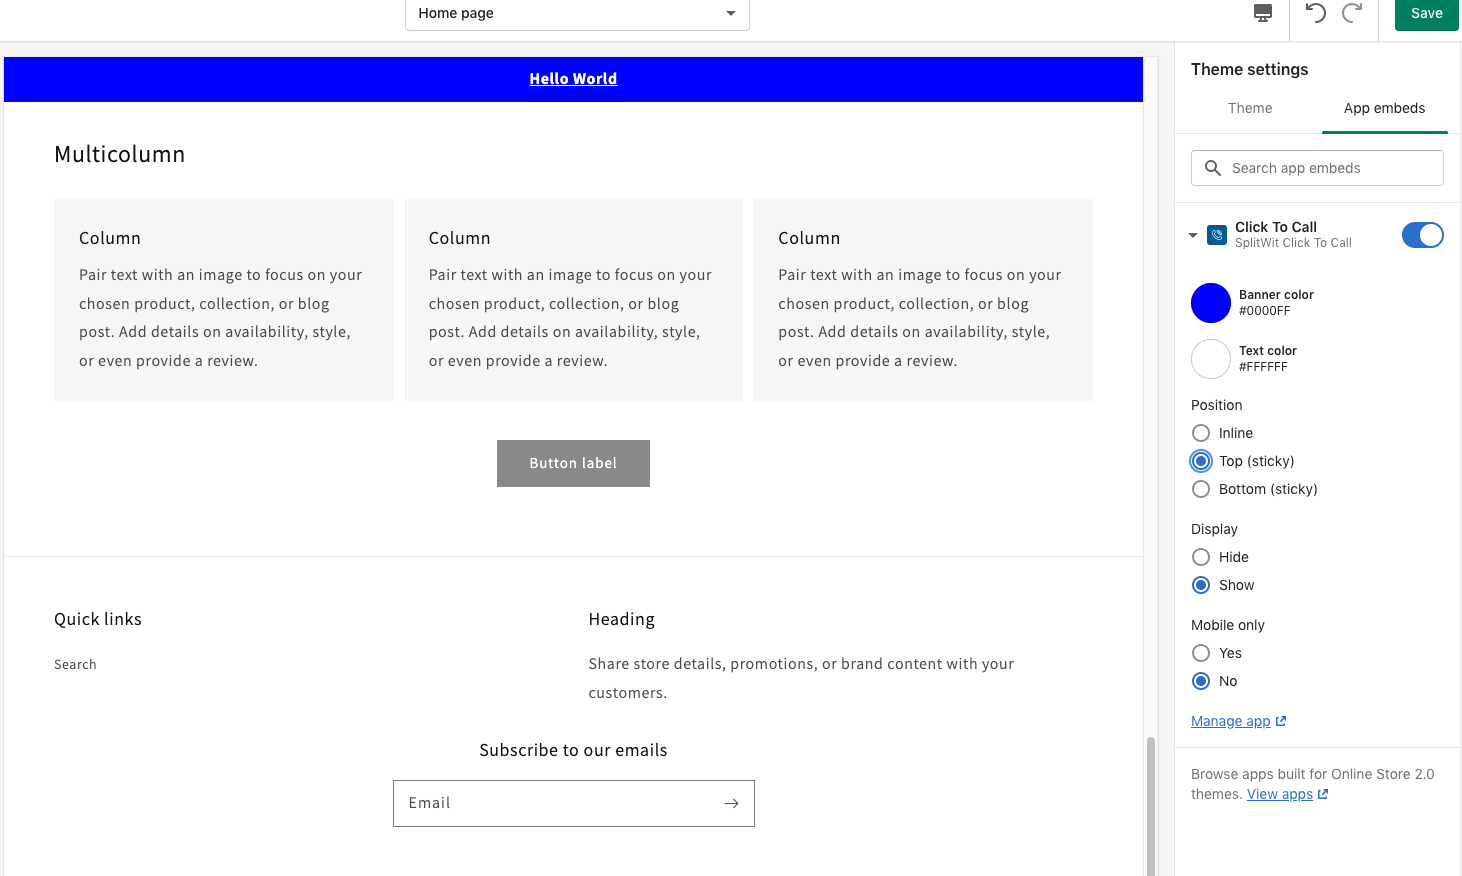
To get a feel for how these are structured and managed, let's watch a practical overview.
Shopify Theme App Extensions (For Theme Developers)
The video 'Shopify Theme App Extensions (For Theme Developers)' provides a great walkthrough of the historical context and a live demonstration of adding both App Blocks and App Embed Blocks to a theme.
Please watch the following segments: 00:00:00 - 00:03:38: This covers the history and problems solved by theme app extensions, reinforcing what you just read. 00:12:39 - 00:21:23: This segment demonstrates adding an App Block (the star rating example) to a product page and exploring its settings. 00:28:31 - 00:33:24: This part explains and demonstrates an App Embed Block (a floating image example).
The Anatomy of a Theme App Extension
When you use the Shopify CLI to generate an extension, it creates a new directory in your app project that mirrors a theme's structure. Your full-stack experience will make this pattern feel intuitive.
Configure theme app extensions
The official Shopify developer documentation provides the definitive reference for the file structure and configuration of theme app extensions. This is your source of truth.
First, review the 'File structure' section to understand the purpose of the assets, blocks, snippets, and locales directories. Then, skim the table in the 'Schema' section. Pay attention to key attributes like name, target, settings, and enabled_on. We'll discuss these next.
As the documentation shows, the most important files live in the blocks directory. Each file in this directory (e.g., star-rating.liquid) defines a block and consists of two parts:
- Liquid/HTML: The actual code that gets rendered on the storefront. You have access to Liquid objects and can use the
block.settingsobject to access values configured by the merchant. - Schema (
{% schema %}): A JSON object that defines the block's properties and the settings a merchant can configure in the theme editor. This is identical to how theme sections are defined, which you've worked with in earlier modules.
Here's a simplified example for a custom button block:
{% comment %} Part 1: The Liquid/HTML to be rendered {% endcomment %}
<a href="{{ block.settings.button_url }}" class="my-custom-button">
  {{ block.settings.button_text }}
</a>

<style>
  .my-custom-button {
    background-color: {{ block.settings.button_color }};
    padding: 10px 20px;
    color: white;
    text-decoration: none;
    border-radius: 5px;
  }
</style>

{% comment %} Part 2: The settings for the theme editor {% endcomment %}
{% schema %}
{
  "name": "Custom Button",
  "target": "section", // This makes it an App Block
  "settings": [
    {
      "type": "text",
      "id": "button_text",
      "label": "Button Text",
      "default": "Click Me"
    },
    {
      "type": "url",
      "id": "button_url",
      "label": "Button Link"
    },
    {
      "type": "color",
      "id": "button_color",
      "label": "Button Color",
      "default": "#000000"
    }
  ]
}
{% endschema %}
The target attribute in the schema is crucial.
"target": "section"creates an App Block."target": "body"or"target": "head"creates an App Embed Block.
Test your understanding!
You are building a "Cookie Consent Banner" app. The banner must appear at the bottom of every page on the merchant's store until the visitor accepts the terms. Would you use an App Block or an App Embed Block, and why?
Show answer
You would use an App Embed Block. The banner needs to appear on every page and is not part of the theme's main content flow (it overlays it). An App Block is meant for content placed within specific sections of a page (like a product description area), which is not suitable for a site-wide banner. An App Embed Block with target: "body" would be the correct choice.
Improving the Onboarding Flow with Deep Linking
A key part of professional app development is creating a smooth user experience. Forcing a merchant to manually find and add your block after installation is not ideal. We can do better using deep linking.
A deep link is a special URL that you can create in your app's admin UI. When a merchant clicks a button like "Add to Theme," this URL takes them directly to the theme editor, with your app block or app embed already added and ready for them to configure. This removes friction and drastically improves the onboarding experience.
How to build your Shopify theme app extension | App Embed Blocks and App Blocks
The video 'How to build your Shopify theme app extension' provides an excellent practical demonstration of creating a custom block from scratch and then implementing deep linking for a superior user experience.
This video uses the Remix template, which is the current standard. Watch from 00:09:20 to 00:27:33. The first part (until ~18:41) shows how to build a custom App Block. The second part demonstrates how to create a deep link from the app's admin page to add that block automatically. This is a powerful technique for your portfolio projects.
Conclusion
Today we've bridged the gap between your app's backend and the merchant's storefront. You now understand the modern, secure, and standardized way to inject functionality directly into a theme without the risks and maintenance burden of the past. This knowledge is fundamental for building a huge variety of Shopify apps.
Key Takeaways:
- The Problem: The old method of theme integration (Asset API, manual snippets) was fragile and created a poor experience for both developers and merchants.
- The Solution: Theme App Extensions provide a self-contained, versioned, and safe way for apps to add functionality to themes.
- The Two Types:
- App Blocks are for UI placed within the theme's layout (e.g., product pages).
- App Embed Blocks are for global or floating functionality (e.g., chat bubbles, analytics).
- The Structure: An extension is a bundle of assets, snippets, and blocks. Each block is a Liquid file with a
schemathat defines its settings for the theme editor. - The Pro Move: Use deep linking to create a smooth onboarding flow, taking merchants directly from your app to the theme editor with your block pre-installed.
In our next lesson, we will shift our focus back to the backend. Now that we understand all the places our app can have a UI (admin, theme block, theme embed), we'll master the engine that powers them all: using the Admin API to create, read, update, and delete Shopify resources like products, orders, and customers.