Hello! Welcome back to your journey in building an interactive web application.
In our last lesson, you took a major step by connecting an external JavaScript file to your HTML page. You even got a small preview of today's topic when you used document.querySelector("h1").textContent = "Hello world!" to change your page's heading.
Today, we're going to dive deep into that command and uncover the system that makes it possible: the Document Object Model (DOM). The DOM is the bridge that allows your JavaScript code to see and interact with your HTML content. Mastering it is the key to creating dynamic, responsive web applications.
By the end of this lesson, you will be able to select any HTML element on your page and manipulate its content, styling, and attributes using JavaScript. This will give you the power to change what the user sees without them having to reload the page.
What is the Document Object Model (DOM)?
When a web browser loads your HTML file, it doesn't just display it as text. It creates an internal, in-memory model of the page's structure. This model is the DOM. It organizes all your HTML elements into a tree-like hierarchy of objects, or "nodes."
To get a quick and clear idea of what the DOM is, let's watch the first minute of this video.
The JavaScript DOM explained in 5 minutes! 🌳
This video from Bro Code gives a great, concise explanation of the DOM and its tree-like structure.
Watch the video from the beginning until 00:46. Focus on understanding that the DOM is a JavaScript object that represents your HTML page as a tree.
As the video explained, every element, attribute, and piece of text in your HTML document becomes a node in the DOM tree.
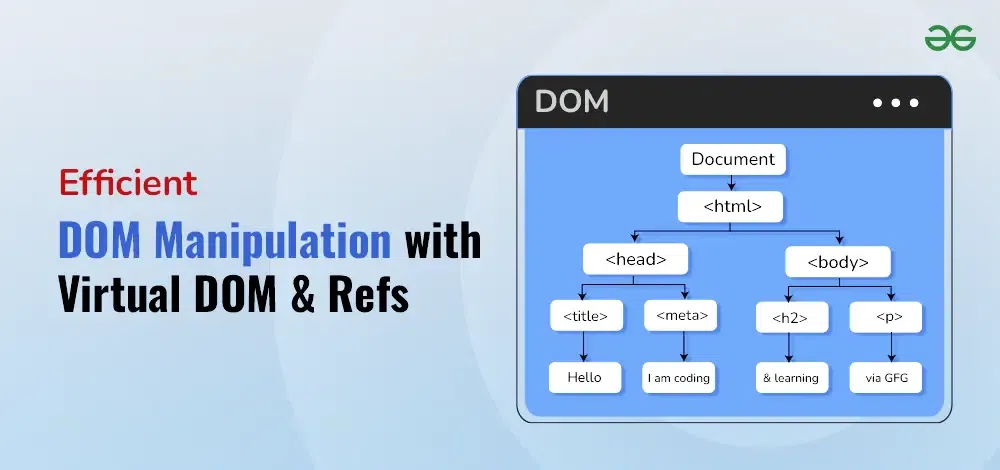
The document object in JavaScript is your entry point to this entire tree. From there, you can navigate to and manipulate any node.
Part 1: Selecting Elements from the DOM
Before you can change an element, you first need to select it. JavaScript provides several powerful methods to grab references to specific nodes in the DOM.
The most modern and versatile way to do this is by using CSS selectors, just like you would in a stylesheet. Let's explore how.
Learn JavaScript DOM Manipulation – Tutorial for Beginners
This video from the tutorial by Beau Carnes will demonstrate the most common methods for selecting elements: getElementById and querySelector.
Watch from the beginning to 03:46. Pay close attention to the difference between getElementById (which uses an ID directly) and querySelector (which can use any CSS selector like #id, .class, or tag).
To summarize the key selection methods:
document.getElementById('some-id'): Selects the one element that has the matchingid. It's very fast and direct.document.querySelector('css-selector'): Selects the first element that matches the given CSS selector. This is extremely flexible.document.querySelector('#main-title')(selects by ID)document.querySelector('.container')(selects by class)document.querySelector('button')(selects by tag)
document.querySelectorAll('css-selector'): Selects all elements that match the CSS selector and returns them in a list (specifically, aNodeList). You would then typically loop through this list to work with each element.
For a more detailed written guide on these methods, the following resource is excellent.
How to Manipulate the DOM - the Ultimate Beginner's Guide
This article from freeCodeCamp, 'How to Manipulate the DOM', provides clear examples of all the main selection methods.
Please read the section 'How to Select Elements in the DOM'. You can skim this to reinforce what you saw in the video. Notice the examples for getElementsByClassName and getElementsByTagName as well.
Test your understanding!
Imagine your HTML has a button <button id="submit-btn" class="primary-action">Go</button>. Which JavaScript command would you use to select it in these scenarios?
- You want to select it using its unique ID.
- You want to select it because it's the first button on the page.
- You want to select it using its class name.
Show answer
document.getElementById('submit-btn')ordocument.querySelector('#submit-btn')document.querySelector('button')document.querySelector('.primary-action')
Part 2: Manipulating Selected Elements
Once you have a reference to an element stored in a variable, you can start changing it. This is where your webpage comes to life!
Changing Content
The most common task is changing the text or HTML inside an element.
.textContent: Changes the plain text content of an element. This is the safest and most efficient method for updating text..innerHTML: Changes the full HTML content inside an element. This is powerful but must be used with caution, as it can create security vulnerabilities if you insert un-sanitized user input..value: For form elements like<input>,<textarea>, and<select>, this property gets or sets their current value.
The video you watched earlier continues with great examples of these.
Learn JavaScript DOM Manipulation – Tutorial for Beginners
Let's continue with Beau Carnes' tutorial to see how to modify element content.
Watch from 05:58 to 11:49. The first part (up to 09:05) compares innerText and textContent. For our purposes, textContent is what you'll use most often. The second part (from 09:05) explains innerHTML and includes an important security warning.
Changing Styles and Attributes
Besides content, you can also change an element's appearance and its attributes.
element.style: Allows you to directly change individual CSS properties. For example,myElement.style.color = 'blue';. Note that CSS properties with hyphens (likebackground-color) are written in camelCase in JavaScript (backgroundColor).element.classList: This is the preferred way to change styles. You can add, remove, or toggle CSS classes, keeping your styling rules neatly in your.cssfile. Key methods areadd(),remove(), andtoggle().element.setAttribute()&element.getAttribute(): Used to set or get the value of any HTML attribute, like thehrefof a link or theplaceholderof a text area.
Let's see these in action.
Learn JavaScript DOM Manipulation – Tutorial for Beginners
This final segment of the video covers attributes, classes, and inline styles.
Watch the following three short segments: Attributes (14:51 - 18:32): See how to use setAttribute, getAttribute, and direct properties like .id. Classes (21:08 - 24:29): Focus on how classList.add(), remove(), and toggle() work. This is a very important concept. Inline Styles (24:29 - 26:11): See how the .style property is used for quick, dynamic style changes.
Hands-On: Modifying Your Project
Now, let's apply these concepts directly to your AI Writing Assistant project.
- Make sure your
index.htmland yourmain.jsfiles are open in your editor, and your page is running with Live Server. - Open the browser's Developer Console (F12 or Ctrl+Shift+I) so you can see your outputs.
In your main.js file, add the following lines one by one. After adding each line, save the file and observe the change on your webpage or in the console.
// 1. Select the main heading element
const mainHeading = document.querySelector('h1');
console.log('Selected Heading:', mainHeading);

// 2. Change its text content
mainHeading.textContent = 'AI Writing Assistant';

// 3. Select the text area
const textInput = document.querySelector('textarea');
console.log('Selected Text Area:', textInput);

// 4. Change its placeholder text
textInput.setAttribute('placeholder', 'Enter your text here to analyze...');

// 5. Select the submit button
const submitButton = document.querySelector('button');
console.log('Selected Button:', submitButton);

// 6. Add a CSS class to the button (you'll need to define this class in your style.css)
submitButton.classList.add('btn-styled');
For step 6 to work, open your style.css file and add a simple style for the new class:
.btn-styled {
    background-color: #007bff;
    color: white;
    border: none;
    padding: 10px 15px;
    cursor: pointer;
}
Now, when you save everything, your page should have a new heading, new placeholder text in the text area, and a newly styled button!
Conclusion
Fantastic work today! You've learned the fundamental skill of web interactivity: selecting and manipulating DOM elements. This is the foundation upon which almost all modern frontend development is built.
Key Takeaways:
- The DOM is the browser's object-based representation of your HTML document, structured like a tree.
- You can select elements using methods like
document.querySelector(),document.getElementById(), anddocument.querySelectorAll(). - Once an element is selected, you can change its content with
.textContentor.innerHTML. - You can change the value of form inputs with the
.valueproperty. - You can modify an element's style using the
.styleproperty or, more effectively, by managing its classes with.classList.
You now know how to change things on the page. But right now, these changes happen as soon as the page loads. In our next lesson, we will learn how to make these changes happen in response to user actions. We will explore Event Listeners, which will allow us to run our JavaScript code when a user clicks a button, types in a field, or moves their mouse. This will be the final piece we need to make your form fully interactive.