Introduction
Welcome back! In our last lesson, we successfully used GLFW to create a window and its corresponding OpenGL context. We have a black window on the screen, which is the canvas for our future game. However, we're still missing a crucial piece of the puzzle. While we have an OpenGL 3.3 context, our C code doesn't yet know how to call any of the modern OpenGL functions associated with it.
This lesson bridges that gap. Our learning outcome is to use the GLAD library to load pointers to OpenGL functions at runtime. We'll start by understanding why this step is necessary, diving into the C concept of function pointers. Then, we'll walk through the practical steps of using GLAD to generate, integrate, and initialize the function loader in our project.
Why Do We Need a Function Loader?
You might be wondering why we can't just #include <opengl.h> and start calling functions like glGenBuffers. The reason is historical and platform-dependent. On most systems, particularly Windows, the standard OpenGL library only guarantees support for the ancient OpenGL 1.1 specification. The functions for modern OpenGL (versions 3.0 and above) exist within your graphics card's driver, but their memory locations aren't known when we compile our program.
To use them, we must fetch their addresses at runtime, after our OpenGL context has been created. These addresses are stored in function pointers. An OpenGL loading library automates this tedious and error-prone process for us.
To understand the mechanics of what a loader library does, it's helpful to first solidify the difference between a regular function and a function pointer in C.
Loading OpenGL Functions for Fun and Profit
The article 'Loading OpenGL Functions for Fun and Profit' provides an excellent explanation of the underlying concepts. Reading the first few sections will give you the necessary theoretical foundation.
Please read the introduction, the 'Functions vs Function Pointers' section, and the 'Dynamic Loading' section. Focus on understanding why function pointers provide the flexibility needed for loading OpenGL functions at runtime.
As the article explains, a function pointer is essentially a variable that holds the memory address of a function. Because it's a variable, we can change its value at runtime. This is exactly what we need:
- We'll declare function pointers for all the OpenGL functions we want to use (e.g.,
glCreateShader,glClearColor). - After creating our OpenGL context with GLFW, we'll ask the graphics driver for the real addresses of these functions.
- We'll assign these addresses to our function pointers.
- From then on, we can call the functions using the pointers.
This process is called dynamic loading. While the article goes on to show how you could write your own loader, we'll use a popular tool called GLAD that does all the heavy lifting for us.
Using GLAD: A Three-Step Process
GLAD (Multi-Language GL/GLES/EGL/GLX/WGL Loader-Generator) is not a library you download in the traditional sense. It's a web service that generates the C source and header files tailored to your specific needs.
Step 1: Generate the GLAD Files
First, we need to visit the GLAD web service to generate our loader.
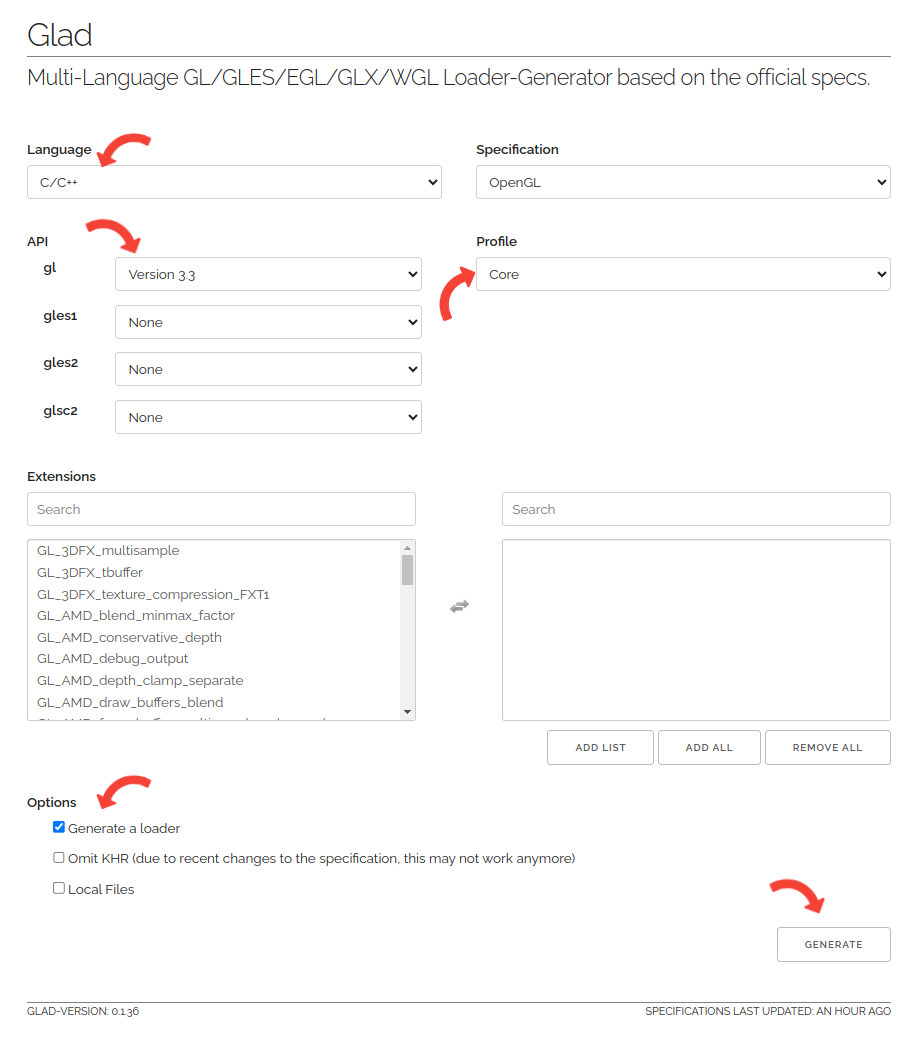
You will need to configure it with the following settings:
- Language: C/C++
- Specification: OpenGL
- API gl: Version 3.3 (This must match the version we requested with GLFW!)
- Profile: Core
- Options: Ensure "Generate a loader" is checked.
Leave the "Extensions" box empty for now. Once configured, click "GENERATE" and then download the resulting .zip file.
Inside the zip, you will find two important folders: include and src.
include/glad/glad.h: The header file containing all the necessary OpenGL function pointer declarations and type definitions.src/glad.c: The source file containing the implementation of the loader function that finds and loads the function pointers.
For a visual walkthrough of this process, the following video is helpful.
Modern OpenGL (Glad) | Game Engine series
This video from The Cherno's game engine series introduces GLAD and walks through the web generation process. It provides good context for what GLAD is and why it's used.
Watch from 02:45 to 06:11. This covers the motivation for using a loader like GLAD and demonstrates the web generation step. You can disregard the parts about the Premake build system for now; we'll cover build systems later.
Step 2: Add GLAD to Your Project
Now, integrate the generated files into your project structure. A good practice is to have a vendor or dependencies directory for third-party code.
- Create a
gladdirectory within your project's include path (e.g.,vendor/glad). - Copy the
gladandKHRdirectories from the zip'sincludefolder into your newvendor/gladdirectory. The path should look likevendor/glad/glad.h. - Copy
src/glad.cinto your project's source directory, alongside your ownmain.c.
When you compile, you will now need to include glad.c in the list of source files to be compiled, just like main.c.
In your main.c file, you need to include the GLAD header. There is a critical rule to follow here:
glad.h must be included before glfw3.h.
#include <glad/glad.h> // MUST be included before GLFW
#include <GLFW/glfw3.h>

// ... rest of the code
This is because glad.h includes the necessary OpenGL headers (like gl.h) and defines macros to prevent glfw3.h from including a conflicting version. Getting this order wrong is a very common source of compilation errors.
Step 3: Initialize GLAD
With the files in place, the final step is to call the loader function. This must be done after you have successfully created a window and made its context current.
The 'Hello Window' tutorial on LearnOpenGL.com provides a concise, code-first explanation of how to initialize GLAD after setting up a GLFW context.
Read the section titled 'GLAD'. It shows the exact code needed to initialize the library and explains the role of glfwGetProcAddress.
As the resource shows, GLAD is initialized by calling gladLoadGLLoader. This function takes a single argument: a pointer to a function that can resolve the addresses of OpenGL functions for the current OS. Conveniently, GLFW provides exactly this function for us: glfwGetProcAddress.
The call looks like this:
// Place this code right after glfwMakeContextCurrent()
if (!gladLoadGLLoader((GLADloadproc)glfwGetProcAddress)) {
    printf("Failed to initialize GLAD\n");
    return -1;
}
The cast to (GLADloadproc) is necessary to match the type that gladLoadGLLoader expects. If this function returns 0 (false), it means the loading failed, and our program should exit.
A Complete Example with Visual Feedback
Let's update the main.c from our previous lesson to include GLAD initialization. To prove that it's working, we'll use two of our newly loaded OpenGL functions, glClearColor and glClear, to change the window's background color from black to a nice blue.
glClearColor(red, green, blue, alpha): Sets the color that the screen will be cleared to. The values are floats from 0.0 to 1.0.glClear(mask): Clears buffers to preset values. Using theGL_COLOR_BUFFER_BITmask tells it to clear the color buffer using the color set byglClearColor.
Here is the complete, updated code:
// main.c


#include <stdio.h>
#include <glad/glad.h> // Must be included before GLFW
#include <GLFW/glfw3.h>

int main(void) {
    // 1. Initialize GLFW
    if (!glfwInit()) {
        printf("Failed to initialize GLFW\n");
        return -1;
    }

    // 2. Set window hints for OpenGL 3.3 Core Profile
    glfwWindowHint(GLFW_CONTEXT_VERSION_MAJOR, 3);
    glfwWindowHint(GLFW_CONTEXT_VERSION_MINOR, 3);
    glfwWindowHint(GLFW_OPENGL_PROFILE, GLFW_OPENGL_CORE_PROFILE);

    // 3. Create the window
    GLFWwindow* window = glfwCreateWindow(800, 600, "GLAD Window", NULL, NULL);
    if (window == NULL) {
        printf("Failed to create GLFW window\n");
        glfwTerminate();
        return -1;
    }

    // 4. Make the window's context current
    glfwMakeContextCurrent(window);

    // 5. Initialize GLAD
    if (!gladLoadGLLoader((GLADloadproc)glfwGetProcAddress)) {
        printf("Failed to initialize GLAD\n");
        glfwTerminate();
        return -1;
    }

    // 6. The Render Loop
    while (!glfwWindowShouldClose(window)) {
        // --- Rendering commands ---

        // Set the clear color (e.g., a cornflower blue)
        glClearColor(0.2f, 0.3f, 0.8f, 1.0f);
        // Clear the color buffer
        glClear(GL_COLOR_BUFFER_BIT);

        // --- End of rendering ---

        // Swap front and back buffers
        glfwSwapBuffers(window);

        // Poll for and process events
        glfwPollEvents();
    }

    // 7. Clean up and terminate
    glfwDestroyWindow(window);
    glfwTerminate();

    return 0;
}
When you compile and run this program (remembering to include glad.c in your build), you should now see a blue window instead of a black one. This is your confirmation that you have successfully loaded and called modern OpenGL functions!
Conclusion
In this lesson, we took the essential step of making modern OpenGL functions available to our program. We now have a complete, minimal foundation for a graphics application.
Key Takeaways:
- Modern OpenGL functions (beyond version 1.1) are not available at compile time and must be loaded from the graphics driver at runtime.
- This is achieved by getting their memory addresses and storing them in function pointers.
- GLAD is a tool that generates the C code (
glad.candglad.h) to perform this loading process for us. - The GLAD header (
glad.h) must be included before the GLFW header (glfw3.h). - GLAD is initialized with
gladLoadGLLoaderafter an OpenGL context is made current withglfwMakeContextCurrent. GLFW provides the necessary address-lookup function,glfwGetProcAddress.
Preview of the Next Lesson:
Our window now has a color, but it's completely static and doesn't respond to us. To build a game, we need interactivity. In the next lesson, we will learn how to configure and handle window events such as user input and resizing. We'll see how to detect key presses and mouse clicks, laying the groundwork for player controls.