Introduction
Hello again! In our last lesson, we successfully made our window interactive by handling resize events with a callback and keyboard input with polling. We ended up with a solid main.c file containing a while loop that already clears the screen and swaps buffers.
Mechanically, you've already implemented the basics for today's learning outcome: Implement a main loop that clears the screen and swaps buffers. However, simply having the code work isn't the same as understanding why it works that way. Today, we're going to dissect that while loop—the very heartbeat of any game or real-time graphics application. We'll formalize the concept of the "game loop" and explore the crucial roles of clearing the screen and a technique called "double buffering." By the end, you'll understand not just what the code does, but why this specific structure is fundamental to modern graphics.
The Game Loop: An Application's Heartbeat
The while loop in our main function is more than just a loop; it's the game loop (or render loop). Its purpose is to run continuously, processing logic and drawing frames to the screen as fast as possible, until the user signals that it's time to quit.
// The condition that keeps our application running
while (!glfwWindowShouldClose(window))
{
    // 1. Check for and process events (like keyboard, mouse)
    glfwPollEvents();

    // 2. Handle game-specific input (polling)
    processInput(window);

    // 3. Update game state (e.g., physics, AI, animations)
    // We will add this in later lessons!

    // 4. Render the new frame
    // ... rendering commands go here ...

    // 5. Display the newly rendered frame
    glfwSwapBuffers(window);
}
The condition !glfwWindowShouldClose(window) is the key. As you learned previously, this function checks a flag that gets set to true when the user clicks the window's close button or when we call glfwSetWindowShouldClose(window, 1) (as we did for the ESC key).
Let's dive into the two most important rendering steps inside this loop: clearing and swapping.
The Illusion of Smooth Motion: Double Buffering
Why do we need to do anything special to draw to the screen? Imagine trying to draw on a single piece of paper while someone is looking over your shoulder. They would see your pencil moving, your eraser marks, and the half-finished drawing. It would look messy and flicker. The same problem happens with computer graphics if we draw directly to the visible screen memory. This can cause visual artifacts like flickering and screen tearing.
The solution is double buffering.
To understand why this is so important and what happens when you don't do things correctly, please watch the following video segment.
The video 'OpenGL Color Buffer' by Jamie King provides an excellent visual demonstration of what happens when you don't clear the screen. It also gives a great intuitive explanation of the front and back buffers.
Watch from 05:03 to 08:46. Pay close attention to the visual artifacts when the buffer isn't cleared and his whiteboard explanation of the front buffer (what you see) and the back buffer (where you draw).
As Jamie King explained, applications use two buffers:
- The Front Buffer: Contains the final, complete image that is currently visible on the screen.
- The Back Buffer: A hidden, off-screen buffer where the application draws the next frame.
The process works like this:
- The application issues all its drawing commands for the current frame to the back buffer.
- Once the entire frame is complete in the back buffer, the two buffers are swapped.
- The back buffer becomes the new front buffer (and is displayed), while the old front buffer becomes the new back buffer, ready to be drawn on for the next frame.
This swap happens instantaneously, so the user only ever sees complete, finished frames. This creates the illusion of smooth animation.
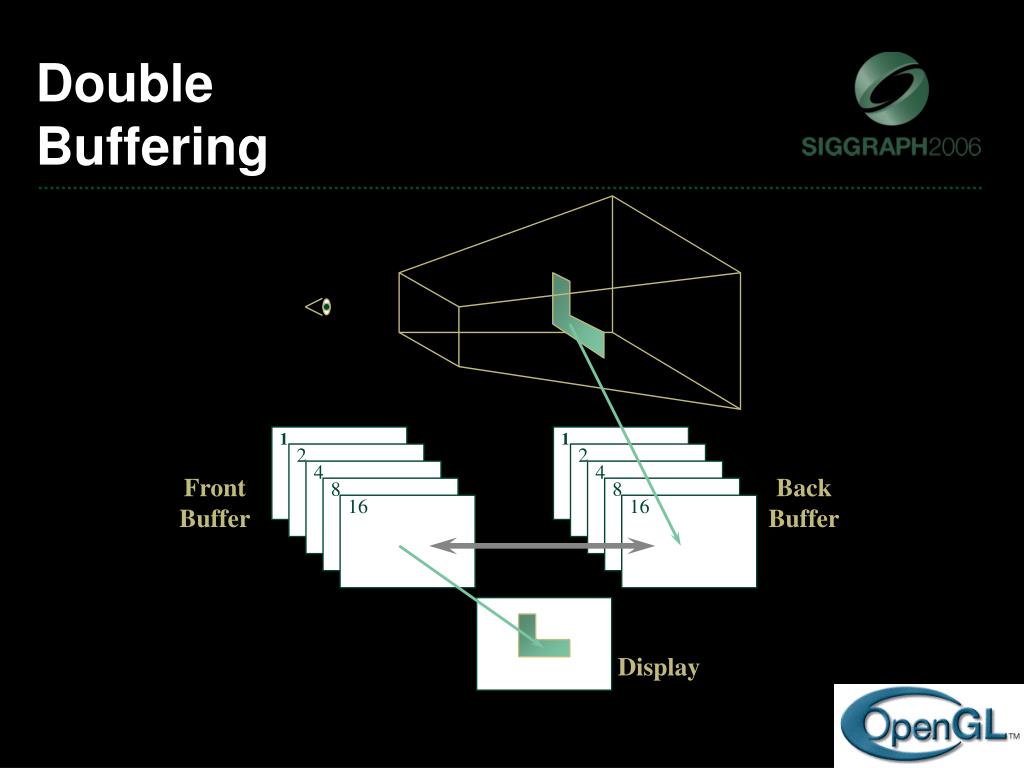
The function that performs this magic is glfwSwapBuffers(window).
For a more detailed textual explanation of this concept and its implementation in GLFW, please review the following resources.
The 'Hello Window' tutorial on LearnOpenGL.com has a concise section explaining this concept. It's a great quick read to solidify your understanding.
First, re-read the main paragraph under 'Ready your engines' to see how glfwSwapBuffers fits into the loop. Then, read the specific callout box titled 'Double buffer'.
The official GLFW documentation provides a more technical look at buffer swapping and an important related concept: V-Sync.
Read the section titled 'Swapping buffers'. This explains not only glfwSwapBuffers but also glfwSwapInterval. Pay attention to the explanation of V-Sync and screen tearing.
A Note on V-Sync
As the GLFW documentation mentions, glfwSwapInterval(1) enables V-Sync (Vertical Synchronization). This tells your application to wait for the monitor's vertical refresh cycle before swapping buffers. This is the ultimate fix for screen tearing but can introduce a small amount of input latency, as your application might have to wait a few milliseconds for the monitor to be ready. For most games, this is a desirable trade-off.
Wiping the Slate Clean: Clearing the Buffer
Now we know we're drawing to a hidden back buffer. But what was in that buffer before we started drawing? As the Jamie King video demonstrated, it contains the image from two frames ago! If we just draw our new objects on top of it, we'll get a "smearing" effect as old drawings persist.
To prevent this, the very first step in our rendering phase must be to clear the buffer. Think of it as erasing a whiteboard before starting a new drawing.
We use two OpenGL functions for this:
glClearColor(r, g, b, a): This is a state-setting function. It doesn't do anything immediately visible. It just configures OpenGL with the color to be used for future clearing operations. The values are floats from0.0to1.0.glClear(GL_COLOR_BUFFER_BIT): This is a state-using function. It performs the actual clear operation, filling the entire color buffer with the color specified by the last call toglClearColor.
The Jamie King video you watched earlier also explains how to fix the smearing issue using glClear.
Let's return to Jamie King's video to see the solution in action.
Watch from 08:46 to 11:54. He first demonstrates how glClear(GL_COLOR_BUFFER_BIT) solves the problem. He then shows how to combine clearing for multiple buffers (like the color and depth buffers) into a single, more efficient call using the bitwise OR | operator. This is a common and important practice.
OpenGL manages several types of buffers. For now, we only care about the color buffer, but in the future, we'll also need to clear the depth buffer (GL_DEPTH_BUFFER_BIT), which is used for 3D perspective. As shown in the video, you can clear multiple buffers at once with a single, efficient command:glClear(GL_COLOR_BUFFER_BIT | GL_DEPTH_BUFFER_BIT);
The Final Loop Structure
Let's review our complete main loop with this new understanding. Each step has a clear purpose and order.
// The Render Loop
while (!glfwWindowShouldClose(window)) {
    // 1. INPUT: Check for events from the OS and update input state.
    // This allows the application to be responsive.
    processInput(window);
    glfwPollEvents();

    // 2. RENDER: Prepare to draw and issue draw commands.
    // First, set the color to use for clearing the screen.
    glClearColor(0.2f, 0.3f, 0.8f, 1.0f);
    // Then, clear the back buffer, wiping the slate clean for this frame.
    glClear(GL_COLOR_BUFFER_BIT);

    // (In future lessons, our glDrawArrays or glDrawElements calls will go here)
    // These commands will draw our triangles, cubes, and models to the back buffer.

    // 3. SWAP: When all rendering is done, present the finished image.
    // The back buffer (with our new drawing) becomes the front buffer.
    glfwSwapBuffers(window);
}
This sequence—Input, Render, Swap—is repeated every frame and forms the fundamental structure of our game engine's main loop.
Conclusion
In this lesson, we put the core structure of our application—the game loop—under the microscope. Though the code was already in place from our last session, you now have the conceptual framework to understand exactly why it's structured the way it is.
Key Takeaways:
- The game loop is a continuous
whileloop that processes input, updates game logic, and renders frames. - Double buffering is a technique used to prevent visual artifacts like flickering and tearing. Rendering is done on a hidden back buffer, which is then swapped with the visible front buffer.
glfwSwapBuffers()is the function that performs the buffer swap, making the newly rendered frame visible.glClear(GL_COLOR_BUFFER_BIT)must be called at the start of each frame's rendering phase to clear the contents of the back buffer from the previous frame.glClearColor()is a state-setting function that defines the color used byglClear().
Preview of the Next Lesson:
We've established the stage: we have a window, and we have a loop that correctly prepares a "canvas" (the back buffer) for drawing each frame. But what happens when we actually want to draw something? The next lesson, "Describe the primary stages of the modern OpenGL rendering pipeline," will take you on a journey through the GPU. You'll learn how the vertices of a triangle get from your computer's memory to becoming colored pixels on the screen. This is our first step into the graphics pipeline itself.