Hello! Welcome to your sixth lesson in the C programming module.
In our last lesson, we dove into function pointers, discovering how they allow us to attach behavior to our structs. We saw how a GameObject could have update and render pointers, allowing different types of objects (players, enemies) to behave differently while being treated uniformly in our code. As we start building these distinct components—a math library, a rendering system, game object logic—our single main.c file will quickly become crowded and difficult to manage.
Today, we'll tackle this problem head-on. Our learning outcome is to organize C code into multiple source and header files. This is a fundamental practice for any C project beyond a simple script, and it's absolutely essential for building something as complex as a game engine. We'll learn how to create clean, reusable "modules" that separate what a piece of code does from how it does it.
Why Separate Files? The Compiler and the Linker
So far, we've compiled our programs with a single command like gcc main.c -o my_program. This command actually performs several steps, but the two most important for us are compilation and linking. Understanding their distinct roles is the key to understanding why header files are necessary.
- The Compiler: Reads one
.csource file at a time and translates it into an intermediate "object file" (.o). It doesn't know about code in other.cfiles. Ifmain.ccalls a functionadd_vectors(), the compiler needs to be told that this function exists, what arguments it takes, and what it returns. This is called a declaration. - The Linker: Takes all the compiled object files (
main.o,math.o, etc.) and "links" them together into a single executable file. It finds the actual code foradd_vectors()(its definition) in one object file and connects the call from another.
When you put everything in one file, these distinctions are hidden. When you split your code, you must manage them explicitly. This video provides an excellent conceptual breakdown of this process.
why do header files even exist?
The video 'why do header files even exist?' from the Low Level channel clearly explains the difference between compile time and link time, and why the compiler needs declarations to do its job.
Watch from the beginning to 05:12. Pay close attention to the distinction between compile-time and link-time errors, and the 'spiky ball' analogy for object files and their dependencies.
The Solution: Interface and Implementation
To solve the problem of declarations, C uses a powerful convention: splitting modules into two file types.
-
Header Files (
.h): The Public Interface- A header file contains declarations. It's like a public menu for your module, telling other parts of the program what functionality is available.
- It typically contains:
- Function prototypes (e.g.,
vector add_vectors(vector v1, vector v2);). struct,union, andenumdefinitions.typedefaliases.externglobal variable declarations (more on this later).
- Function prototypes (e.g.,
-
Source Files (
.c): The Private Implementation- A source file contains definitions. It's the "kitchen" where the work described in the header file's "menu" is actually done.
- It contains the function bodies (the actual code inside the curly braces
{...}).
Let's see how this works in practice. We'll watch a video where Mike Shah builds a small, reusable math library for a vector type—a perfect example for our game engine journey.
Your Second Day in C (Understand .h header and .c source files) - Crash Course in C Programming
In this video from his 'Crash Course in C' series, Mike Shah walks through the entire process of creating a simple math module, demonstrating the roles of the .c and .h files.
Watch from the beginning to 08:00. This section covers the core concepts: what goes into a header file (the interface) versus a source file (the implementation), and then demonstrates it by creating mic_math.h and mic_math.c.
Using Your Module: #include and Header Guards
Now that you have a module, how do other files use it? And what stops things from breaking if a header is included more than once?
The #include Directive
The #include directive is a command for the C preprocessor. It's a simple text-based operation: it literally copies the entire content of the specified file and pastes it into the current file before compilation begins.
You'll see two forms of #include:
#include <stdio.h>: The angle brackets tell the compiler to look in the standard system directories where library headers are stored.#include "my_math.h": The double quotes tell the compiler to look in the current directory (or other user-specified directories) first. You use this for your own project's headers.
The Problem of Multiple Inclusions
Imagine player.c includes vector_math.h, and physics.c also includes vector_math.h. If your main file then includes both player.h and physics.h, you might end up with the contents of vector_math.h pasted into your code twice. This would lead to "redeclaration" or "redifinition" errors, as the compiler would see the same struct and function prototypes defined multiple times.
To prevent this, we use header guards. These are special preprocessor directives that ensure the content of a header is only included once per compilation unit.
Let's return to the Mike Shah video to see how this is implemented and how to tie it all together.
Your Second Day in C (Understand .h header and .c source files) - Crash Course in C Programming
This next segment of the video is crucial. It explains header guards and shows how to include and use your custom module in main.c.
Watch from 08:00 to 20:43. This covers three key topics: the purpose and syntax of header guards (#ifndef), how to #include and use your custom module in main.c, and the compilation commands needed for a multi-file project.
The syntax for a header guard in a file named my_header.h is:
#ifndef MY_HEADER_H
#define MY_HEADER_H

// All of your header content goes here...
// (struct definitions, function prototypes, etc.)


#endif // MY_HEADER_H
The first time the compiler sees this, MY_HEADER_H is not defined, so it proceeds to define it and includes the file's content. On any subsequent encounter in the same compilation run, MY_HEADER_H is already defined, and the preprocessor skips the entire block.
The Full Build Process
Let's formalize the steps to compile and link a multi-file project.
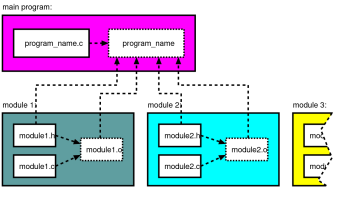
As shown in the diagram and the video, the process is:
- Compile each source file individually. Use the
-cflag withgccto tell it "compile only, don't link." This turns each.cfile into a corresponding.o(object) file.# Compiles main.c into main.o gcc -Wall -c main.c -o main.o # Compiles my_math.c into my_math.o gcc -Wall -c my_math.c -o my_math.o - Link all the object files together. This final step resolves all the dependencies (like the call to
add()inmain.oand its definition inmy_math.o) and creates the final executable.# Links main.o and my_math.o into an executable named 'game' gcc main.o my_math.o -o game
For a different perspective and to reinforce these commands, the following reading provides a clear, text-based tutorial on the process.
The 'Separate Compilation Tutorial' from the University of Utah provides a concise, step-by-step guide to compiling and linking multi-file C programs.
Read through the sections titled 'Compiling Files', 'Compiling Multiple Files', 'Declaring Functions', 'Include Files', and 'Summary'. These sections walk through the motivation and the exact commands for compiling object files and linking them.
Best Practices for Healthy Code
Organizing code is not just about making it compile; it's about making it maintainable, reusable, and easy to understand. Here are some foundational guidelines to adopt.
- One Module, One Purpose: Each module (
.h/.cpair) should represent a clear, distinct piece of functionality (e.g.,vector_math,file_io,renderer). (Guideline #1 from LINK) - Interface vs. Implementation: A header should only contain what is necessary for other modules to use it. The corresponding
.cfile contains the implementation details. (Guideline #4 from LINK) - Hide Your Secrets: If a function or global variable is only used inside its own
.cfile, declare it asstatic. This gives it "internal linkage," meaning the linker won't make it visible to other modules. This prevents naming conflicts and enforces good encapsulation. (Guideline #6 from LINK) - Include Your Own Header: A
.cfile should always include its own corresponding.hfile (e.g.,my_math.cshould#include "my_math.h"). This allows the compiler to check that your declarations in the header match your definitions in the source file. - NEVER Include a
.cfile: Writing#include "my_stuff.c"is always a mistake. It breaks the compilation model and creates massive confusion. (Guideline #11 from LINK)
This linked PDF provides a more thorough list of professional guidelines. You don't need to memorize it, but skimming it will give you a strong sense of how to structure C code properly.
For a deeper dive into professional best practices, this handout on C Header File Guidelines from UC Santa Cruz is an excellent reference.
Skim through the introduction and guidelines 1, 2, 3, 4, 6, and 11. Focus on the core principles we've discussed today.
Conclusion
You've now taken a massive step from writing simple C programs to structuring a large-scale C project. Mastering the separation of code into header and source files is a non-negotiable skill for building your game engine. It enforces a clean architecture, improves compilation times, and makes your code vastly easier to navigate and debug.
Key Takeaways:
- C projects are split into header (
.h) files for public declarations (the interface) and source (.c) files for private definitions (the implementation). - The compiler turns one
.cfile into one.oobject file. It needs declarations from header files to work. - The linker combines all
.oobject files into a single executable, resolving references between them. - Header guards (
#ifndef/#define/#endif) are essential to prevent errors from including a header multiple times. - The build process is a two-step sequence: compile all
.cfiles to.ofiles, then link all.ofiles into an executable.
In our previous lessons, we've focused on the C language itself. Now that we know how to organize a project, we can start building the tools our engine will need. In the next lesson, we'll create our first utility module to read from and write to files using C standard library functions. This is the first step toward loading game assets like models, textures, and save data.