Hello! Welcome back to our course on affiliate marketing with ClickBank.
Introduction
In our last lesson, we focused on driving traffic to your website by engaging in online communities like Reddit and Facebook Groups. You learned how to provide value and build authority to attract potential customers.
But once that traffic starts coming, a critical question arises: Which of your efforts are actually working? If you get a sale, did it come from your blog post, a comment you left in a Facebook group, or a helpful answer you wrote on Quora? Without knowing the answer, you're flying blind.
This lesson will give you the vision you need. We'll tackle the learning outcome: Set up ClickBank Tracking IDs (TIDs) to attribute clicks to specific content or campaigns. You'll learn how to "tag" every affiliate link you create so you can see exactly which marketing activities are driving clicks and, most importantly, earning you commissions.
Why Basic Affiliate Links Aren't Enough
As you know, your ClickBank HopLink is the special URL that tells ClickBank to credit you for a sale. If you use the same generic HopLink everywhere, all your sales will be lumped together in your reports. You'll know you made money, but you won't know how.
Think of it like running a small business with three different pop-up shops around town. If you use a single, unlabeled cash box to collect money from all three, at the end of the day you'll know your total revenue, but you'll have no idea which location was the most profitable. Should you invest more in Shop A, B, or C? It's impossible to say.
Tracking IDs solve this problem by acting as a label for each "cash box." To see this explained in the context of ClickBank, let's start with a short reading.
What is a ClickBank Hoplink and How Does It Work?
This article from LinkTrackr explains very clearly why a basic HopLink isn't enough for effective marketing and introduces the concept of a 'tracking hoplink'.
Please read the section titled 'How to Create “Tracking” Hoplinks.' Focus on understanding the core problem: a basic link doesn't tell you where you made a sale, and how adding a simple tag solves this.
The Anatomy of a Trackable HopLink
As the article explained, the solution is to add a Tracking ID (TID) to your HopLink. A TID is simply a short piece of text that you add to the end of your link to act as a unique identifier.
The official ClickBank guide provides the precise format and rules for doing this. It's a fundamental skill you'll use constantly.
Now that you understand the 'why,' let's look at the official ClickBank documentation for the 'how.' This guide shows the exact format and rules for using Tracking IDs.
Please read the section titled 'Using Tracking IDs with HopLinks.' Pay close attention to: The definition and character rules for a TID (alphanumeric, up to 100 characters, no dashes). The exact format for adding a TID to your HopLink: ?tid=YOUR_TID_HERE The practical examples of creating different TIDs for a blog, Facebook, and Twitter.
The key takeaway is that you can create as many unique, trackable links as you need, all pointing to the same product. Each link will just have a different TID at the end.
How to Create Your Trackable Links in ClickBank
Now for the practical part. Let's walk through how you actually generate these links inside your ClickBank account. There are a couple of ways to do this.
Historically, you could use a tool to create a HopLink and add your TID in a simple field.
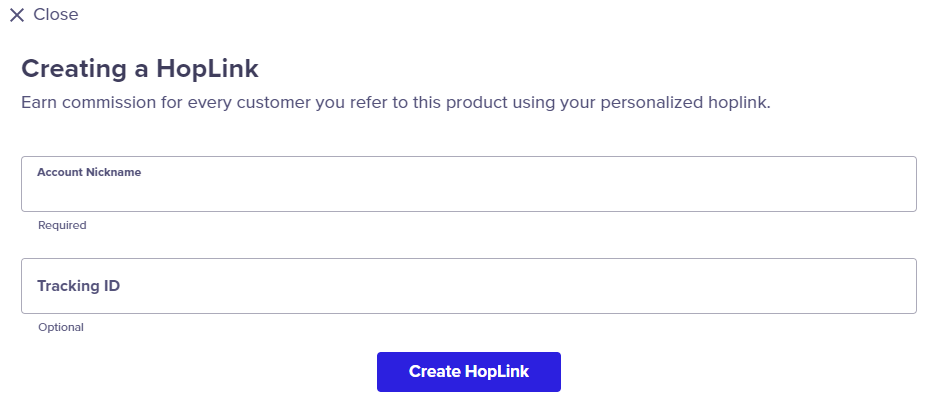
Today, the ClickBank marketplace has a more advanced and powerful link generator. This next video from ClickBank's official channel will show you the modern process.
How to Make Money with ClickBank in 2026 (Complete Beginner Tutorial)
This video walks through the current process of generating an affiliate link in the marketplace. It covers the basics and then dives into using tracking parameters.
Please watch from 18:00 to 22:13. The first part (18:00 - 19:49) is a quick review of generating the basic link. The key section is 19:49 to 22:13, which explains tracking parameters. Notice how they use TIDs like 'YT2026' for YouTube and 'TT2026' for TikTok, and also introduce other useful parameters like 'traffic_source'.
The pop-up window shown in the video is your new best friend for creating clean, trackable links.

Best Practice: Develop a Consistent Naming Convention
Now for a pro tip that will save you massive headaches later: be consistent with your TIDs.
If you use facebook, FB, and fb_group for different links, your reports will treat them as three separate sources, making analysis difficult. You need a system.
Here is a simple but powerful convention you can use:source_placement_identifier
source: Where is the traffic coming from?blog(your website)eml(your email list)fb(Facebook)rdt(Reddit)qra(Quora)
placement: Where on that source is the link?review1(your first review article)sidebar(the sidebar widget on your blog)groupname(a specific Facebook group)welcome1(the first email in your welcome sequence)
identifier: What specific link is it? (Useful if you have multiple links in one place)ctabutton(the main call-to-action button)textlink(an in-text link)image(a clickable image)
Let's create some examples based on what you've learned:
-
The main button in your product review article:
- HopLink:
https://hop.clickbank.net/... - TID:
?tid=blog_review1_ctabutton
- HopLink:
-
A link you share in a comment in the "DogLovers" Facebook group:
- HopLink:
https://hop.clickbank.net/... - TID:
?tid=fb_doglovers_comment
- HopLink:
-
A link in your answer to a Quora question about puppy training:
- HopLink:
https://hop.clickbank.net/... - TID:
?tid=qra_puppytraining_answer
- HopLink:
By using this system, you'll be able to look at your future ClickBank reports and know exactly which link generated a click or a sale.
Conclusion
You now have the power to move from guessing to knowing. By using Tracking IDs, you can measure the effectiveness of every single affiliate link you place online. This is the foundation of data-driven marketing, allowing you to stop wasting time on things that don't work and double down on the strategies that do.
Key Takeaways:
- Tracking is essential: Without it, you cannot optimize your marketing efforts.
- TIDs are your tool: A Tracking ID (TID) is a simple label you add to a HopLink to identify its source.
- The format is simple: Add
?tid=yourlabelto the end of any HopLink. - Consistency is key: Develop and stick to a clear naming convention for your TIDs to keep your reports clean and easy to analyze.
Preview of the next lesson:
ClickBank TIDs tell you what happens after someone clicks your link (i.e., if they buy). But what about what happens before? How do visitors find your website in the first place, and what do they do once they get there?
In our next lesson, we will install the most powerful tool for answering these questions: Google Analytics. You will learn how to use Google Analytics to identify your most popular pages and traffic sources, giving you the other half of the tracking puzzle.