Hello! Welcome to your first lesson in learning Figma. I'm excited to guide you on this journey. Given your background in illustration and writing, you already have a strong creative foundation. This course is designed to help you channel that creativity into designing user interfaces (UI) for apps and websites.
We'll take a "learning by doing" approach, starting with hands-on tasks right away. Today's goal is to master the very first step of any design project: creating a new Figma file and setting up a mobile device frame. Think of this as preparing your canvas before you start a new painting. It’s a fundamental skill that you'll use every time you begin a new project.
Let's get started.
Creating Your First Figma File
Every project in Figma starts with a new file. This file will contain all your screens, assets, and design elements. The process is straightforward.
To see how it's done, watch the first few seconds of the following video. It provides a clear, quick demonstration. I recommend having Figma open so you can follow along.
Figma Wireframe Tutorial for Beginners
This short clip from the video 'Figma Wireframe Tutorial for Beginners' by Aliena Cai will show you how to create and name a new design file.
Watch from 0:13 to 0:35. Focus on how a new file is created from the main dashboard and how it's renamed at the top of the editor. Go ahead and name your file something like 'My First App'.
As you saw in the video, the steps are:
- From your Figma dashboard, click the New design file button.
- A new, empty file opens with a blank area called the Canvas.
- Click on the default title, "Untitled," at the top-center of the screen to give your file a descriptive name.
Setting Up a Mobile Frame
Now that you have your file, you need a dedicated space to create your design. In Figma, this is called a Frame.
A Frame is a container for your design elements. For UI design, you'll typically set the frame's dimensions to match the device you are designing for, like a specific smartphone or tablet. This is very similar to choosing the size of your paper or canvas before you start drawing.
This next clip from the same video demonstrates how to create a frame for a mobile device.
Figma Wireframe Tutorial for Beginners
Let's continue with the same video to see how to add a mobile frame to your canvas.
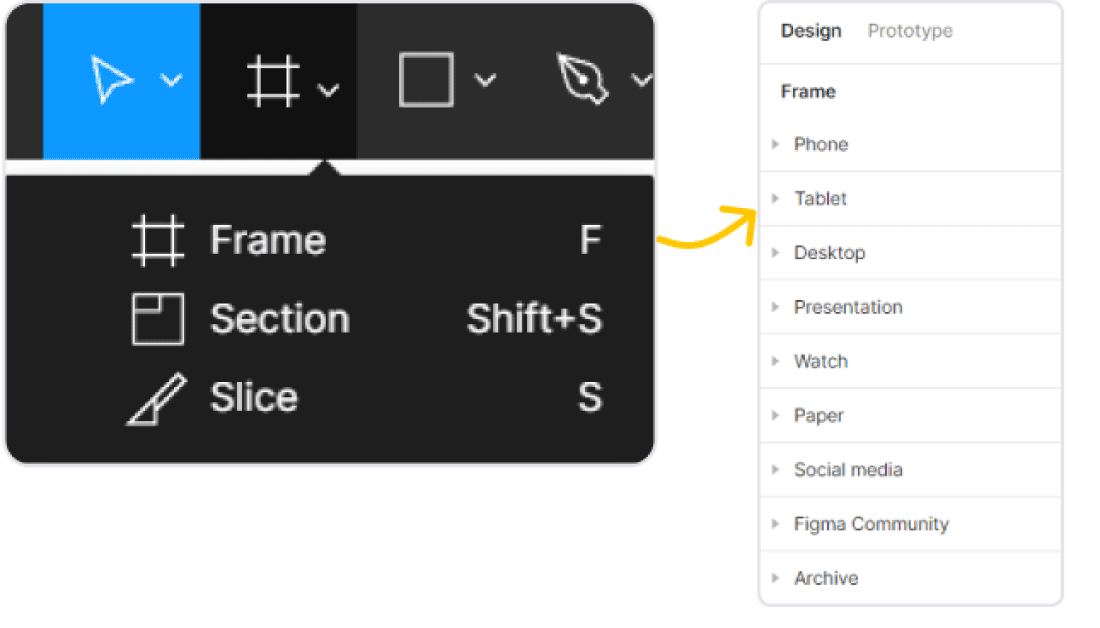
Watch from 0:35 to 0:57. Pay attention to the Frame Tool in the top toolbar and the Design panel that appears on the right, which lists preset device sizes.
To make this even clearer, here is an image highlighting the key interface elements:
Now, it's your turn to practice.
- Click the Frame Tool in the toolbar (it looks like a hash symbol). A useful shortcut for this is to simply press the
Fkey on your keyboard. - The Design panel will appear on the right side of your screen.
- Under the "Phone" category, select a device. For this exercise, let's choose iPhone 14.
You should now see a white rectangle on your canvas with "iPhone 14 - 1" written above it. This is your first frame!

Test your understanding!
You've successfully created a frame for a phone. Now, imagine the client also wants to see what the app would look like on a small tablet.
How would you add a frame for an "iPad Mini 8.3"" to your canvas, right next to your iPhone frame?
Show answer
- Make sure no other elements are selected by clicking on the gray canvas area.
- Select the Frame Tool again from the toolbar (or press the
Fkey). - In the Design panel on the right, find the Tablet category.
- Click on iPad Mini 8.3" from the list. A new frame for the iPad will appear on your canvas.
Conclusion
Great work! In this first lesson, you've learned the two most fundamental skills in Figma:
- Creating a new design file to house your project.
- Setting up a device frame, which acts as the canvas for your user interface.
You are now ready to start building. Every app or website design in Figma begins with exactly these steps.
In our next lesson, we will begin to bring our app screen to life. We will learn how to draw and arrange basic shapes like rectangles and ellipses to build common UI elements like buttons and avatars.