Hello! Welcome to your first lesson in our FastAPI course.
Your goal is to build powerful APIs for your AI and machine learning projects. Before we can start building our own APIs with FastAPI, it's crucial to understand how to interact with existing ones. Think of it like learning to order food at a restaurant before you try to run the kitchen.
In this lesson, we'll act as a client application. You will learn how to send HTTP requests to a public API and dissect the responses you get back. We will focus on using Postman, a graphical tool that makes this process straightforward and visual. By the end of this lesson, you'll be able to look at an API interaction and confidently identify the request method, URL, headers, and the structure of the response.
1. The Anatomy of an API Call
At its core, interacting with a web API is a conversation between a client (the one making a request) and a server (the one providing a response). This conversation follows a set of rules called the Hypertext Transfer Protocol (HTTP).
Every interaction has two parts:
-
The Request: The client sends a request to a specific URL on the server. This request includes:
- An HTTP Method (or verb) that specifies the intended action (e.g.,
GETto retrieve data). - A URL (or endpoint) that identifies the resource you want to interact with.
- Headers, which contain metadata about the request (e.g., what format the client expects the data in).
- An optional Body, which contains data you're sending to the server (e.g., user information for a new account).
- An HTTP Method (or verb) that specifies the intended action (e.g.,
-
The Response: The server processes the request and sends back a response, which includes:
- A Status Code indicating the outcome (e.g.,
200 OKfor success,404 Not Foundif the resource doesn't exist). - Headers, which contain metadata about the response (e.g., what format the data is in).
- An optional Body, which contains the data the client asked for (e.g., a list of users, or the details of a single product).
- A Status Code indicating the outcome (e.g.,
This request-response cycle is the fundamental building block of all web APIs.
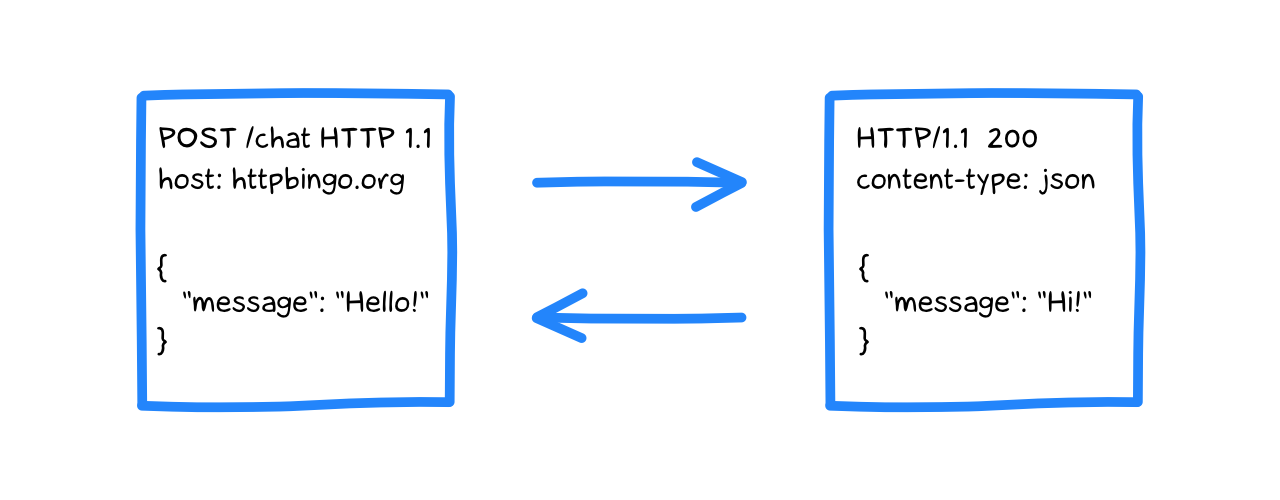
To get a more formal definition of these components, please read the following short sections from a helpful guide.
This article from Medium provides a clear breakdown of the components that make up an HTTP request and response.
Please read the two sections titled 'The Request' and 'The Response' to solidify your understanding of these key components.
2. Your API Toolkit: Installing and Setting Up Postman
While you can make HTTP requests using Python libraries like requests, specialized API clients like Postman provide a much better experience for testing and exploration. Postman gives you a graphical user interface to build any kind of request, send it, and inspect the response in detail.
Let's get Postman set up on your machine.
Postman API Testing Tutorial | Postman Tutorial For Beginners 2025
The following video from the Code Bless You channel provides a quick guide to downloading Postman and creating your first workspace. There's no need to create an account if you don't want to; you can skip that step and use it locally.
Watch the video from the beginning until 01:23 to see how to install Postman and get the interface ready for our first request.
3. Hands-On: Making Your First GET Request
Now that Postman is ready, let's use it to fetch some data from a public API. We'll use JSONPlaceholder, a free fake API that's perfect for practice. We'll ask it for data about a specific blog post.
Follow these steps in Postman:
- Create a new request (click the
+tab). - In the dropdown menu, ensure the HTTP method is set to GET.
- In the URL bar, enter:
https://jsonplaceholder.typicode.com/posts/1 - Click the blue Send button.
You should see a response appear in the bottom pane of the Postman window. Let's watch a video demonstrating this process to make sure you're on the right track.
Postman API Testing Tutorial | Postman Tutorial For Beginners 2025
This clip from the same tutorial shows how to make a basic GET request and where to find the response.
Watch from 01:23 to 03:21. The video uses a different API ('simple-book-api'), but the steps and the Postman interface are exactly the same. Focus on how the URL is entered, the request is sent, and where the response data and status code appear.
Now, let's identify the key components from the learning outcome using the response you received in Postman for the jsonplaceholder request:
- Request Method: Look at the dropdown next to the URL. It should say
GET. You told the server you want to get information. - URL: The address
https://jsonplaceholder.typicode.com/posts/1you entered. This identifies the exact resource you want. - Response Structure:
- Status: In the response pane, look for
Status: 200 OK. This is the server confirming your request was successful. - Body: This is the main content area in the response pane, showing the JSON data for post #1. It's automatically formatted for readability under the "Pretty" tab.
- Headers: Click the "Headers" tab in the response pane. You'll see a list of key-value pairs. Find the
Content-Typeheader. It should beapplication/json; charset=utf-8, which is the server telling you the body contains JSON data.
- Status: In the response pane, look for
4. Adding Specificity: Path and Query Parameters
URLs can contain more than just a base address. They often include parameters to specify or filter the resources you're interested in.
Path Parameters are part of the URL path and are used to identify a single, unique resource.
- In our last request,
https://jsonplaceholder.typicode.com/posts/1, the/1is a path parameter. It specifies that we want the post withid=1. - Try changing it to
/2and sending the request again. You'll get a different post.
Query Parameters are key-value pairs added to the end of a URL after a ?. They are used to sort, filter, or paginate results.
- Let's get all the posts written by
userId=1. Change the URL to:https://jsonplaceholder.typicode.com/posts?userId=1 - In Postman, you can also use the "Params" tab just below the URL bar. If you type
userIdin the "Key" field and1in the "Value" field, Postman will automatically add it to the URL for you. Send the request and you'll see a list of posts, all with"userId": 1.
The following video segments demonstrate how Postman handles both types of parameters.
Postman API Testing Tutorial | Postman Tutorial For Beginners 2025
These short clips illustrate how to work with path and query parameters in the Postman interface.
First, watch from 04:09 to 05:00 to see how Postman handles path parameters. Then, watch from 03:21 to 04:09 to see how to add query parameters using the 'Params' tab.
5. A Command-Line Alternative: curl
While Postman is great for visual exploration, you'll often see APIs documented with curl examples. curl is a powerful command-line tool for transferring data with URLs. Since you're proficient with Python and likely comfortable in the terminal, it's a valuable tool to know.
To perform the same request we made earlier, open your terminal and run:
curl -X GET https://jsonplaceholder.typicode.com/posts/1
You'll see the JSON response printed directly to your terminal.
Let's break that down:
curl: The command itself.-X GET: The-Xflag specifies the request method.GETis often the default, so you could even omit it.https://...: The URL of the resource.
One limitation is that curl by default only shows the response body. To see the status code and headers (which are crucial for debugging!), you can add the -i (include headers) flag:
curl -i https://jsonplaceholder.typicode.com/posts/1
Now the output will start with the HTTP status line (e.g., HTTP/2 200) and the response headers, followed by the JSON body. This gives you the full picture, just like in Postman.
Testing REST API with Postman and curl
For a quick reference on using curl for different types of requests, check out this GeeksforGeeks article. We are only focusing on the GET request for now.
Read the section titled 'Using cURL for API Testing'. Pay attention to the syntax for the GET request example. We will cover POST requests in a later lesson.
Conclusion
Congratulations on completing your first lesson! You've taken a critical first step into the world of APIs.
Here are the key takeaways:
- API interactions are based on a request-response cycle using the HTTP protocol.
- A request consists of a method, URL, headers, and an optional body.
- A response consists of a status code, headers, and an optional body.
- Postman is a graphical tool that allows you to easily build requests and inspect every part of the response.
curlis a command-line tool that achieves the same goal, ideal for scripting and quick tests in the terminal.
So far, we've only focused on retrieving data using the GET method. In the next lesson, we will explore how to use other fundamental HTTP methods—POST, PUT, and DELETE—to create, update, and delete data through an API. This will complete your foundational understanding of how to interact with any REST API.