Hello! Welcome to the final lesson in our FastAPI course.
In our last session, we successfully packaged our application into a Docker container and pushed it to Google Artifact Registry. Your application image is now securely stored in the cloud, ready for its final journey to a live environment.
Today, we will complete the deployment process. Our goal is to deploy the container image from Artifact Registry to Google Cloud Run. By the end of this lesson, your FastAPI application will be running on Google's serverless infrastructure, accessible to the world via a public URL. This is the moment where all our previous work—building the API, containerizing it, and storing the image—comes together.
Let's look at where this step fits into the overall process.
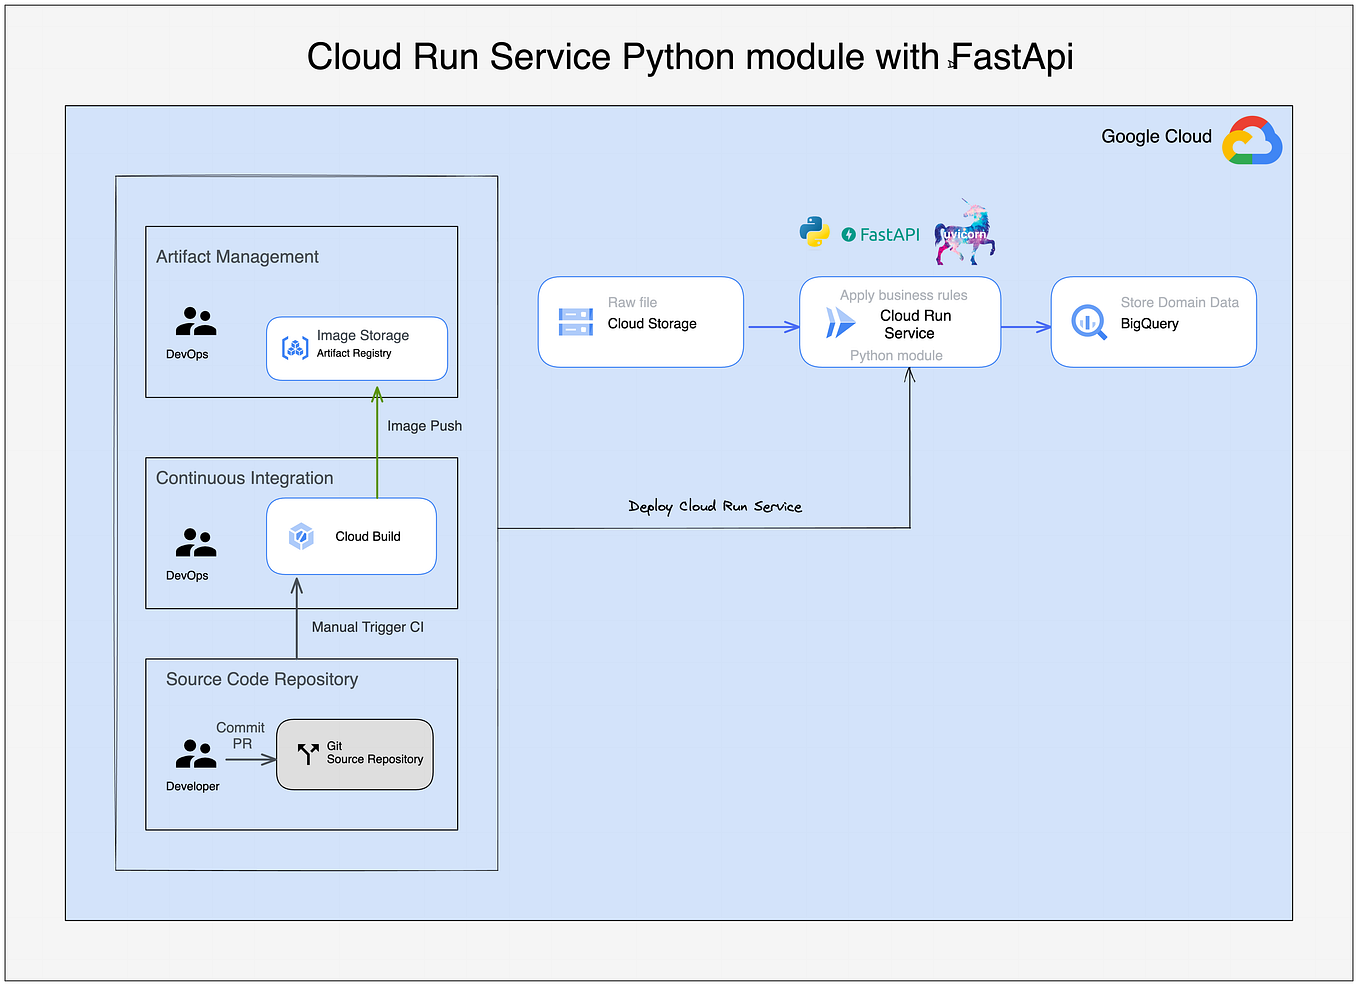
Step 1: Enable the Cloud Run API
Before we can deploy anything, we must ensure that the Cloud Run API is enabled for your Google Cloud project. This is a one-time setup step that grants your project permission to use the Cloud Run service.
You can do this with a single command in your terminal using the gcloud CLI:
gcloud services enable run.googleapis.com
If the API is already enabled, the command will simply confirm it. If not, it will enable it for you.
Step 2: Deploy Your Image to Cloud Run
With the API enabled, we can now proceed with the deployment. The most direct and repeatable way to do this is with the gcloud CLI. The primary command we'll use is gcloud run deploy.
Let's watch a video that demonstrates this exact process. The video shows deploying an ML model service, which aligns perfectly with your goals.
Quick & Easy Deploy ML Model into Google Cloud. Explained.
The video 'Quick & Easy Deploy ML Model into Google Cloud. Explained.' by Daniel provides a clear, step-by-step walkthrough of the deployment command.
Watch the segment from 17:33 to 19:42. Pay close attention to the structure of the gcloud run deploy command and the options used, especially --allow-unauthenticated. The video also shows how to test the resulting URL with curl, which we will do in the next step.
As you saw in the video, the deployment is handled by a single, powerful command. Let's break it down so you can adapt it for your own project.
The command template is:
gcloud run deploy [SERVICE_NAME] --image [IMAGE_URL] --region [REGION] --allow-unauthenticated
Here’s what each part means:
[SERVICE_NAME]: This will be the name of your deployed service (e.g.,my-fastapi-service). Cloud Run will use this name to create the service's URL. Keep it simple and descriptive.--image [IMAGE_URL]: This is the full path to your container image in Artifact Registry. You constructed this path in the previous lesson. It looks likeLOCATION-docker.pkg.dev/PROJECT-ID/REPOSITORY/IMAGE:TAG.--region [REGION]: The Google Cloud region where your service will run. For best performance, this should be the same region where your Artifact Registry repository is located.--allow-unauthenticated: This is a critical flag. It makes your API endpoint public, meaning anyone with the URL can access it. For a public website or a personal project you want to share, this is what you want. If you were building an internal corporate tool or an API that handles sensitive data, you would omit this flag to make the service private by default, which we will touch on later.
Your Turn to Deploy
Now, open your terminal and run the command, replacing the placeholders with your own values.
Example:
If your service name is fastapi-ml-api, your image URL is us-central1-docker.pkg.dev/cool-project-123/fastapi-apps/my-fastapi-app:v1, and your region is us-central1, the command would be:
gcloud run deploy fastapi-ml-api \
    --image us-central1-docker.pkg.dev/cool-project-123/fastapi-apps/my-fastapi-app:v1 \
    --region us-central1 \
    --allow-unauthenticated
The CLI will prompt you to confirm the details. Once you confirm, Google Cloud will pull your image, create the necessary infrastructure, and start your service. This may take a minute or two.
Step 3: Test Your Deployed API
Once the deployment is complete, the gcloud command will print a success message and, most importantly, the Service URL. This is the public endpoint for your API.
It's time to verify that everything is working.
Method 1: The Interactive Docs (Swagger UI)
The easiest way to check a FastAPI application is to visit its interactive documentation. Copy the Service URL from your terminal, paste it into your web browser, and add /docs to the end.
For example: https://my-service-name-blahblah-uc.a.run.app/docs
If everything is correct, you should see the familiar Swagger UI, just like when you were running the app locally. You can even test your endpoints directly from this page.
Method 2: Using curl
For a programmatic check, you can use a command-line tool like curl. This is what was shown in the video you watched. If your API has a simple GET endpoint at the root (/), you can test it like this:
curl YOUR_SERVICE_URL
If you have a POST endpoint, for example at /predict, you would structure the request like this:
curl -X POST "YOUR_SERVICE_URL/predict" \
    -H "Content-Type: application/json" \
    -d '{"input_feature": "some_value"}'
A successful response from your API confirms that your deployment is live and working correctly.
Alternative Method: Using the Google Cloud Console
While the CLI is efficient and scriptable, you might sometimes prefer a graphical interface. Google Cloud's web console provides a user-friendly way to deploy services.
Deploying container images to Cloud Run
The official Google Cloud documentation provides a clear, step-by-step guide for deploying through the web interface.
Read the section under the 'Console' tab. This will walk you through the 'Create service' form. You don't have to follow it now, but it's good to know this alternative exists. Notice how the fields in the form correspond to the flags we used in the gcloud command (service name, region, authentication).
The form in the console guides you through selecting your container image, naming your service, and choosing the authentication method.

A Note on Updates and Revisions
When you run the gcloud run deploy command again for an existing service (perhaps with a new image tag like :v2), you aren't overwriting the service. Instead, Cloud Run creates a new revision. Each revision is an immutable snapshot of your service's code and configuration.
By default, Cloud Run directs 100% of traffic to the latest successful revision. However, it also keeps the old revision(s) available, making it easy to roll back instantly if you discover a bug. This revision system is a powerful feature for managing updates safely in a production environment.
Conclusion and Next Steps
Congratulations! You have successfully deployed a containerized FastAPI application to the cloud. You now have a live, scalable, and secure API endpoint.
Key Takeaways:
- Google Cloud Run is a serverless platform that runs containers.
- The
gcloud run deploycommand is the primary tool for deploying your container images from Artifact Registry. - The
--imageflag specifies the full path to your container, while--allow-unauthenticatedmakes the service public. - After deployment, you receive a public URL that you can test with a browser or tools like
curl. - Every deployment creates a new, immutable revision, enabling safe updates and rollbacks.
You have now completed the entire journey from a local Python script to a globally available web API. You've mastered the core skills to build, containerize, and deploy FastAPI applications, putting you in a great position to develop and serve your own AI/ML models or build other complex backend systems.
From here, you can explore more advanced topics on your own, such as:
- Automating deployments with a CI/CD pipeline using Cloud Build.
- Managing secrets and configuration for different environments (development, production).
- Securing your API with JWT authentication to control access.
- Monitoring and logging to understand your API's performance and usage.
This course has given you the foundation. Happy building