Hello! Welcome back to our FastAPI course.
In our last lesson, we explored how to use Depends to inject shared logic into specific endpoints. This is a powerful way to reduce code duplication for tasks like handling common query parameters or, as we'll see later, providing a database session.
But what if you need to run a piece of code for every single request that comes into your application? For example, what if you want to log every incoming request, measure its processing time, or add a specific header to every response? Repeating this logic in every endpoint, or even in a dependency used by every endpoint, would be cumbersome. This is where middleware comes in.
This lesson addresses that exact need. Our learning outcome is to: Add custom middleware to an application to perform actions on every request, such as logging.
This is a fundamental skill for building production-ready applications, as it allows you to handle cross-cutting concerns like monitoring, authentication, and error handling in a clean, centralized way.
1. What is Middleware? The "Onion" Model
A middleware is a function that sits between the web server and your API's route handlers. It intercepts every incoming request on its way to an endpoint and every outgoing response on its way back to the client.
You can have multiple middleware layers, which are often visualized as an "onion." A request travels from the outermost layer to the innermost, and the response travels back out in the reverse order.
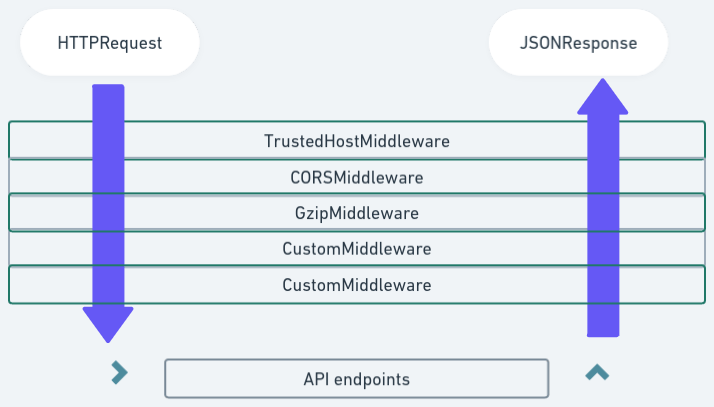
To get a concise definition, let's start with the official FastAPI documentation.
The official documentation provides the most direct definition of middleware and its role in the request-response cycle.
Read the introductory section, up to 'Create a middleware'. Focus on understanding that middleware works with every request before the path operation and every response before it's returned.
In essence, middleware is the perfect tool for logic that applies globally to your application.
2. Creating a Custom Middleware for Logging
The most common use case for middleware is logging. A good log can tell you what happened, when it happened, and how long it took—invaluable information for debugging and monitoring, especially for ML model APIs where you want to track inference times and request payloads.
Let's see how to build a middleware that logs key details about every request. A middleware function in FastAPI is an async function that accepts two arguments:
request: Request: The incoming request object.call_next: A function that youawaitto pass the request to the next layer in the "onion" (either another middleware or the route handler itself).
The general flow is:
- Code to run before the endpoint is executed.
response = await call_next(request)- Code to run after the endpoint has produced a response.
return response
This video provides a clear, step-by-step guide to creating a logging middleware from scratch.
Logging in FastAPI Apps / Writing a FastAPI Middleware
This video from Better Stack is excellent. It walks through setting up Python's logging and then creating a FastAPI middleware to log request details and processing time.
Watch the video from 14:17 to 19:04 and 25:01 to 27:35. You can skip the parts about the 'Better Stack' platform itself. Focus on: (14:17 - 19:04) How to define a middleware function using the @app.middleware("http") decorator. How the request and call_next parameters are used. (25:01 - 27:35) How to use the time module to calculate the total processing time for a request.
As the video demonstrated, you can capture the start time before call_next and calculate the duration after it returns, giving you a precise measurement of how long each request took to process.
3. Hands-On Practice: Implement a Logging Middleware
Now it's your turn to apply this. We will create a middleware in your main.py that logs important information about every request to the console.
Task:
- In your
main.py, importRequestfromfastapiand Python's built-intimemodule. - Create an
asyncmiddleware function using the@app.middleware("http")decorator. - Inside the middleware, implement the following logic:
- Record the
start_timeusingtime.perf_counter(). - Call
response = await call_next(request). - Calculate the
process_timein milliseconds. - Get the client's host IP from
request.client.host. - Create a formatted log message that includes the client's host, request method, request path, response status code, and the process time.
- Print the log message to the console.
- Return the
response.
- Record the
- Run your server with
uvicornand make requests to a few different endpoints (e.g.,/,/status,/predict/simple). Observe the log messages printed in your terminal for each request.
Click here for the solution
main.py:
import time
from fastapi import FastAPI, Depends, Request
from routers import predictions

app = FastAPI(
    title="House Price Prediction API",
    description="API to predict house prices using a simple model.",
    version="0.4.0" # Version bump!
)


# --- New code for this lesson ---
@app.middleware("http")
async def log_requests(request: Request, call_next):
    start_time = time.perf_counter()

    response = await call_next(request)

    process_time = (time.perf_counter() - start_time) * 1000
    client_host = request.client.host

    formatted_process_time = '{0:.2f}'.format(process_time)

    print(
        f'Client: {client_host} - "{request.method} {request.url.path}" '
        f'{response.status_code} | Processed in: {formatted_process_time}ms'
    )

    return response


# --- End of new code ---


# Include the router from the previous lesson
app.include_router(
    predictions.router,
    prefix="/predict",
    tags=["House Price Predictions"]
)


# Dependency from previous lesson
async def common_debug_params(verbose: bool = False, level: int = 1):
    return {"verbose": verbose, "level": level}


# Main root endpoint
@app.get("/")
async def root():
    return {"message": "Welcome to the House Price Prediction API"}


# Endpoints using the dependency
@app.get("/status", tags=["General"])
async def get_status(debug_params: dict = Depends(common_debug_params)):
    response = {"status": "OK"}
    response.update(debug_params)
    return response

@app.get("/monitoring", tags=["General"])
async def get_monitoring_status(debug_params: dict = Depends(common_debug_params)):
    response = {"service": "monitoring"}
    response.update(debug_params)
    return response
When you run the server and access http://127.0.0.1:8000/status, you should see a terminal output similar to this:
Client: 127.0.0.1 - "GET /status" 200 | Processed in: 0.54ms
4. Best Practices and Next Steps
You've successfully implemented your first middleware! While placing it directly in main.py is fine for simple projects, in larger applications, it's best to organize middleware into its own module (e.g., a middleware/ directory) and register it using app.add_middleware(). This is the same principle we followed when organizing our routes with APIRouter.
For a more robust and organized implementation, you can explore creating middleware as classes that inherit from Starlette's BaseHTTPMiddleware.
How to Implement Custom Middleware in FastAPI
This article from OneUptime provides excellent code examples for a more advanced, class-based logging middleware and discusses important best practices.
Read the sections 'Class-Based Middleware with BaseHTTPMiddleware', 'Logging Middleware', and 'Best Practices'. You don't need to implement this now, but pay attention to: How a class-based middleware is structured with an __init__ and dispatch method. How to register it with app.add_middleware(). The best practice of keeping middleware focused on a single responsibility.
Conclusion
Great job! You've now mastered a key technique for handling application-wide concerns.
Key Takeaways:
- Middleware is a function that intercepts every request and response, allowing you to execute code globally.
- It follows an "onion" model, where requests flow in through layers and responses flow back out.
- In FastAPI, you can create a simple middleware using the
@app.middleware("http")decorator on anasyncfunction. - The middleware function must accept
requestandcall_nextparameters andawait call_next(request)to pass control down the chain. - This pattern is ideal for cross-cutting concerns like logging, adding security headers, handling errors, and measuring performance.
This lesson concludes our module on structuring applications. You now have the tools to organize your endpoints with APIRouter, share logic with Depends, and handle global logic with middleware.
With this solid structure in place, we're ready for the next big step: connecting our API to a database. In the next module, we will begin integrating a SQLite database using SQLAlchemy to persist and retrieve data.