Hello! Welcome to the next lesson in our backend engineering course.
In our last session, we implemented DRF's built-in TokenAuthentication. We saw that it was a stateful system because every time a client sent a token, our server had to perform a database lookup to verify it and find the associated user. While simple and effective, this reliance on a central database can become a performance bottleneck in large, distributed systems.
Today, we're going to explore a more modern and scalable approach: JSON Web Tokens (JWT). The goal of this lesson is to explain the structure and stateless nature of JWTs. You'll learn what a JWT is, how it's constructed, and why its self-contained design makes it a cornerstone of modern API security and microservice architectures.
1. From Stateful to Stateless Authentication
To understand the power of JWTs, we first need to solidify the difference between the stateful model we've used so far and the stateless model that JWTs enable.
- Stateful (Session/DB Token): The server stores the "state" (i.e., who is logged in). When a client presents an ID (a session cookie or a database token), the server looks it up in its memory or database to retrieve the user's information.
- Stateless (JWT): The server stores nothing. The token itself contains all the necessary information about the user. The server can verify the user's identity just by inspecting the token, without needing to consult a database.
This video provides an excellent visual comparison of these two approaches.
What Is JWT and Why Should You Use JWT
To start, watch this video from Web Dev Simplified. It clearly illustrates the fundamental difference between traditional session-based authentication and the JWT-based approach, highlighting why JWTs are considered stateless.
Watch from 00:26 to 05:28. Pay close attention to the diagrams comparing the two login flows. Notice where the user information is stored in each model—on the server for sessions, and on the client within the token for JWTs.
The key difference is captured in this diagram, which mirrors the explanation in the video:

As you can see, the JWT flow removes the server's dependency on a session database for authenticating requests, which is the essence of its stateless nature.
2. The Structure of a JSON Web Token
So, how can a token be self-contained and verifiable? The answer lies in its structure. A JWT is a compact, URL-safe string that consists of three parts, separated by dots (.):
xxxxx.yyyyy.zzzzz
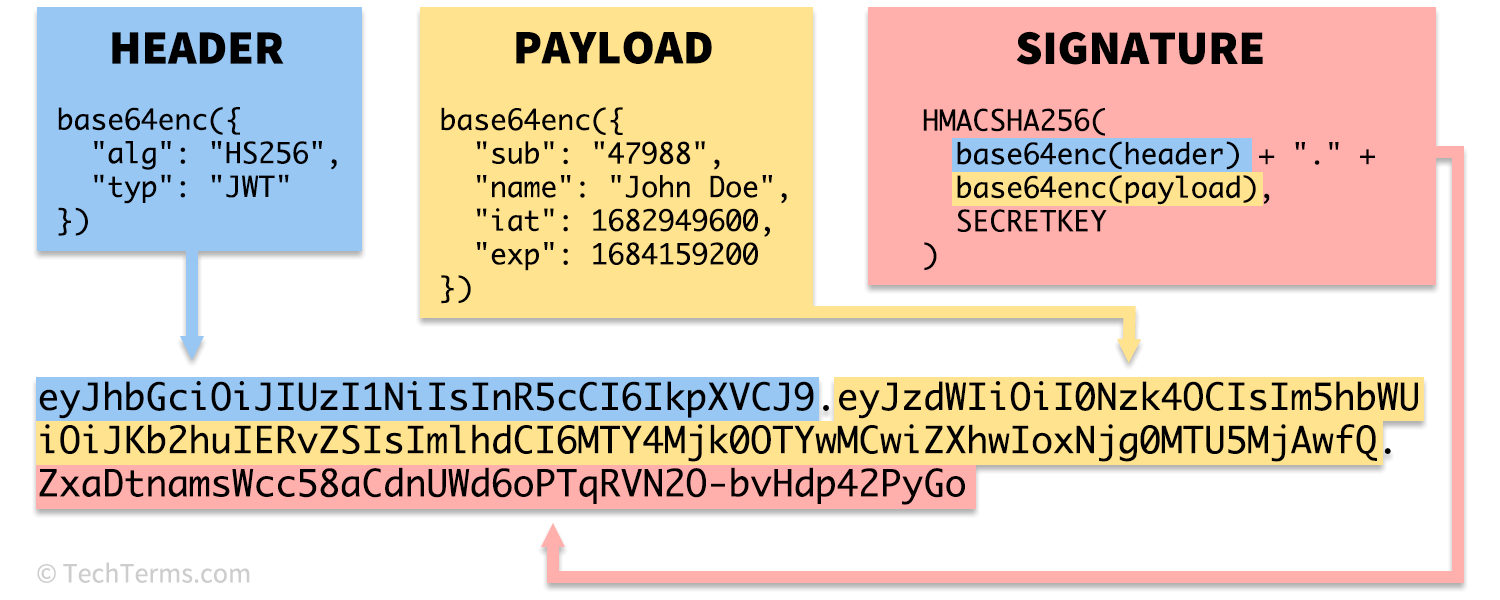
Let's break down each component. We'll use the "Introduction to JSON Web Tokens" article as our reference.
JSON Web Token Introduction - jwt.io
This article from jwt.io, the organization that maintains the standard, provides the definitive textual explanation of a JWT's structure. It's a great companion to the videos.
Read the section 'What is the JSON Web Token structure?'. This will walk you through the Header, Payload, and Signature components in detail.
Part 1: Header
The first part of the token specifies metadata about the token itself. It's a JSON object that typically contains two fields:
typ: The type of the token, which is always"JWT".alg: The signing algorithm used to create the signature, such asHS256(HMAC using SHA-256) orRS256(RSA).
Example Header:
{
  "alg": "HS256",
  "typ": "JWT"
}
This JSON is then Base64Url encoded to form the first part of the JWT.
Part 2: Payload
The second part is the payload, which contains the claims. Claims are statements about an entity (typically the user) and other data. This is where the user information is stored.
There are several types of claims:
- Registered Claims: These are a set of predefined, recommended claims. Some common ones are:
sub(Subject): The ID of the user.exp(Expiration Time): The timestamp when the token expires. After this time, the token is invalid. This is crucial for security.iat(Issued At): The timestamp when the token was created.
- Private Claims: These are custom claims that you define for your application to share information between parties. For example, you could include a user's role or name.
Example Payload:
{
  "sub": "user123",
  "name": "Alex Doe",
  "admin": false,
  "iat": 1516239022,
  "exp": 1516242622
}
Like the header, this payload JSON is Base64Url encoded to form the second part of the JWT.
A Critical Security Note: Base64Url encoding is just a way to represent binary data in an ASCII string format. It is not encryption. Anyone who intercepts a JWT can easily decode the payload and read its contents.
API Authentication Explained (Finally) — Basic Auth, Bearer & JWT
This point is so important it's worth hearing again. Watch this short clip that emphasizes the public nature of the JWT payload.
Watch from 05:07 to 06:49. The speaker makes a very clear distinction: the payload is readable by anyone, and you should never put sensitive information like passwords in it.
Therefore, never store sensitive information (passwords, credit card numbers, etc.) in a JWT payload.
Part 3: Signature
The signature is the component that makes a JWT secure and tamper-proof. It's created by taking the encoded header, the encoded payload, a secret key, and signing them with the algorithm specified in the header.
The process for an HS256 signature looks like this:
signature = HMACSHA256(
  base64UrlEncode(header) + "." +
  base64UrlEncode(payload),
  secret_key
)
The secret_key is a long, secret string known only by the server.
When the server receives a JWT from a client, it performs the same signature calculation using the header and payload from the token and its own secret key.
- If the newly calculated signature matches the signature on the token, the server knows the token is authentic and that the header and payload have not been changed since they were signed.
- If the signatures do not match, the token is rejected as invalid or tampered with.
This verification process is purely mathematical and doesn't require any database lookups, which is what makes JWTs so fast and scalable.
What Is JWT and Why Should You Use JWT
This video provides a great walkthrough of how the signature is generated and used for verification.
Watch from 07:58 to 10:56. The demonstration on jwt.io clearly shows that if you change any part of the payload, the signature verification fails. This is the core mechanism that ensures a JWT's integrity.
Test your understanding!
An attacker intercepts a JWT sent from a regular user. The decoded payload looks like this: {"sub": "user123", "admin": false}.
The attacker changes the payload to {"sub": "user123", "admin": true}, encodes it, and sends the modified JWT to the server to try to gain admin privileges. Will this attack succeed? Why or why not?
Show answer
This attack will fail.
When the server receives the tampered token, it will try to verify the signature. It will take the attacker's modified payload ("admin": true), the original header, and its own secret key to recalculate the signature.
Because the payload has been altered, the newly calculated signature will not match the original signature attached to the token. The server will detect this mismatch, conclude the token has been tampered with, and reject the request. The attacker cannot generate a valid signature for the modified payload without knowing the server's secret key.
3. The Advantage of Statelessness in Practice
Now that we understand the structure, let's circle back to why the stateless nature of JWTs is so beneficial for backend systems.
Because a JWT is self-contained and verifiable with just a secret key, it decouples authentication from a central data store. This is a massive advantage in modern architectures.
What Is JWT and Why Should You Use JWT
This final clip explains the practical benefits of JWTs in scalable systems.
Watch from 10:56 to 14:35. The video discusses scenarios with multiple servers, load balancers, and microservices. In these cases, a stateful session would require complex synchronization, whereas any server with the shared secret key can validate a JWT independently.
Your background in building scalable data pipelines with PySpark and understanding distributed systems with GNNs gives you an appreciation for architectures that don't rely on a single point of state. JWTs bring this same philosophy to authentication, making them ideal for:
- Microservices: A client can use the same JWT to authenticate with multiple different microservices (e.g., an ordering service, a user profile service), as long as each service knows the secret key or can validate it.
- Horizontally Scaled APIs: When you run multiple instances of your API behind a load balancer, any server instance can handle any client request because it doesn't need to access a shared session store.
Conclusion
In this lesson, we've unpacked the theory behind JSON Web Tokens, contrasting them with the stateful authentication methods we've seen before.
Key Takeaways:
- Stateless vs. Stateful: JWTs are stateless because they carry user information within them, removing the need for the server to store session state in a database.
- JWT Structure: A JWT has three parts: the Header (metadata), the Payload (claims/data), and the Signature (for verification).
- Integrity, Not Secrecy: The signature guarantees that the token is tamper-proof, but the payload is only Base64 encoded and is readable by anyone. Never put secret data in the payload.
- Verification: The server verifies a JWT by recalculating the signature with a secret key and comparing it to the signature on the token. This is a fast, cryptographic operation.
- Scalability: The stateless nature of JWTs makes them highly scalable and well-suited for distributed systems like microservices.
Preview of the Next Lesson:
Theory is great, but practice is better. In our next lesson, we will put this knowledge to use by implementing JWT-based authentication in our DRF application. We will replace the stateful TokenAuthentication system with a stateless JWT solution, bringing our API one step closer to a modern, production-ready architecture.