Hello! Welcome back.
In our last lesson, we successfully integrated Django, Celery, and Redis. You now have a functioning system where a Django application (the producer), a Redis server (the message broker), and a Celery worker (the consumer) are all running and communicating. The worker is listening, but so far, we haven't given it any work to do.
Today, we'll put that system to use. This lesson focuses on the learning outcome: Define and execute a background task using Celery to improve API response times. We will create a function to handle a long-running process, turn it into a Celery task, and call it from a Django view. This will demonstrate firsthand how asynchronous processing makes your application feel significantly faster and more responsive to the user.
This pattern is fundamental in the AI-powered applications you're familiar with. When a user uploads a document for analysis or requests a complex data visualization, the API shouldn't freeze while the backend processes the data or runs a model inference. Instead, it should instantly accept the request, delegate the heavy lifting to a background worker (like Celery), and immediately inform the user that the job has started. Today, you'll build that exact mechanism.
The Problem: Synchronous Blocking
Imagine an API endpoint that needs to perform a time-consuming operation, like generating a report or sending an email via a slow, external service. In a standard synchronous flow, Django processes the entire operation before it can send a response back to the client. This leads to a poor user experience, where the application appears frozen.
We're going to simulate this with a simple function that pauses execution for a few seconds.
Step 1: Defining an Asynchronous Task
Our goal is to offload this "slow" operation to Celery. The first step is to define the operation as a Celery task. By convention, Celery tasks for a Django app are placed in a file named tasks.py within that app's directory. This is where Celery's autodiscover_tasks() function (which we set up in celery.py) automatically looks.
The Real Python article we used previously has an excellent section that walks through refactoring a synchronous function into an asynchronous Celery task.
Asynchronous Tasks With Django and Celery
This guide will show you how to create a tasks.py file, define a function, and transform it into a shareable Celery task using a decorator. We'll be working with a simulated email-sending function, which is a classic example of a task you don't want blocking your API.
Please read the first part of the section 'Handle Workloads Asynchronously With Celery', stopping just before 'Test Your Asynchronous Task'. Specifically, focus on: 'Revisit the Synchronous Code': Understand the initial, slow implementation. 'Refactor the Code as a Celery Task': Follow the steps to create feedback/tasks.py, define send_feedback_email_task(), and decorate it with @shared_task.
Let's summarize the key steps and concepts:
- Create
tasks.py: Inside one of your Django apps, create a new file namedtasks.py. - Define the function: Write a standard Python function that contains the logic you want to run in the background. In the example, this is
send_feedback_email_task. Notice it takes regular arguments likeemail_addressandmessage. - Use the
@shared_taskdecorator: By adding@shared_taskfromceleryabove your function definition, you register it with Celery as a task.
Why @shared_task?
The @shared_task decorator creates a task that is not tied to any specific Celery application instance. This is a best practice in Django because it allows you to write reusable apps that don't have hard-coded dependencies on your main project's Celery setup. The task will use whatever Celery instance is available when the code is executed.
Step 2: Executing the Task from Your Application
Now that you have a defined task, you need to call it from your Django code (e.g., from a view). You don't call it like a regular function. Instead, you use a special method to send it to the message queue.
The most common way to do this is with the .delay() method.
Let's continue with the Real Python article, which shows exactly how to modify the application code to call the new task.
Asynchronous Tasks With Django and Celery
Now we'll connect the dots. The article will show you how to replace the direct, slow function call with an asynchronous task call using .delay().
Continue reading the same section 'Handle Workloads Asynchronously With Celery'. Focus on the final part where forms.py is refactored to import send_feedback_email_task and call it using send_feedback_email_task.delay(...).
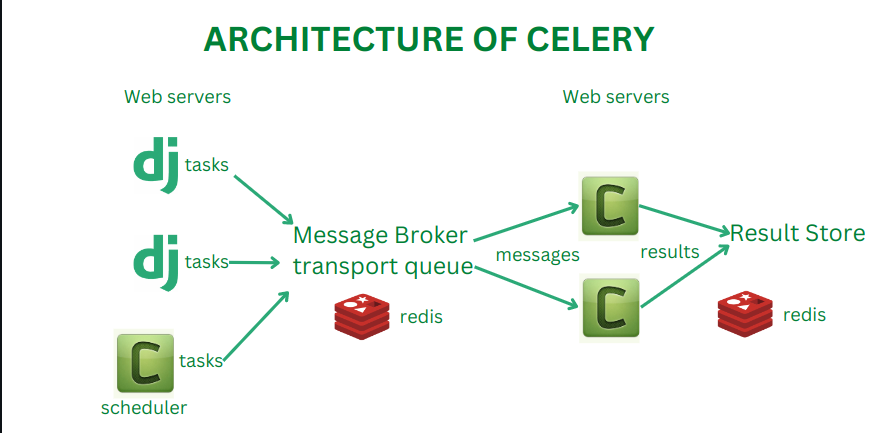
When your view calls my_task.delay(arg1, arg2), here's what happens behind the scenes:
- Celery serializes the task name (
my_task) and its arguments (arg1,arg2) into a message. - It sends this message to the broker (Redis).
- The
.delay()call returns immediately, without waiting for the task to start or finish. - Your Django view continues its execution and can quickly return an HTTP response to the user.
- In the background, a Celery worker that is subscribed to the queue will pick up the message from Redis, deserialize it, and execute the
my_taskfunction with the provided arguments.
Test your understanding!
The article mentions that .delay() is a shortcut for a more powerful method, .apply_async(). What is the fundamental difference in how you pass arguments to .delay() versus .apply_async()?
Show answer
With .delay(), you pass arguments directly, just like a normal function call: my_task.delay(1, 2, keyword_arg='hello').
With .apply_async(), you must pass positional arguments as a list or tuple to the args parameter and keyword arguments as a dictionary to the kwargs parameter: my_task.apply_async(args=[1, 2], kwargs={'keyword_arg': 'hello'}).
While .delay() is more convenient for simple calls, .apply_async() gives you more control, allowing you to specify options like a countdown before execution, task priority, or retry policies.
Step 3: Observing the Asynchronous Flow
This is the most important part—seeing the results of your work. You need to run all three components and trigger the task to witness the improvement in response time.
Asynchronous Tasks With Django and Celery
Let's test the entire setup. This final part of the article will guide you through restarting the worker and observing the logs to confirm the task is running in the background.
Read the entire section 'Test Your Asynchronous Task'. Pay close attention to: The command to restart the Celery worker and why it's necessary. The difference in the application's behavior from the user's perspective (quick redirection). Where the task's output appears (in the Celery worker's terminal, not the Django server's).
Critical Takeaway: Any time you change your task code (in tasks.py) or add new tasks, you must restart the Celery worker. The worker process loads your code into memory on startup, so it won't see any changes until it's restarted.
To summarize the testing procedure:
- Terminal 1: Make sure your Redis server is running.
redis-server - Terminal 2: Run your Django development server.
python manage.py runserver - Terminal 3: Stop your previous Celery worker (
Ctrl+C) and restart it. This will load your new task. Replacemyprojectwith your project's name.
Upon startup, you should now see your new task listed under thecelery -A myproject worker --loglevel=info[tasks]section in the worker's output.
Now, when you trigger the action in your web app:
- Browser: The page should respond almost instantly.
- Django Server Log (Terminal 2): You will see the HTTP request and a quick 200 or 302 response, but you will not see the output of the slow operation.
- Celery Worker Log (Terminal 3): After you trigger the task, you will see a log line that the task was received. Then, after the
sleepduration, you will see the task's output and a final log line indicating the task succeeded.
You have successfully decoupled the user's request-response cycle from a long-running operation!
Your Turn: Build an Asynchronous API Endpoint
Now, apply what you've learned.
-
Create a slow, synchronous API endpoint.
- Create a view mapped to a URL like
/api/generate-report/. - This view should use
time.sleep(10)to simulate a long process.
- After the sleep, it should return a Django
JsonResponsewith a message like{"status": "Report generated successfully"}.
- Test this endpoint using your browser or an API client. Notice that it takes 10 seconds to get a response.
- Create a view mapped to a URL like
-
Refactor it to be asynchronous.
- Create a new Celery task in
tasks.pythat contains thetime.sleep(10)logic. This task could also print a message like "Generating report...". - Modify your
/api/generate-report/view to call this new task using.delay(). - The view should now immediately return a
JsonResponsewith a message like{"status": "Report generation has started. It will be ready in a few moments."}. - Remember to restart your Celery worker to detect the new task.
- Create a new Celery task in
-
Test the new endpoint.
- Call the API endpoint again. This time, you should get an immediate response in your browser/client.
- Watch the Celery worker's terminal. You should see the "Generating report..." message appear after the 10-second delay.
This exercise directly implements the core learning outcome and mirrors a realistic backend development task.
Conclusion
You have now mastered a critical pattern in modern backend engineering. By defining and executing a background task, you've seen how to build APIs that remain fast and responsive, even when they need to trigger complex, time-consuming operations.
Key Takeaways:
- Celery tasks are regular Python functions defined in
tasks.pyand decorated with@shared_task. - You execute tasks asynchronously by calling the
.delay()method, which sends a job to the message broker and returns instantly. - The Celery worker runs as a separate process, picks up jobs from the broker, and executes them in the background.
- Always restart your worker after changing task code to ensure your changes are loaded.
Preview of the Next Lesson:
We've successfully executed tasks on-demand. But what if you need a task to run automatically at regular intervals—for example, cleaning up old data every night or fetching new data every hour? In the next lesson, we will introduce Celery Beat, the scheduler that allows you to run tasks on a predefined schedule.