Welcome to the final lesson in our foundational module. In our previous session, we demystified the logic of double-entry bookkeeping. You learned how every transaction is a balanced story told through debits and credits and how the DEALER mnemonic provides the rules for recording that story.
Today, we move from theory to practice. You will take the abstract concept of a journal entry and record your first real transaction in the digital ledger you created for "Sunshine Getaways." This lesson is the capstone for Module 1, connecting the "what" (Chart of Accounts) and the "why" (double-entry logic) with the "how" of day-to-day bookkeeping.
By the end of this 30-minute session, you will have successfully recorded a simple cash purchase in your Google Sheets ledger, making the accounting equation come to life.
Structuring Your Ledger for Transactions
So far, our spreadsheet contains a Chart of Accounts. Now we need to create the "journal" — a chronological log of all transactions. While there are many ways to structure this, we'll adopt a method that is both robust and particularly elegant for a spreadsheet environment. It turns the sheet into a self-auditing system, something your background in building logical systems will appreciate.
Instead of having just "debit" and "credit" columns, we will create a column for every single account from your Chart of Accounts. We'll then use positive and negative numbers to represent debits and credits, ensuring that every transaction row mathematically balances to zero.
The "Accounting Outside" YouTube channel demonstrates this system perfectly. Let's watch how to set it up.
This video provides a clear, practical demonstration of setting up a double-entry system in Excel. We will adapt this model for our Google Sheet.
First, watch the initial setup from the beginning. Notice how the sheet is organized with columns for Date, Description, and then individual accounts grouped by type (Assets, Liabilities, etc.). Next, pay close attention to the core logic explained from this section. The key idea is: Increases in Asset and Expense accounts are positive numbers. Increases in Liability, Equity, and Revenue accounts are negative numbers. This cleverly ensures that for any balanced transaction, the sum of the entries in the row will be zero—a simple "checksum."
Your Actionable Task: Record Your First Transaction
Let's apply this. It's time to open your "Sunshine Getaways" Google Sheet.
Step 1: Create the General Journal Tab
- Click the "+" icon at the bottom left to add a new sheet.
- Double-click the new tab and rename it "General Journal".
Step 2: Set Up Your Columns
- In the first row of your "General Journal" sheet, create the following column headers:
- Cell A1:
Date - Cell B1:
Description
- Cell A1:
- Starting in Cell C1, list the names of every account from your "Chart of Accounts" sheet, each in its own column. You should have columns for
Cash,Accounts Receivable,Owner's Equity,Service Fee Revenue,Software Expense,Office Supplies Expense, etc.
Step 3: Analyze and Record the Transaction
Here is our scenario:
On January 20, 2024, Sunshine Getaways buys office supplies (printer paper and pens) from a local store for $35, paid with cash from the business bank account.
Let's analyze this using the DEALER rules:
- Accounts Affected: The business spent
Cashand receivedOffice Supplies. So, the accounts areCashandOffice Supplies Expense. - Account Types:
Cashis an Asset.Office Supplies Expenseis an Expense. - Increase/Decrease: The
Cashaccount (Asset) has decreased. TheOffice Supplies Expenseaccount (Expense) has increased. - Apply the Rules:
- To increase an Expense (E in DEALER), you Debit it.
- To decrease an Asset (A in DEALER), you Credit it.
- So, we Debit
Office Supplies Expense$35 and CreditCash$35.
Now, let's record this in your sheet using the positive/negative system:
- Find the first empty row (row 2).
- Date (Cell A2): Enter
20/01/2024. - Description (Cell B2): Enter
Purchase of office supplies. - Office Supplies Expense column: This is an Expense, and it's increasing. Based on the video's logic, this is a debit, so you enter a positive number:
35. - Cash column: This is an Asset, and it's decreasing. A decrease to an Asset is a credit. Based on the video's logic (or thinking of it as "money out"), you enter a negative number:
-35. - All other account columns in this row should be left blank or contain a
0.
If you sum the values across that row (35 and -35), the total is 0. Your books are balanced!
The following clip from the same video shows an almost identical transaction being recorded.
This clip shows the recording of a gas and supplies purchase, reinforcing the entry you just made.
Watch how the transaction is entered from this segment. Notice the cash account gets a negative entry, and the expense account gets a positive entry.
Step 4: Add Balancing Formulas (Optional but Recommended)
To make your ledger even more powerful, add two formulas:
- Row Checksum: In the column immediately after your last account, add a header like "Checksum". In the first transaction row, enter a formula to sum up all the numerical entries for that row (e.g.,
=SUM(C2:Z2)). Drag this formula down. It should always show0. - Account Balances: In a row below your transaction area (e.g., row 50), add labels for "Current Balance". In each account column, use a
SUMformula to total all the entries above it (e.g.,=SUM(C2:C49)). This will give you a real-time balance for every account.
Alternative View: The Simple Cash Book
For very simple businesses or personal tracking, a full double-entry system can feel like overkill. A more basic tool is a cash book, which simply tracks money in and money out of a single account (usually the main bank account). It forgoes the double-entry mechanism.
The two images below show common formats for a cash book in a spreadsheet.
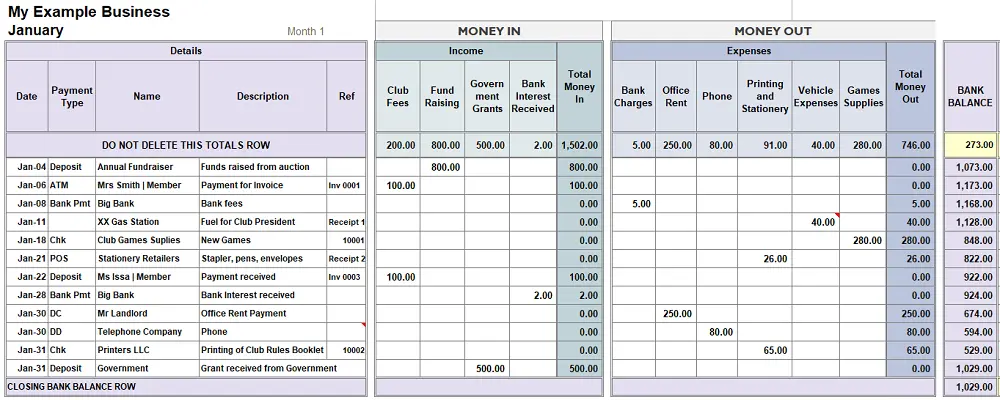
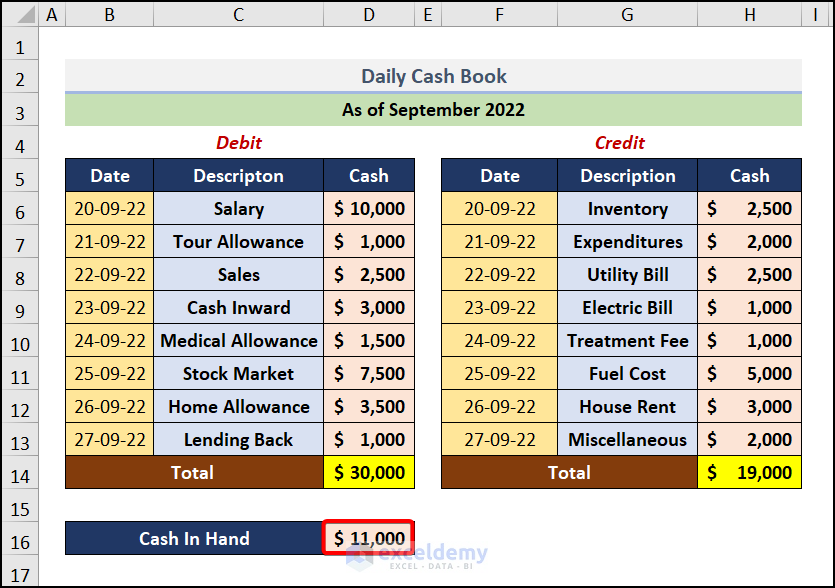
While simple, the cash book's main limitation is that it can't track non-cash concepts like an invoice you've sent but haven't been paid for yet (Accounts Receivable). The double-entry system you are learning is far more comprehensive and is the standard for professional bookkeeping.
Conclusion
Congratulations on completing the first module! You have progressed from understanding the role of a bookkeeper to building a professional Chart of Accounts, learning the theory of double-entry, and finally recording your first transaction in a functional digital ledger. You have built the essential foundation upon which all other bookkeeping skills rest.
Key Takeaways:
- A general journal is a chronological record of all business transactions.
- A spreadsheet can be a robust double-entry system by using one column per account.
- Representing debits and credits with positive and negative numbers allows for a simple "checksum" to ensure each transaction is balanced.
- Recording a transaction involves identifying the accounts, determining the direction of change (increase/decrease), and applying the DEALER rules to make the correct entry.
In our next module, "Recording Daily Business Transactions," we will build on this foundation. The first lesson will introduce a crucial concept: cash-basis vs. accrual-basis accounting. This determines when you record revenue and expenses and is fundamental to providing an accurate financial picture for a travel business, where bookings and payments are often weeks or months apart.