Hello! In our last lesson, you mastered the use of <RouterLink> and <RouterView> to build navigation and render page components in your single-page application. You can now navigate to dynamic routes like /items/1, but the pages themselves are still static.
This lesson bridges that gap. Our goal is to fetch data from a REST API within a component's onMounted lifecycle hook. We'll make your pages dynamic by pulling in live data from a server when a component loads, bringing your application one step closer to a real-world product.
Part 1: The "When" to Fetch - Understanding Lifecycle Hooks
Before we fetch data, we need to decide when to do it. A Vue component has a "lifecycle" — it's created, added to the page (mounted), updated with new data, and eventually removed (unmounted). Vue provides lifecycle hooks, which are functions that allow us to run code at these specific moments.
For fetching initial data, the most common hook is onMounted. This hook runs right after the component has been rendered to the DOM for the first time.
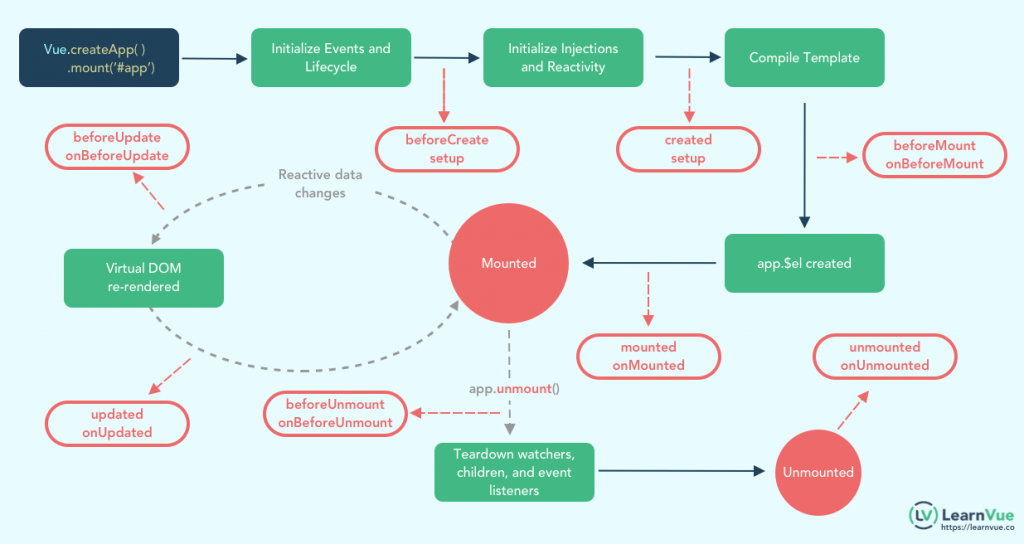
This strategy is called "Fetching After Navigation". We navigate to the new route immediately, render the component, and then fetch the data within the component itself. This allows us to show a "loading" message to the user while the data is being fetched in the background.
The official Vue Router documentation explains this concept well. Read this short section to solidify your understanding of why we fetch data after navigating to a new page.
Read the section titled 'Fetching After Navigation'. Focus on the core idea: navigating immediately and fetching data inside the component's lifecycle hook.
Part 2: The "What" to Fetch - Simulating an API
Most real applications fetch data from a backend server. To simulate this without building a full backend, we'll use a fantastic tool called json-server. It lets you create a fully functional fake REST API from a simple JSON file. This is a common industry practice for frontend development and prototyping.
The following video will guide you through setting up json-server.
Vue JS 3 Tutorial for Beginners #9 - Fetching Data
The Net Ninja provides a clear, practical guide to setting up json-server. This will give us a local API endpoint to practice fetching data from.
Watch from the beginning to 06:15. Follow the steps to install json-server and create a db.json file. You don't have to use the exact same data as the video; we'll create our own in the hands-on section.
Part 3: The "How" to Fetch - async/await and the Fetch API
Now that we know when and what to fetch, let's look at how. Modern JavaScript provides two primary tools for making network requests:
- The Fetch API: A powerful, flexible, and promise-based interface built directly into modern browsers.
- Axios: A popular third-party library that simplifies some aspects of making HTTP requests.
We will use the native Fetch API, as it requires no extra installation. To handle the asynchronous nature of network requests (which can take time), we'll use the modern async/await syntax. This allows us to write asynchronous code that reads like synchronous code, making it much cleaner and easier to understand. This is a core "best practice" you asked about.
A typical data fetch inside a Vue component looks like this:
<script setup>
import { ref, onMounted } from 'vue';

// 1. Create a reactive variable to hold the data
const data = ref(null);

// 2. Use the onMounted hook to run code when the component is ready
onMounted(async () => {
  try {
    // 3. Use await to 'wait' for the fetch request to complete
    const response = await fetch('https://api.example.com/data');

    // 4. Parse the JSON response
    const jsonData = await response.json();

    // 5. Update our reactive variable with the fetched data
    data.value = jsonData;
  } catch (error) {
    // We'll cover proper error handling in the next lesson!
    console.error('Failed to fetch data:', error);
  }
});
</script>
This pattern is fundamental to building dynamic web applications.
Part 4: Your Turn - Fetching Data for Your Project
Let's apply these concepts to the mini-project from the last module: the two-page app that will eventually list items and show their details.
1. Set up Your API
- In your project's root directory, create a new folder named
data. - Inside
data, create a file nameddb.json. - Paste the following JSON content into
db.json. This defines an "items" endpoint for our fake API.
{
  "items": [
    {
      "id": 1,
      "title": "First Project",
      "description": "This is the description for the first project. It involves setting up the initial Vue structure."
    },
    {
      "id": 2,
      "title": "Second Project",
      "description": "This project focuses on component architecture and passing data with props."
    },
    {
      "id": 3,
      "title": "API Integration",
      "description": "The goal of this project is to fetch and display data from an external source, just like we are doing now!"
    }
  ]
}
- Open a new terminal window in VS Code (do not close your
npm run devterminal). - Run the
json-serverwith the following command. The--watchflag tells it to watch your file for changes, and--port 3001runs it on a different port than your Vue app.
npx json-server --watch data/db.json --port 3001
Now, if you open http://localhost:3001/items in your browser, you should see the JSON data!
2. Fetch and Display a List of Items
Let's modify your "list" view (e.g., ItemsView.vue or HomeView.vue) to fetch and display these items.
// src/views/ItemsView.vue

<script setup>
import { ref, onMounted } from 'vue';
import { RouterLink } from 'vue-router';

// A reactive ref to store our array of items
const items = ref([]);

onMounted(async () => {
  try {
    const response = await fetch('http://localhost:3001/items');
    items.value = await response.json();
  } catch (error) {
    console.error('Error fetching items:', error);
  }
});
</script>

<template>
  <div>
    <h1>My Projects</h1>
    <div v-if="items.length > 0" class="item-list">
      <div v-for="item in items" :key="item.id" class="item-card">
        <h2>{{ item.title }}</h2>
        <RouterLink :to="`/items/${item.id}`">View Details</RouterLink>
      </div>
    </div>
    <div v-else>
      <p>Loading items...</p>
    </div>
  </div>
</template>

<style scoped>
.item-list { display: flex; flex-direction: column; gap: 1rem; }
.item-card { border: 1px solid #ccc; padding: 1rem; border-radius: 8px; }
</style>
When you run your app and navigate to this page, you should briefly see "Loading items..." and then your three projects will appear, fetched from your local API.
3. Fetch a Single Item for a Detail Page
Now, let's make the detail page dynamic. When you click "View Details", we want to fetch only the data for that specific item.
- In your detail view component (e.g.,
ItemDetailView.vue), update the script.
// src/views/ItemDetailView.vue

<script setup>
import { ref, onMounted } from 'vue';
import { useRoute } from 'vue-router'; // Import useRoute to access route params

// A reactive ref to store the single item object
const item = ref(null);
const route = useRoute(); // Get access to the current route object
const itemId = route.params.id; // Get the 'id' from the URL, e.g., '1', '2', etc.

onMounted(async () => {
  try {
    // Use the itemId to build the specific API endpoint
    const response = await fetch(`http://localhost:3001/items/${itemId}`);
    item.value = await response.json();
  } catch (error) {
    console.error('Error fetching item:', error);
  }
});
</script>

<template>
  <div>
    <!-- Use v-if to only render the details when 'item' is not null -->
    <div v-if="item">
      <h1>{{ item.title }}</h1>
      <p>{{ item.description }}</p>
      <RouterLink to="/items">Back to List</RouterLink>
    </div>
    <!-- Optionally, show a loading message while item is null -->
    <div v-else>
      <p>Loading details...</p>
    </div>
  </div>
</template>
Notice the v-if="item" in the template. This is crucial! Initially, item is null. The fetch request takes a moment. Without v-if, Vue would try to render item.title on null, causing an error. This simple conditional rendering prevents that.
Conclusion
Congratulations! You've just implemented one of the most critical patterns in modern web development. You now know how to make your components come alive with data fetched from an API.
Key Takeaways:
- Lifecycle hooks like
onMountedgive you control over when to execute code during a component's life. - The
onMountedhook is the standard place to perform initial data fetching for a component. - The Fetch API combined with
async/awaitprovides a clean and modern way to handle asynchronous network requests. json-serveris an invaluable tool for quickly creating a mock API, allowing you to focus on frontend development without waiting for a real backend.- Using
v-ifto conditionally render content is essential to prevent errors while waiting for asynchronous data to arrive.
In our next lesson, we will build on this foundation. What happens if the API is slow, or if the request fails completely? We'll learn how to manage and display loading and error states in a more robust and user-friendly way.