Hello! Let's dive into the next step of our JavaScript journey.
In our last lesson, we focused on the "data" side of JavaScript, learning how to manipulate arrays and objects with modern methods like map, filter, destructuring, and the spread syntax. These are essential skills for managing information within your application.
Today, we'll connect that logic to what the user actually sees on the webpage. We will explore the Document Object Model (DOM), which is the bridge between your JavaScript code and the HTML structure. Our goal for this lesson is to select and manipulate DOM elements using querySelector to modify content, classes, and styles. This is the fundamental skill needed to make web pages interactive and dynamic.
1. What is the Document Object Model (DOM)?
When a browser loads your HTML file, it doesn't just display it as static text. It creates a live, in-memory representation of the page's structure called the Document Object Model, or DOM. You can think of the HTML file as the blueprint and the DOM as the actual object model of the house that your JavaScript code can interact with and change.
The DOM represents the document as a tree of "nodes". Every HTML element, piece of text, and attribute becomes a node in this tree.
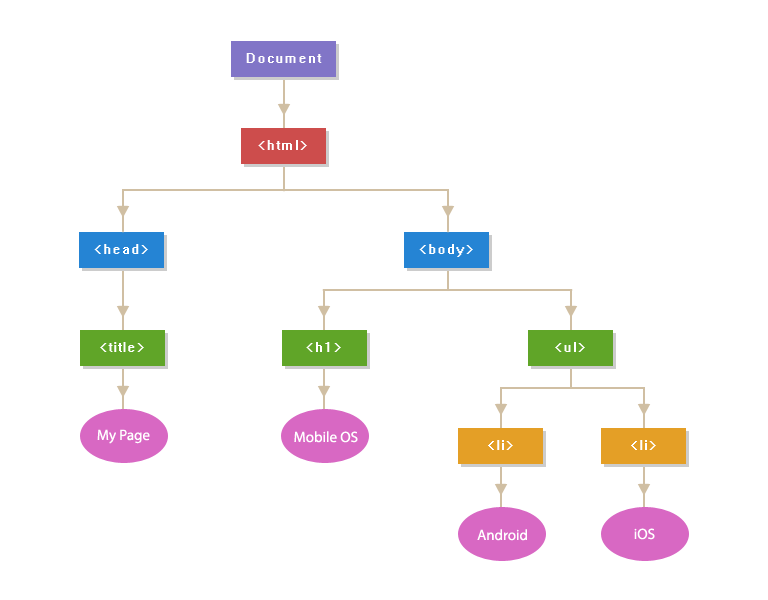
To get a more dynamic view of this concept, let's watch a short video.
JavaScript DOM Manipulation Mastery: A Comprehensive Guide
This video from Envato Tuts+ provides a great introduction to what the DOM is, how the browser creates it, and how you can explore it using your browser's developer tools.
Watch the segment from 01:13 to 05:49. Focus on understanding the tree-like structure and how the 'Elements' tab in your developer tools is a live representation of the DOM, not just your static HTML file.
2. Selecting Elements with querySelector
To manipulate an element, you first need to select it. While there are older methods like getElementById() or getElementsByClassName(), the modern and most versatile approach is to use query selectors. They allow you to find elements using the same CSS selector syntax you use for styling.
document.querySelector(selector): Returns the first element within the document that matches the specified CSS selector. If no matches are found, it returnsnull.document.querySelectorAll(selector): Returns aNodeList(which is like an array) containing all elements in the document that match the specified selectors.
Let's read a quick overview that summarizes these methods.
DOM Manipulation and Events - The Odin Project
The Odin Project has a concise article on DOM manipulation. This section will quickly get you up to speed on using query selectors.
Read the sections titled "Targeting nodes with selectors" and "Query selectors". These sections will reinforce how to use CSS-style selectors to find the elements you want to work with.
Here's how you would use them in practice. Imagine you have this HTML:
<div id="app">
    <h1 class="main-title">Welcome!</h1>
    <p>This is a paragraph.</p>
    <ul>
        <li class="list-item">Item 1</li>
        <li class="list-item">Item 2</li>
    </ul>
</div>
You could select these elements in your JavaScript file like this:
// Select the h1 by its class
const title = document.querySelector('.main-title');

// Select the div by its ID
const appContainer = document.querySelector('#app');

// Select the FIRST list item by its class
const firstItem = document.querySelector('.list-item');

// Select ALL list items, which returns a NodeList
const allItems = document.querySelectorAll('.list-item');

console.log(title); // Logs the <h1> element
console.log(allItems); // Logs a NodeList containing two <li> elements
Because querySelectorAll returns a NodeList, you can use array-like methods on it, such as forEach, which you learned in the previous lesson.
allItems.forEach(item => {
  console.log(item); // This will log each <li> element individually
});
3. Manipulating Selected Elements
Once you have a reference to an element stored in a variable, you can change it.
Modifying Content
The safest and most common way to change the text inside an element is with the .textContent property.
const title = document.querySelector('.main-title');
title.textContent = 'Hello, DOM!'; // The h1 will now display "Hello, DOM!"
You might also see .innerHTML. While powerful, innerHTML can expose your site to security risks (Cross-Site Scripting, or XSS) if you insert content from untrusted sources. For changing text, always prefer .textContent.
Modifying Styles
You can change styles in two main ways.
1. Directly with the .style property (for quick, dynamic changes)
Every element has a style property that corresponds to its inline style attribute. You can set CSS properties directly on it. Note that CSS properties with hyphens (like background-color) are converted to camelCase in JavaScript (e.g., backgroundColor).
const title = document.querySelector('.main-title');
title.style.color = 'blue';
title.style.backgroundColor = 'lightgray'; // background-color becomes backgroundColor
This is useful for quick, one-off changes, but it's not ideal for applying many styles at once.
2. By Managing CSS Classes (The Preferred Method)
A much cleaner and more maintainable approach is to define your styles in your CSS file and use JavaScript to add or remove classes. This respects the separation of concerns: CSS for styling, JavaScript for logic.
Every element has a classList property with helpful methods:
.add('className'): Adds a class..remove('className'): Removes a class..toggle('className'): Adds the class if it's not there, and removes it if it is.
Let's watch a video that demonstrates this powerful technique.
JavaScript DOM Manipulation Mastery: A Comprehensive Guide
This segment of the 'JavaScript DOM Manipulation Mastery' video focuses on modifying element styles, contrasting the direct .style property with the more powerful and recommended classList property.
Watch the segment from 45:30 to 52:10. The video first reviews the direct .style property, but pay close attention to the explanation of classList starting around 47:30. This is the key takeaway.
Hands-On Practice
Time to put this into practice! This is the best way to make these concepts stick.
- In your project folder, create three files:
index.html,style.css, andscript.js. - Paste the following code into the respective files.
index.html
<!DOCTYPE html>
<html lang="en">
<head>
    <meta charset="UTF-8">
    <meta name="viewport" content="width=device-width, initial-scale=1.0">
    <title>DOM Practice</title>
    <link rel="stylesheet" href="style.css">
</head>
<body>
    <div id="container">
        <h1 id="main-heading">Original Heading</h1>
        <p class="description">This is a paragraph that will be styled with JavaScript.</p>
        <ul id="item-list">
            <li>Item 1</li>
            <li>Item 2</li>
            <li>Item 3</li>
            <li>Item 4</li>
        </ul>
    </div>
    <script src="script.js"></script>
</body>
</html>
style.css
body {
    font-family: sans-serif;
}


#container {
    padding: 20px;
    border: 1px solid #ccc;
    border-radius: 8px;
}

.highlight {
    background-color: #fffbe6;
    font-weight: bold;
}
script.js
Now, open your script.js file and complete the following tasks. After each step, save the file and refresh index.html in your browser to see the effect.
// Task 1: Select the h1 element by its ID and change its text content to "DOM Manipulation Fun".
const heading = document.querySelector('#main-heading');
heading.textContent = 'DOM Manipulation Fun';

// Task 2: Select the paragraph by its class and change its font color to green and font size to 18px using the .style property.
const paragraph = document.querySelector('.description');
paragraph.style.color = 'green';
paragraph.style.fontSize = '18px';

// Task 3: Select all the list items using querySelectorAll.
const listItems = document.querySelectorAll('#item-list li');

// Task 4: Loop through the list items. If the item's index is odd (1, 3, etc.), add the "highlight" class to it.
// This connects to what you learned about loops and array methods!
listItems.forEach((item, index) => {
  // The modulo operator (%) gives the remainder of a division.
  // index % 2 !== 0 checks if the index is an odd number.
  if (index % 2 !== 0) {
    item.classList.add('highlight');
  }
});
Conclusion
Great job! You've now learned the core mechanics of how JavaScript interacts with a webpage. This is the foundation for building any kind of dynamic user interface, from a simple interactive button to a complex single-page application.
Key Takeaways:
- The DOM is the browser's object-based representation of your HTML, which you can modify with JavaScript.
querySelectorandquerySelectorAllare the modern, standard ways to select any element using CSS selectors.- You can change an element's text content safely with the
.textContentproperty. - For styling, you can make quick changes with the
.styleproperty, but the best practice for maintainability is to manage CSS classes using the.classListproperty (.add(),.remove(),.toggle()).
In our next lesson, we will make our pages truly interactive. We'll learn how to attach event listeners to elements to run our JavaScript code in response to user actions like clicks and keyboard input.