Welcome to your personalized study plan for acing the Senior Dataflow & Integration Engineer role.
This first lesson is all about setting up your workbench. The learning outcome is to set up a Scala development environment using the Helix editor and Metals LSP, as per your preference. By the end of this session, you'll have a fully functional, professional-grade Scala development environment configured exactly the way you want it, ready for you to start building Beam pipelines. We will not only cover the "how" but also the "why," exploring the architecture of the tools involved, which should appeal to your background in complex systems.
Let's begin.
1. The Architecture of a Modern Scala Environment
Before we install anything, it's crucial to understand the components you'll be working with. Unlike some environments where a single IDE handles everything, a lightweight setup like the one you prefer involves several specialized tools that communicate with each other. Your experience with CI/CD and container orchestration will make the service-oriented nature of this setup feel familiar.
The key components are:
- Helix: Your chosen editor. A modern, modal, terminal-based editor written in Rust. It has built-in support for the Language Server Protocol (LSP), which is fundamental to our setup.
- Language Server Protocol (LSP): A standard protocol created by Microsoft that allows editors (like Helix) to communicate with language "servers." The server provides language-specific features like code completion, diagnostics, and go-to-definition. This decouples the editor from the language intelligence.
- Metals: The language server for Scala. It's the "brain" of our operation, providing all the Scala-specific smarts to Helix.
- sbt (Scala Build Tool): The most common build tool for Scala projects. It manages dependencies, compiles, tests, and packages your code. Think of it as a combination of
pip/poetryandmakefor Scala, defined in abuild.sbtfile. - Bloop: A build server that runs in the background. Metals uses Bloop to provide extremely fast compilation and diagnostic feedback within the editor, without the startup overhead of sbt for every small change.
- Coursier: A dependency fetcher for the JVM ecosystem, written in Scala. We will use its command-line tool,
cs, to install and manage our Scala tooling.
The video below provides an excellent conceptual overview of how Metals, LSP, and Bloop work together to create a responsive development experience. While it uses other editors for demonstration, the underlying principles are exactly what we're setting up.
Happy Life With #Scala #Metals
To understand the architecture of the tools we're about to install, please watch this section from the 'Happy Life With #Scala #Metals' video by DevInsideYou. Focus on how LSP, the build server (Bloop), and the language server (Metals) interact.
Watch the section from 18:08 to 42:29. The key takeaway is understanding the distinct roles of LSP (the protocol), Metals (the server/brain), and Bloop (the fast compiler), and how they form a cohesive system.
2. Installation and Setup
Now, let's get these tools installed and configured. We'll follow a streamlined process using Homebrew and Coursier. The article "Helix and Scala" by Eugene Yokota provides a great, concise guide for this exact setup.
This article directly addresses our goal. We will use its 'setup' section as our primary installation guide.
Read the 'setup' section of the article. We will follow these steps precisely.
Here is a summary of the steps to perform in your terminal:
- Install Java: Metals and the Scala compiler run on the JVM. Ensure you have a Java Development Kit (JDK), version 8 or 11, installed. You likely already do, but you can verify with
java -version. - Install Helix:
brew install helix - Install Coursier:
brew install coursier/formulas/coursier - Install Metals CLI:
This command uses Coursier to install the Metals command-line application.cs install metals
After installation, verify that the tools are correctly installed and available on your PATH:
hx --health scala


# Expected output should show a ✓ next to 'metals'

metals --version


# Expected output should show the installed Metals version
A Note on PATH: A common pitfall is having conflicting versions of tools on your PATH. For example, Homebrew might install one version of metals, and cs another. The GitHub discussion in the resource LINK highlights how a PATH issue led to problems. Ensure that the cs-installed versions are prioritized in your shell's PATH to avoid such issues.
3. Creating Your First Scala Project
With the tools installed, let's create a standard sbt project. sbt uses a conventional directory structure that will be familiar from other build systems.
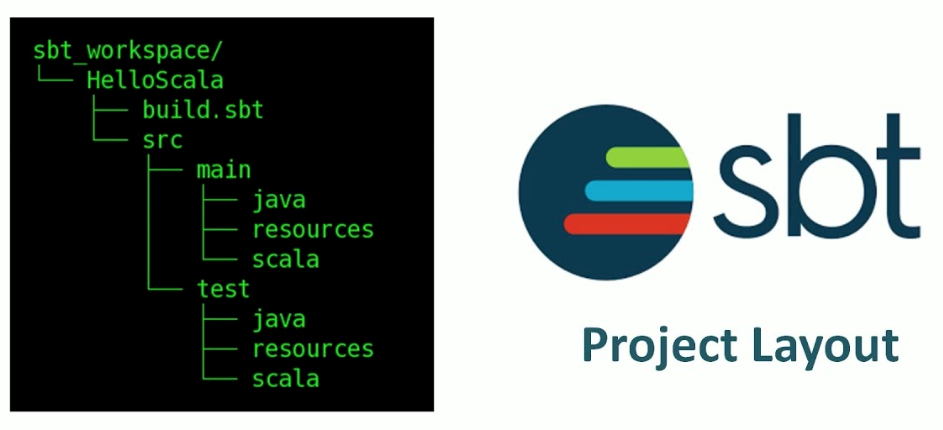
-
Create a new directory for your project and navigate into it:
mkdir scala-beam-kickstart cd scala-beam-kickstart -
Create the
build.sbtfile. This file tells sbt about your project, including its name, version, and dependencies.touch build.sbtOpen
build.sbtand add the following lines:val scala3Version = "3.3.3" lazy val root = project .in(file(".")) .settings( name := "scala-beam-kickstart", version := "0.1.0-SNAPSHOT", scalaVersion := scala3Version ) -
Create your first Scala source file:
mkdir -p src/main/scala
touch src/main/scala/Main.scala
Open
Main.scalaand add a simple "Hello, World" object:@main def hello(): Unit = println("Hello, Scala environment!") println(s"Running on Scala version: ${util.Properties.versionString}")
Your project is now set up.
4. The Critical Link: Importing the Build in Helix
This is the most important—and often missed—step for using Metals with Helix. When you open a project, Metals needs to "import the build" to understand its structure, dependencies, and source files. In full-featured IDEs or more mature LSP clients, a prompt appears automatically. In Helix, you currently need to trigger this manually.
This is a known limitation of Helix's LSP support, as explained in the GitHub discussion LINK. Fortunately, the workaround is simple once you know it.
- Open the project in Helix: From your project's root directory, run
hx. - Open a Scala file: Use the file picker (
<Space>f) to opensrc/main/scala/Main.scala. - Trigger the Build Import: Once the file is open, enter command mode by typing
:and then run the following command:
This sends a command to Metals, telling it to analyze your:lsp-workspace-command build-importbuild.sbtfile. Metals will then usesbt-bloopto generate the necessary configuration. This process can take a minute or two for the first time, as it may download sbt, Bloop, and other dependencies. Helix will not show progress, so be patient. - Verify LSP is Active: Once the import is complete, LSP features should work. Move your cursor over
printlnand pressk(in normal mode) to invoke hover information. You should see documentation for theprintlnmethod. Trygd(go to definition) onProperties. It should take you to the source file (which Metals downloads for you).
If you encounter issues, the troubleshooting thread below is an invaluable resource.
Help getting Metals working as the LSP for Scala in Helix? #9517
This GitHub discussion is essential for troubleshooting. It explains why manual steps are needed and provides the commands to fix most common connection issues between Helix and Metals.
Skim this discussion. Pay close attention to the answer providing the :lsp-workspace-command build-import command. Also note the advice on checking logs (hx -vv, :log-open) and removing cache directories (.metals, .bsp, .bloop) as a last resort.
Summary and Next Steps
Congratulations! You have successfully configured a lightweight, powerful Scala development environment tailored to your preferences.
Key Takeaways:
- A modern Scala dev setup consists of communicating components: Helix (editor), Metals (language server), sbt (build tool), and Bloop (build server), all tied together by LSP.
- Installation is managed via
brewand the Scala tool managercs. - The most critical step in Helix is manually triggering the build import with
:lsp-workspace-command build-importafter opening a Scala file.
You are now fully equipped to start coding. In the next lesson, "Translate core Python concepts to their idiomatic Scala equivalents," we will leverage this new environment to dive into the Scala language itself, drawing parallels to your existing knowledge of Python and Go to accelerate your learning.