Hello! Welcome to the next lesson in our journey to build a professional RESTful API.
In our last session, we successfully connected our API to a database. We created a Database class, a ProductGateway to handle SQL queries, and updated our ProductController to fetch and create products. We even started sending back JSON data and using a couple of HTTP status codes like 201 Created.
Today, we'll formalize and professionalize how our API communicates. The learning outcome for this lesson is to format and return responses in JSON format with correct HTTP status codes. A well-behaved API is predictable, and a big part of that is sending clear, standardized responses that any client can easily understand.
1. The Language of APIs: HTTP Status Codes
Before we write any code, let's understand the "language" servers use to talk back to clients. Every time your API responds to a request, it includes an HTTP status code. This is a three-digit number that quickly tells the client the outcome of its request. Was it successful? Did the client make a mistake? Did something go wrong on our server?
To get a quick but comprehensive overview of the most common codes, please watch the following video.
HTTP Status Codes Explained In 5 Minutes
This short video from ByteByteGo, 'HTTP Status Codes Explained In 5 Minutes', provides an excellent breakdown of the different categories of status codes and what they mean. It's a perfect primer for what we're about to implement.
Watch from 00:20 to 03:30. Pay close attention to the three main categories relevant to our API: 2xx Success: 200 OK, 201 Created, 204 No Content 4xx Client Errors: 400 Bad Request, 404 Not Found 5xx Server Errors: 500 Internal Server Error
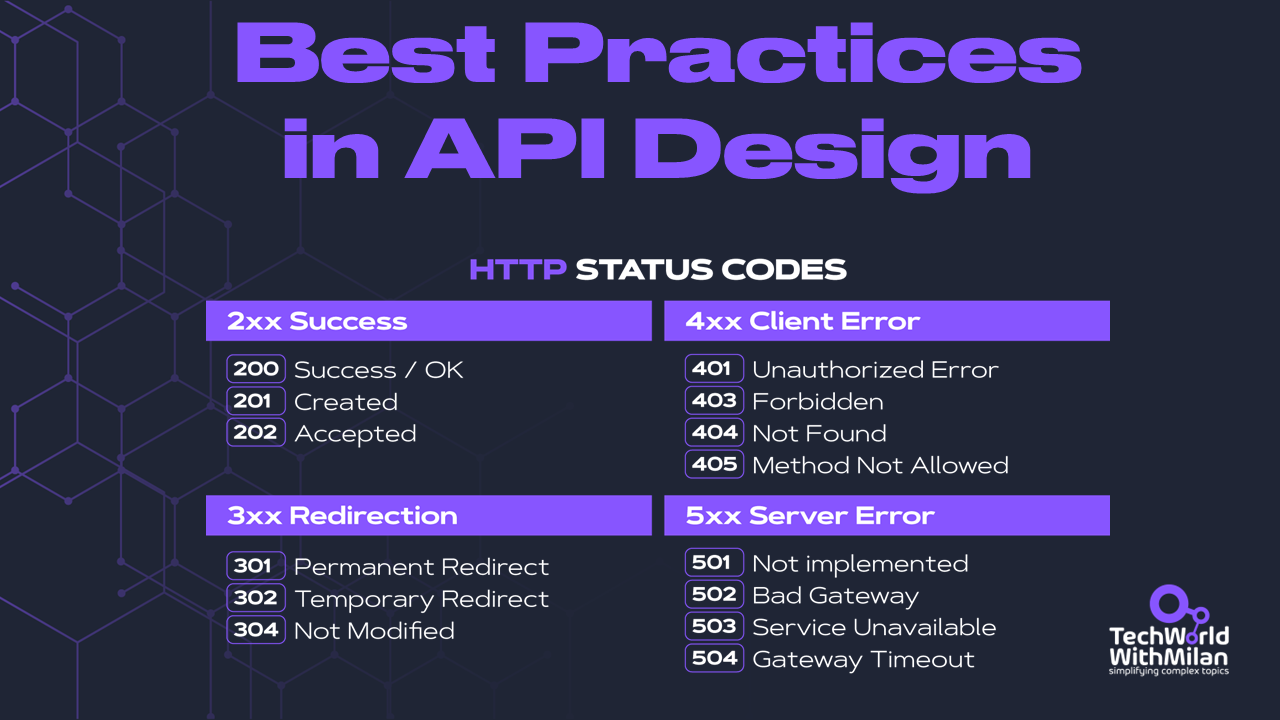
As you saw, these codes provide immediate, standardized feedback. Here's a quick summary and a visual guide for the codes most critical for our REST API:
200 OK: The standard success response forGETrequests.201 Created: The success response for aPOSTrequest that creates a new resource.204 No Content: A success response, typically forDELETEorPUT/PATCHrequests, where the server fulfilled the request but doesn't need to send back a body.400 Bad Request: A generic client-side error, often used for malformed request syntax or invalid JSON.404 Not Found: The requested resource (e.g.,/products/999) could not be found.422 Unprocessable Entity: The request was well-formed, but the server couldn't process it due to semantic errors (e.g., a required field likenamewas missing). We used this in the last lesson.500 Internal Server Error: A catch-all for unexpected errors on the server (e.g., the database connection fails).
2. Declaring Your Intent: The Content-Type Header
When our API sends back a JSON string, how does the client (like a browser or a mobile app) know it's JSON and not just plain text or HTML? We have to tell it explicitly using the Content-Type HTTP header. For JSON, the standard value is application/json.
This next video demonstrates why this header is important and how to set it in PHP.
The Content-Type Header Explained (with examples) | Web Development Tutorial
The video 'The Content-Type Header Explained' by dcode clearly illustrates the role of this header and shows the exact PHP code needed to set it.
Watch from 02:44 to 04:20. The key takeaways are the use of PHP's header() function and the json_encode() function, which we've already seen.
As the video shows, setting the header is straightforward. Before you output any content (with echo or print), you call the header() function:
header("Content-Type: application/json; charset=UTF-8");
We've already been doing this in our index.php, but it's crucial to understand why it's there.
3. Implementing a Standardized Response System
Now, let's combine status codes and JSON formatting into a clean, reusable system. This will make our controller code much tidier and our API's behavior consistent. A great way to do this is with a helper function.
Let's look at an article that proposes a very practical helper function for this exact purpose.
How to create your own API endpoints with PHP
The article 'How to create your own API endpoints with PHP' by Chris Ferdinandi shows a simple and effective way to manage API responses using a utility function.
Read the sections 'PHP utility methods' and 'Handling HTTP methods'. Focus on the send_response() function. Notice how it takes the response data and a status code, and then handles both http_response_code() and die(json_encode()) in one place.
The send_response() function is a brilliant little utility. It encapsulates the logic for setting the status code and sending the JSON-encoded body, preventing us from repeating that code everywhere.
Let's create this utility for our own project.
-
Create a new file in your project's root directory named
api_helpers.php. -
Add the following function to it:
<?php

/**
 * Send an API response in a standard format.
 *
 * @param mixed $data The data to be sent (will be JSON encoded).
 * @param int $code The HTTP status code to send.
 */
function send_response($data, int $code = 200): void
{
    // Set the HTTP response code.
    http_response_code($code);

    // If data is provided, encode it and send it.
    // We stop script execution after sending the response.
    die(json_encode($data));
}
Note:
die()is used here to ensure no other code runs and accidentally alters the response after it has been sent. -
Now, open your main
index.phpfile andrequirethis new helper file at the top:<?php require __DIR__ . '/api_helpers.php'; // Add this line spl_autoload_register(function ($class) { // ... rest of the file
4. Refactoring the ProductController
With our send_response helper ready, we can dramatically clean up the ProductController. We'll replace all the http_response_code() and echo json_encode() calls with a single call to our new function.
Here is the refactored processCollectionRequest method in src/ProductController.php:
// In src/ProductController.php

private function processCollectionRequest(string $method): void
{
    switch ($method) {
        case "GET":
            $products = $this->gateway->getAll();
            send_response($products); // Defaults to 200 OK
            break;

        case "POST":
            $data = (array) json_decode(file_get_contents("php://input"), true);

            // Simple validation
            $errors = $this->getValidationErrors($data);
            if (!empty($errors)) {
                send_response(["errors" => $errors], 422); // Unprocessable Entity
                break;
            }

            $id = $this->gateway->create($data);

            send_response([
                "message" => "Product created successfully",
                "id" => $id
            ], 201); // Created
            break;

        default:
            // For any other method on the collection endpoint
            send_response(["message" => "Method not allowed"], 405);
            break;
    }
}

// You can add this helper method to the controller for validation logic
private function getValidationErrors(array $data): array
{
    $errors = [];
    if (empty($data["name"])) {
        $errors[] = "name is required";
    }
    // You could add more validation rules here
    return $errors;
}
Look how much cleaner that is! The intent of each block is now crystal clear: get or create data, then send a response with the appropriate code.
5. Handling Resource-Specific Requests
Let's complete our controller by implementing the processResourceRequest method to handle requests for a single product (e.g., GET /products/1). This will give us a chance to use the 404 Not Found and 204 No Content status codes.
First, add two new methods to your src/ProductGateway.php: one to get a single record by ID, and one to delete it.
// In src/ProductGateway.php

public function get(string $id): array | false
{
    $sql = "SELECT * FROM product WHERE id = :id";
    $stmt = $this->conn->prepare($sql);
    $stmt->bindValue(":id", $id, PDO::PARAM_INT);
    $stmt->execute();
    return $stmt->fetch(PDO::FETCH_ASSOC);
}

public function delete(string $id): int
{
    $sql = "DELETE FROM product WHERE id = :id";
    $stmt = $this->conn->prepare($sql);
    $stmt->bindValue(":id", $id, PDO::PARAM_INT);
    $stmt->execute();
    return $stmt->rowCount(); // Returns the number of affected rows
}
Now, update src/ProductController.php with the processResourceRequest method.
// In src/ProductController.php

private function processResourceRequest(string $method, string $id): void
{
    $product = $this->gateway->get($id);

    if (!$product) {
        send_response(["message" => "Product with ID $id not found"], 404);
        return; // Important to stop execution here
    }

    switch ($method) {
        case "GET":
            send_response($product); // 200 OK
            break;

        case "DELETE":
            $this->gateway->delete($id);
            http_response_code(204); // No Content. No body is sent with this response.
            break;

        default:
            send_response(["message" => "Method not allowed"], 405);
            break;
    }
}
Notice the special handling for DELETE. We use http_response_code(204) directly because a 204 No Content response, by definition, has no body. Our send_response helper is designed to always send a body, so we bypass it in this specific case.
Conclusion
Great job! You've transformed our API's output from simple data dumps into professional, standardized responses. This makes your API predictable, easier to debug, and much simpler for other developers and services to consume.
Key Takeaways:
- HTTP Status Codes are Key: They provide immediate, machine-readable feedback on the outcome of a request (
2xxfor success,4xxfor client error,5xxfor server error). - Announce Your Data Type: Always send the
Content-Type: application/jsonheader so clients know how to interpret the response body. - Standardize with Helpers: A utility function like
send_response()reduces code duplication and enforces a consistent response format across your entire API. - Choose the Right Code: Use specific codes like
200(OK),201(Created),204(No Content),404(Not Found), and422(Unprocessable Entity) to accurately describe outcomes.
Preview of the Next Lesson:
Our API is now well-structured and communicates clearly, but it's completely open to the public. Anyone can view, add, or delete products. In the next lesson, we will begin to secure it by exploring how to implement a basic API key authentication mechanism to protect endpoints. This is our first step into the world of API security, a topic central to your interests in cybersecurity.