Hello! Welcome to our first hands-on module. In the previous lessons, we established a strong theoretical foundation, culminating in a framework for evaluating and selecting Agent Development Kits (ADKs). We identified LangGraph as a powerful, flexible choice for building complex, auditable agents.
Now, it's time to move from theory to practice. This lesson kicks off our deep dive into LangGraph. Our goal is to set up a complete, professional development environment from scratch. By the end of this session, you will have installed the necessary tools, configured your API keys, and built a minimal, functioning agent to verify that everything is working correctly. This setup will be the foundation for all the advanced agents we build in the upcoming lessons.
A First Look at LangGraph's Structure
Before we write any code, let's visualize what a LangGraph agent looks like. At its core, LangGraph allows you to define agentic workflows as state graphs. A graph consists of nodes (functions that perform work) and edges (which direct the flow of data from one node to another). The data itself is held in a state object that is passed around the graph.
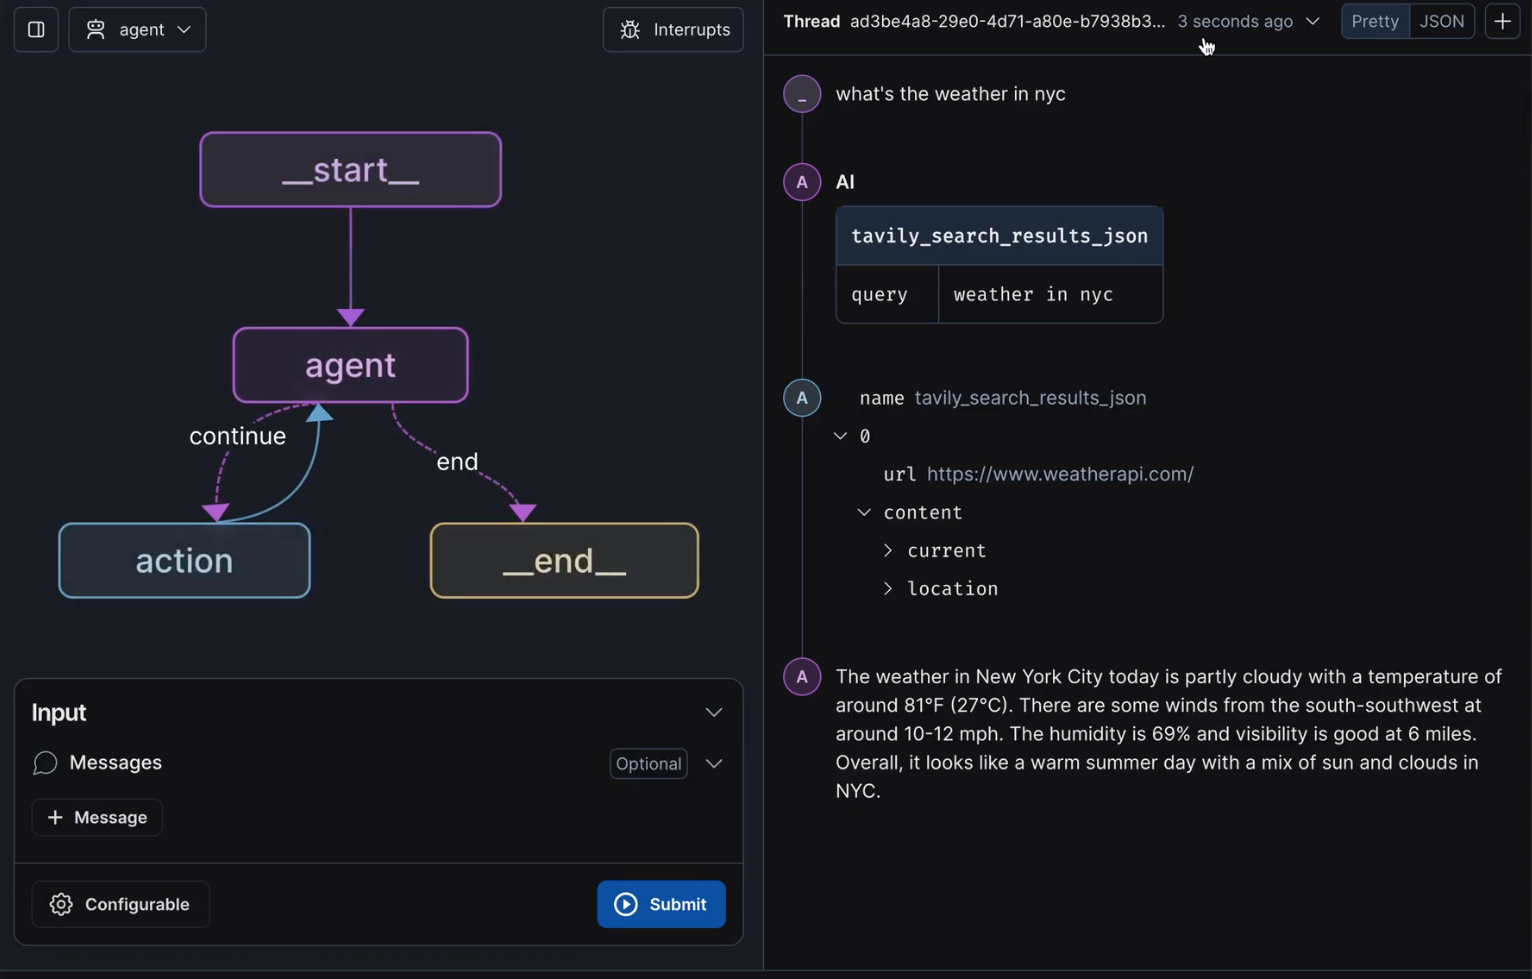
This graph-based structure is highly analogous to defining a state machine or a DAG (Directed Acyclic Graph) to orchestrate complex jobs, a pattern you're likely familiar with from general software engineering. It gives you explicit control over the agent's execution path.
For a dynamic introduction to these concepts, the following video provides an excellent overview.
LangGraph Tutorial - How to Build Advanced AI Agent Systems
The 'LangGraph Tutorial' from Tech With Tim offers a great conceptual introduction to LangGraph, contrasting it with simpler frameworks and explaining its core components.
Please watch the first four minutes of the video (00:00:00 - 04:13). The presenter will cover: Why LangGraph?: Its advantages for building production-grade, complex agents. Graphs, Nodes, and Edges: A clear explanation of how these components are used to define an agent's workflow, with simple and more advanced examples. Focus on understanding how nodes represent steps (like calling an LLM or a tool) and how edges define the flow between them.
Step 1: Project Setup and Dependency Management
Now, let's get our hands dirty. We'll set up a new project directory and install the necessary Python packages. We'll follow modern Python practices by using a virtual environment and a fast package manager called uv.
The video you just started will now guide you through the practical setup. We'll be following its steps closely.
LangGraph Tutorial - How to Build Advanced AI Agent Systems
We will now set up the project. This segment of the 'LangGraph Tutorial' covers creating the project, installing dependencies using uv, and setting up the IDE.
Please watch from 04:13 to 07:20. Follow the steps to: Create a new project directory. Install uv, if you don't have it already. uv is a modern, extremely fast Python package manager that can replace pip and venv. Initialize a uv project with uv init. Install the required packages using uv add. While the video uses PyCharm, these steps will work in any terminal and with any code editor like VS Code.
To summarize the commands you'll be running in your project directory:
-
Initialize the project:
uv initThis creates a
pyproject.tomlfile to manage your project's metadata and dependencies, and a virtual environment in a.venvfolder. -
Install dependencies:
uv add python-dotenv langgraph "langchain-anthropic" ipykernelLet's quickly break down what these packages are for:
python-dotenv: Loads environment variables from a.envfile. We'll use this for our API key.langgraph: The core LangGraph framework.langchain-anthropic: The specific LangChain integration for Anthropic's Claude models. If you prefer OpenAI, you would installlangchain-openaiinstead.ipykernel: Allows you to run code in Jupyter notebooks, which is great for iterative development and experimentation.
Step 2: API Key Configuration
Our agent needs an LLM to function as its "brain," and accessing an LLM requires an API key. We will use Anthropic's Claude 3.5 Sonnet model for this example, but the process is similar for any provider (like OpenAI).
To keep our secret keys out of our source code—a crucial security practice—we'll store the key in a .env file.
LangGraph Tutorial - How to Build Advanced AI Agent Systems
The next step is to acquire and securely store an API key. The video demonstrates how to do this for Anthropic.
Watch from 07:20 to 09:05. The presenter will show you how to: Create a .env file in your project root. Get an API key from the Anthropic console. Add the key to your .env file in the format ANTHROPIC_API_KEY='your_key_here'.
After this step, your project directory should look something like this:
langgraph-project/
├── .venv/
├── .env
├── main.py
└── pyproject.toml
And your .env file should contain one line:ANTHROPIC_API_KEY='sk-ant-...'
Step 3: Verifying the Setup with a Minimal Agent
With our environment ready, let's write a minimal "hello world" agent to confirm everything is connected properly. This agent will take a user's message, send it to the LLM, and print the response.
This final part of the tutorial will guide you through writing the code. We will go through it step-by-step.
LangGraph Tutorial - How to Build Advanced AI Agent Systems
Now we'll write the code for a simple chatbot to verify our setup. This section covers defining the state, creating a node, building the graph, and invoking it.
Please watch from 09:05 to 23:18. The video explains the entire process of building and running a simple agent. Pay attention to the main building blocks: State Definition: How a TypedDict is used to define the data structure (messages) that persists throughout the graph's execution. Node Definition: A Python function (chatbot) that takes the current state, performs an action (calls the LLM), and returns an update to the state. Graph Construction: Using StateGraph to add the node and connect it to the START and END points. Compilation and Invocation: How to compile() the graph into a runnable object and then invoke() it with an initial state.
Here is the complete code for your main.py file. You can use this to check your work.
import os
from typing import Annotated

from dotenv import load_dotenv
from langchain_anthropic import ChatAnthropic
from typing_extensions import TypedDict

from langgraph.graph import StateGraph, START, END
from langgraph.graph.message import add_messages

# Load environment variables from .env file
load_dotenv()

# Define the structure of our agent's state
# For this simple example, it's just a list of messages
class State(TypedDict):
    messages: Annotated[list, add_messages]

# Define the node that will be the core of our chatbot
def chatbot(state: State):
    """
    This function is a node in our graph. It takes the current state
    (which includes the conversation history), calls the LLM with that
    history, and returns the LLM's response.
    """
    return {"messages": [llm.invoke(state["messages"])]}

# Initialize the LLM. We are using Claude 3.5 Sonnet.
# The API key is read automatically from the ANTHROPIC_API_KEY environment variable.
llm = ChatAnthropic(model="claude-3.5-sonnet-20240620")

# Create the graph builder
graph_builder = StateGraph(State)

# Add our chatbot node
graph_builder.add_node("chatbot", chatbot)

# Define the graph's edges
graph_builder.add_edge(START, "chatbot") # The graph starts at the chatbot node
graph_builder.add_edge("chatbot", END)   # The graph ends after the chatbot node

# Compile the graph into a runnable object
graph = graph_builder.compile()

# Run the agent in a loop
while True:
    user_input = input("User: ")
    if user_input.lower() in ["quit", "exit", "q"]:
        print("Goodbye!")
        break

    # We invoke the graph with the current user message
    # The `add_messages` function in our state automatically handles
    # appending this new message to the history.
    response = graph.invoke({"messages": [("user", user_input)]})

    # The response contains the final state. We extract the last message.
    ai_message = response["messages"][-1]
    print(f"AI: {ai_message.content}")
When you run this script (python main.py), it should prompt you for input. If you type a message like "Hello world", the script will call the Claude API and print its response, confirming your entire setup is working!
Test your understanding!
Imagine you want to switch from Anthropic's Claude to OpenAI's gpt-4o model. What two specific parts of the setup process and code would you need to change?
Show answer
- Dependency Installation: You would need to install the OpenAI integration instead of the Anthropic one. You would run:
uv add langchain-openai - LLM Initialization and API Key:
- You would need to change the API key in your
.envfile fromANTHROPIC_API_KEYtoOPENAI_API_KEY. - In
main.py, you would change the LLM initialization fromChatAnthropictoChatOpenAI:# from langchain_anthropic import ChatAnthropic from langchain_openai import ChatOpenAI # ... # llm = ChatAnthropic(model="claude-3.5-sonnet-20240620") llm = ChatOpenAI(model="gpt-4o")
- You would need to change the API key in your
Conclusion
Congratulations! You have successfully set up a complete development environment for LangGraph. You've created a new project, managed dependencies with uv, handled API keys securely, and built and run a minimal agent to verify the entire pipeline.
Key Takeaways:
- LangGraph organizes agent workflows into state graphs with nodes (functions) and edges (transitions).
- A professional Python setup involves using a virtual environment and a modern package manager like
uv. - API keys must be stored securely in a
.envfile, separate from your source code. - A minimal graph consists of an entry point (
START), at least one node, and an exit point (END).
You now have a solid foundation to build upon. In our next lesson, we will expand on the code we wrote today. We'll deconstruct the ReAct (Reasoning and Acting) pattern and implement a more sophisticated agent loop using LangGraph's state graph, preparing us to add tools and more complex logic.