Hello! Welcome to the next step in our journey to build sophisticated AI agents with LangGraph.
In our previous lessons, you've already built a fully functional ReAct-style agent. It can decide if it needs to use a tool and which tool to use from a list. However, its workflow is still fairly linear: it calls the model, optionally calls a tool, and then loops back or ends.
Today, we will break out of that linear path and implement conditional routing. This powerful technique allows you to create complex, branching workflows where the agent's path through the graph changes dynamically based on its state. This is the key to building agents that can handle diverse tasks, follow different procedures, or even escalate to a human when needed.
Our learning outcome for this lesson is to implement conditional routing in a LangGraph agent to direct its workflow based on state. To achieve this, we will build an agent that first classifies a user's request and then routes it to one of two specialized "sub-agents"—one logical, one empathetic—to generate the most appropriate response.
From Simple Decisions to Complex Routing
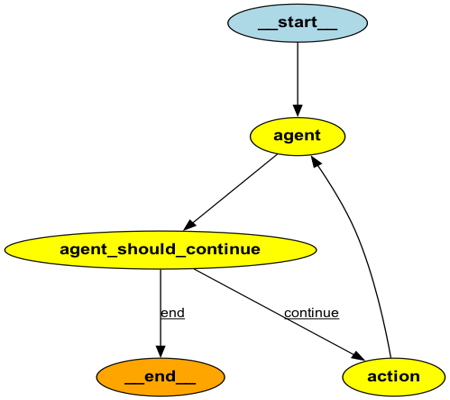
So far, our conditional logic has been a binary choice, implemented in our should_continue function: should the agent call a tool or end the conversation?
def should_continue(state: AgentState):
    if state["messages"][-1].tool_calls:
        return "tools" # Go to the tool node
    return "end"     # Go to the end
This is a form of conditional routing, but LangGraph allows for much more. The add_conditional_edges function can handle any number of paths. The core mechanism consists of three parts:
- Source Node: The node after which the decision is made.
- Routing Function: A function that inspects the current
stateand returns a string (or any hashable value) indicating which path to take. - Path Map: A dictionary that maps the values returned by the routing function to the names of the destination nodes.
This pattern allows for creating highly dynamic and intelligent workflows, as shown in the diagram below.
Building a Multi-Personality Agent
To put this into practice, we'll build a new agent that first classifies the user's intent and then routes the query to a specialized LLM persona for a tailored response.
The flow will be:
- Start: Receive user input.
- Classifier: A node uses an LLM to classify the input as requiring either a "logical" or "emotional" response. This decision is stored in the agent's state.
- Router (Conditional Edge): Our routing function reads the classification from the state and directs the workflow to one of two paths.
- Specialist Agents:
- Logical Agent: A node with a system prompt geared towards factual, analytical answers.
- Therapist Agent: A node with a system prompt designed for empathetic, supportive answers.
- End: The specialist agent provides its response, and the graph concludes.
The following video tutorial provides a complete, step-by-step walkthrough of building this exact agent. As a software engineer, you'll find its code-centric approach very clear. We will work through it together.
LangGraph Tutorial - How to Build Advanced AI Agent Systems
The video 'LangGraph Tutorial' by Tech With Tim will be our primary guide for this lesson. It's a comprehensive walkthrough of building a conditionally routed agent from the ground up.
Please watch from 24:16 to 41:33. This segment covers the entire implementation of the multi-agent graph. As you watch, focus on these key implementation details: State Modification (25:27): Notice how a message_type field is added to the State class to hold the router's decision. Structured Output (26:18): The classify_message node uses a Pydantic model (MessageClassifier) with with_structured_output. This forces the LLM to return a predictable JSON object, making the classification reliable. The Router Function (32:38): The router node is surprisingly simple. It just reads the message_type from the state and returns the name of the next node. Pay close attention to how he returns a value under the key next—this will be used by the conditional edge. Specialist Agent Nodes (35:22): The therapist_agent and logical_agent are just LLM calls with different system prompts. This is a common and powerful pattern for specialization. add_conditional_edges (39:09): This is the most critical part. Observe the syntax: add_conditional_edges(source_node, routing_function, path_map). The path_map dictionary connects the string returned by the routing function to the actual nodes in the graph.
Let's Code: Full Implementation
After watching the video, you should have a solid grasp of the components. Here is the complete code for the agent. You can create a new Python file and follow along. This code mirrors what was built in the video, with minor adjustments for clarity and to ensure it runs as a standalone script.
First, ensure you have the necessary dependencies. In addition to the ones from the previous lesson, you'll need pydantic and python-dotenv.
uv pip install langgraph langchain-anthropic pydantic python-dotenv
Next, create a .env file in your project root and add your Anthropic API key (the example uses Claude, but you can adapt it for OpenAI if you prefer).
ANTHROPIC_API_KEY="your_api_key_here"
Now, here is the full main.py:
import os
from dotenv import load_dotenv
from typing import Annotated, Literal
from typing_extensions import TypedDict

from langchain_anthropic import ChatAnthropic
from langgraph.graph import StateGraph, START, END
from langgraph.graph.message import add_messages
from pydantic import BaseModel, Field

# --- 1. Setup Environment ---
load_dotenv()

# --- 2. Define State and Pydantic Models ---
class State(TypedDict):
    """The state of our graph."""
    messages: Annotated[list, add_messages]
    # This field will be used by the router
    message_type: str | None

class MessageClassifier(BaseModel):
    """Pydantic model for classifying the user's message."""
    message_type: Literal["emotional", "logical"] = Field(
        ...,
        description="Classify the message as requiring an emotional/therapist or logical response."
    )

# --- 3. Initialize Model ---
llm = ChatAnthropic(model="claude-3-5-sonnet-20240620")

# --- 4. Define Graph Nodes ---

def classify_message(state: State):
    """
    Classifies the user's message and updates the message_type in the state.
    """
    # Use a version of the LLM that is forced to produce structured output
    classifier_llm = llm.with_structured_output(MessageClassifier)

    last_message = state["messages"][-1]

    # System prompt to guide the classification
    system_prompt = """You are a master at reading people. Classify the user's message as either 'emotional' if it deals with feelings, personal problems, or requires empathy, or 'logical' if it asks for facts, information, or practical solutions."""

    # Invoke the classifier
    result = classifier_llm.invoke(
        [
            ("system", system_prompt),
            ("user", last_message.content)
        ]
    )

    print(f"--- Classifier decided: {result.message_type} ---")
    return {"message_type": result.message_type}

def logical_agent(state: State):
    """
    Generates a response from a logical, fact-based perspective.
    """
    system_prompt = "You are a purely logical assistant. Focus on facts and provide clear, concise answers based on evidence."
    response = llm.invoke([("system", system_prompt)] + state["messages"])
    return {"messages": [response]}

def therapist_agent(state: State):
    """
    Generates a response from an empathetic, supportive perspective.
    """
    system_prompt = "You are a compassionate therapist. Focus on the emotional aspects of the user's message, show empathy, and validate their feelings."
    response = llm.invoke([("system", system_prompt)] + state["messages"])
    return {"messages": [response]}

# --- 5. Define the Router ---
def router(state: State) -> Literal["logical_agent", "therapist_agent"]:
    """
    Reads the message_type from the state and decides which agent to route to.
    """
    return f"{state['message_type']}_agent"

# --- 6. Assemble the Graph ---
graph_builder = StateGraph(State)

# Add all the nodes
graph_builder.add_node("classify_message", classify_message)
graph_builder.add_node("logical_agent", logical_agent)
graph_builder.add_node("therapist_agent", therapist_agent)

# The entry point is the classifier
graph_builder.set_entry_point("classify_message")

# Add the conditional edge from the classifier to the specialist agents
graph_builder.add_conditional_edges(
    "classify_message",
    router,
    {
        "logical_agent": "logical_agent",
        "therapist_agent": "therapist_agent"
    }
)

# The specialist agents lead to the end
graph_builder.add_edge("logical_agent", END)
graph_builder.add_edge("therapist_agent", END)

# Compile the graph
graph = graph_builder.compile()

# --- 7. Run the Agent ---
def run_agent(query):
    print(f"\n--- Querying Agent: '{query}' ---")
    response = graph.invoke({"messages": [("user", query)]})
    print("--- Final Response ---")
    print(response["messages"][-1].content)


# Test with a logical query
run_agent("What are the main components of a CPU?")

# Test with an emotional query
run_agent("I'm feeling really overwhelmed with work lately.")
When you run this script, you'll see the output from the classifier node for each query, followed by a response generated by the corresponding specialist agent. This demonstrates conditional routing in action!
Test your understanding!
Imagine you want to add a third path for "creative" queries, like writing a poem. You create a new node called creative_agent. What are the three key changes you would need to make to integrate this new path into the existing graph?
Show answer
- Update the Pydantic Model: You would need to add
"creative"as a valid option in theMessageClassifierLiteraltype to allow the classifier to choose it.class MessageClassifier(BaseModel): message_type: Literal["emotional", "logical", "creative"] = Field(...) - Add the New Node: You must add the
creative_agentnode to the graph builder.graph_builder.add_node("creative_agent", creative_agent) - Update the Path Map: You need to add the new route to the
path_mapin theadd_conditional_edgescall.
You also need to add an edge from the new node tograph_builder.add_conditional_edges( "classify_message", router, { "logical_agent": "logical_agent", "therapist_agent": "therapist_agent", "creative_agent": "creative_agent" # New route } )END.graph_builder.add_edge("creative_agent", END)
Conclusion
Congratulations! You have now mastered one of the most fundamental concepts for building advanced agents: conditional routing. You've moved beyond simple linear chains and can now create dynamic, stateful workflows that adapt their behavior based on the situation.
Key Takeaways:
- Conditional Routing is the mechanism for creating branches in your agent's workflow.
- The
add_conditional_edgesfunction is the primary tool for this, requiring a source node, a routing function, and a path map. - The Routing Function's sole job is to inspect the current
stateand return a key that determines the next step. - Using an LLM with Structured Output (e.g., via Pydantic) is a robust way to make routing decisions, as it provides predictable output that your routing function can easily parse.
- This pattern allows for the creation of "specialist" agents, where a primary agent routes tasks to sub-agents that are experts in a specific domain.
In our next lesson, we will tackle error handling. Real-world agents need to be resilient to failures, such as a tool's API being temporarily down. We will implement strategies like automatic retries to make our agent more robust and production-ready.