Introduction
Welcome back! In our last session, you successfully integrated the fastapi_mcp library into your FastAPI application. By adding just a few lines of code, you created a new /mcp endpoint, which is the gateway for an AI to discover the tools your application offers.
Today, we'll focus on the final and most crucial step of this foundational module: verifying that your get_order_details tool is correctly exposed. We'll move from theory to practice by running your server and using a specialized tool, the MCP Inspector, to examine the /mcp endpoint. This will confirm that the operation_id, parameters, and response schema you defined are being broadcast exactly as expected.
By the end of this lesson, you will have tangible proof that your API is "AI-ready."
1. Understanding the /mcp Endpoint
Before we dive into verification, it's important to understand that the /mcp endpoint you created behaves differently from a standard REST API endpoint. It uses a technology called Server-Sent Events (SSE).
Instead of sending a single JSON response and closing the connection, an SSE endpoint keeps the connection open and can "push" a stream of messages to the client over time. This is the mechanism MCP clients use to discover tools and receive updates.
What is FastAPI MCP? Effortless AI Integration for Your FastAPI APIs
The article 'What is FastAPI MCP?' provides a clear, brief explanation of what you should expect to see if you access an MCP endpoint directly in a browser. It helps set the correct expectation for its behavior.
Please read 'Step 5: Explore the MCP Endpoint'. This short section explains that the output is an SSE stream and shows an example. This confirms that seeing a stream of text is the correct behavior, not an error.
While you could inspect this raw stream using a tool like curl, it's not very user-friendly. For effective verification and debugging, we'll use the official MCP Inspector.
2. Verifying with the MCP Inspector
The MCP Inspector is a web-based utility specifically designed to connect to, inspect, and test MCP servers. It provides a clean user interface to see which tools are exposed, what their input parameters are, and what their output schemas look like. This is the standard way to confirm your server is broadcasting its capabilities correctly.
Let's get it set up and connected to your running application.
How To Build a MCP Server with FastAPI (FastAPI-MCP)
The project guide we've been following, 'How To Build a MCP Server with FastAPI (FastAPI-MCP)', contains a perfect walkthrough for using the Inspector. We will follow these steps precisely.
Please read the section 'Testing Your MCP Server with the Inspector'. This will guide you through installing and running the inspector and connecting it to your local FastAPI server. We will not be using the Authentication tab in this lesson; that comes later.
Hands-On: Step-by-Step Verification
Follow the instructions from the reading to verify your server. Here's a summary of the steps tailored for our current setup:
-
Ensure your FastAPI server is running. In your project terminal, make sure the command
uv run uvicorn main:app --reloadis active. -
Install the MCP Inspector. You'll need Node.js and npm for this. Open a new terminal window and run:
npm install -g @modelcontextprotocol/inspector -
Run the Inspector UI. In the same new terminal, run:
npx @modelcontextprotocol/inspectorThis will start the Inspector's web server and provide you with a URL, typically
http://localhost:5173. -
Connect to your server:
- Open the Inspector URL in your browser.
- Set Transport Type to
SSE. - Enter the MCP server URL:
http://localhost:8000/mcp. - Skip the Authentication tab for now.
- Click Connect.
If the connection is successful, the interface will update, indicating it's connected to your server.
3. Analyzing the Tool Definition
Now that you're connected, let's confirm your tool is exposed correctly.
- In the Inspector, click on the Tools tab.
- You should see your tool listed as
get_order_details.
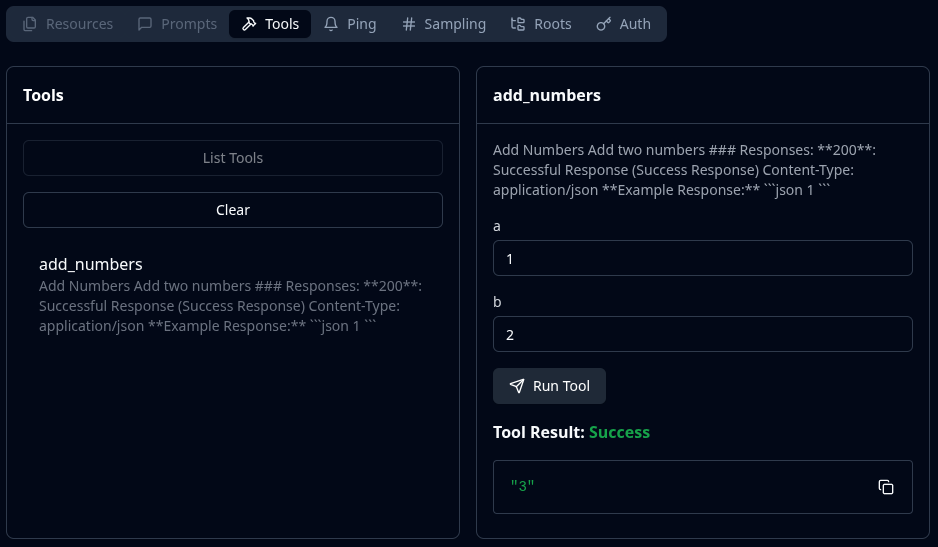
Click on get_order_details to expand its details. This is the moment of truth! Let's connect what you see in the Inspector back to your Python code:
- Tool Name: The name
get_order_detailscomes directly from theoperation_idyou set in your@app.getdecorator. - Input Parameters: You should see an input field for
order_id. This was automatically inferred from theorder_id: strparameter in yourasync def get_order_details(order_id: str)function signature. - Output Schema: The Inspector will show the expected output structure. This structure is derived directly from the fields in your
OrderPydantic model, which you linked viaresponse_model=Order.
This confirms that fastapi-mcp has successfully introspected your FastAPI code and translated it into a standardized tool definition that an AI can understand and use.
To see this automatic conversion explained visually, the following short clip is very helpful.
Create MCP Servers from Python Code in 10.5 Minutes
The video 'Create MCP Servers from Python Code' demonstrates exactly how an existing FastAPI endpoint is automatically discovered and listed as a tool by an MCP client.
Watch the segment from 06:14 to 07:07. The narrator shows a /books endpoint in their FastAPI code and then points to the get_all_books tool that was automatically discovered by the client. This is the same principle you just observed with your get_order_details tool.
You can even test the tool directly from the Inspector. Enter ORD12345 into the order_id field and click Run Tool. You should see a "Success" result with the placeholder JSON data you defined in your endpoint.
Conclusion
Congratulations! You have successfully completed the first module. You've not only built a functional API endpoint but have also integrated an MCP server and, most importantly, verified that your tool is correctly exposed and ready for an AI to consume.
Here are the key takeaways from this lesson:
- The
/mcpendpoint uses Server-Sent Events (SSE) to stream information to clients. - The MCP Inspector is the essential utility for verifying and debugging your MCP server.
- The Inspector provides concrete proof that
fastapi-mcpcorrectly translates your FastAPI code (operation_id, function parameters, and Pydanticresponse_model) into a structured tool definition.
In our next lesson, we will begin Module 2 by focusing on making our tool more effective. Now that the technical connection is established, we need to guide the AI on when and how to use it. We'll start by learning how to write a high-quality description for your tool, a critical element for LLM performance.