Introduction
In our last lesson, we focused on designing the "public API" of a custom tool—the contract we present to the LLM, comprising its name, description, and input/output schemas. This contract is crucial for the model to understand what a tool does and when to use it.
Today, we move from design to implementation. This lesson directly addresses the learning outcome: Implement the backend logic for a custom tool as a callable function. You will write the actual Python code that gets executed when the LLM decides to use your tool. This is where the agent's "thought" turns into concrete "action." For a production-focused engineer, writing robust, efficient, and error-proof tool logic is a core competency.
Let's start by revisiting the overall flow of function calling to see exactly where our backend logic fits.
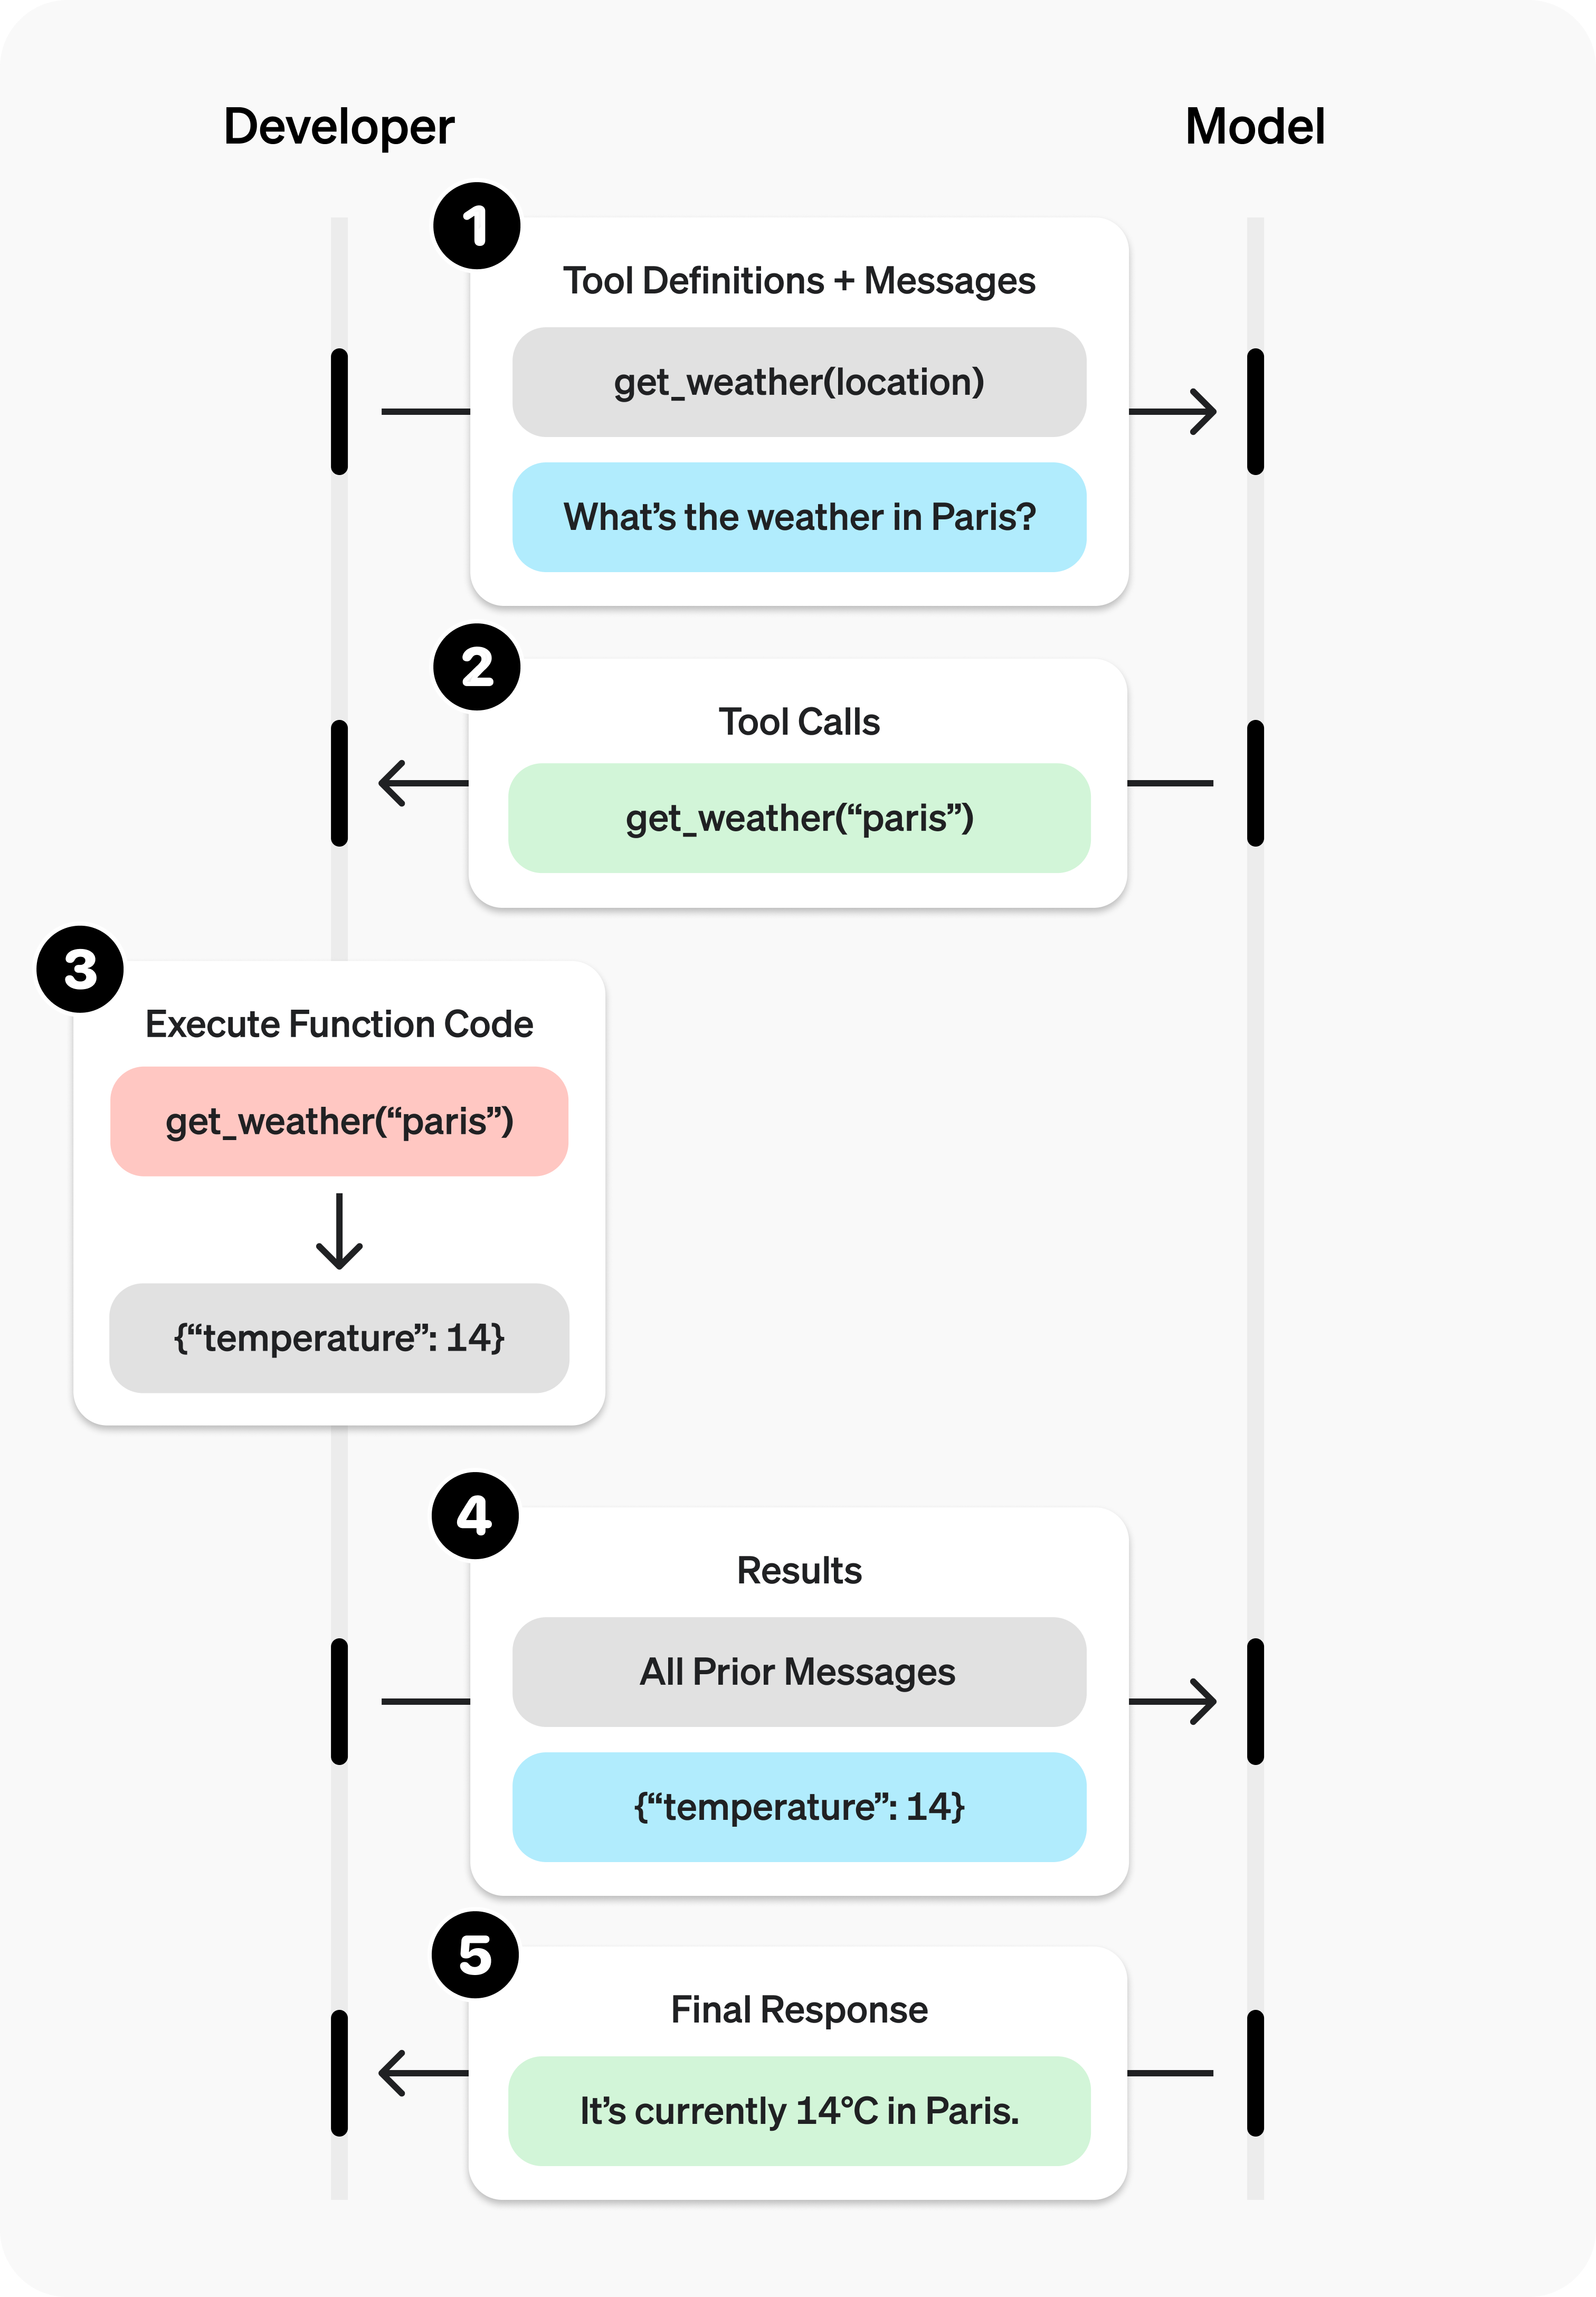
From Schema to Function: The @tool Decorator
In the world of LLM frameworks like LangChain, there are a few ways to define a tool. The most common and Pythonic method is using the @tool decorator. It's an elegant way to turn a standard Python function into something an LLM agent can use, by automatically inferring the tool's properties from the function itself:
- Tool Name: Inferred from the function's name (e.g.,
def get_current_weatherbecomes a tool namedget_current_weather). - Tool Description: Inferred from the function's docstring. This is why the clear descriptions we worked on in the last lesson are so important—they become the docstring.
- Input Schema: Inferred from Python type hints and, for more complex inputs, a Pydantic
BaseModel.
To get a firm grasp of this concept, we'll consult a guide that walks through creating a custom tool from scratch.
Create Custom Tools for LangChain Agents
The article 'Create Custom Tools for LangChain Agents' from apxml.com clearly explains the structure of a tool and demonstrates the use of the @tool decorator.
Please read the first three sections: 'The Structure of a Tool', 'Using the @tool Decorator for Simplicity', and the accompanying code examples. Focus on how the Tool class components (name, description, func) map directly to the function name, docstring, and body when using the @tool decorator.
Implementing a Real-World Tool
Now, let's build a tool that does something useful: fetching data from an external API. This is a canonical example of tool use, allowing an LLM to access information beyond its training data. We will build a weather tool, a classic example that covers all the essential components of a robust backend implementation.
A well-implemented tool function should do the following:
- Accept structured inputs: Use Pydantic to define a clear input schema.
- Handle credentials securely: Access API keys from environment variables, never hardcoding them.
- Perform the core action: Make the API request.
- Process the response: Extract the relevant information from the API's JSON response.
- Handle errors gracefully: Manage API errors, network issues, or invalid inputs.
- Return a clean output: Provide a concise string that the LLM can easily parse and use in its final answer.
The article we just read has an excellent, complete example of this.
Create Custom Tools for LangChain Agents
Let's return to the 'Create Custom Tools for LangChain Agents' article and study its final, practical example.
Read the final two sections, 'Defining Structured Tool Inputs' and 'A Practical Example: A Weather API Tool'. Analyze the get_current_weather function closely. Note the use of the WeatherInput Pydantic model, how os.getenv is used for the API key, the try...except block for error handling, and how the final string is formatted.
Let's break down the key parts of the get_current_weather function from the article to solidify your understanding.
# 1. Structured input using Pydantic
class WeatherInput(BaseModel):
    city: str = Field(description="The city name for which to get the weather.")

# 2. Decorator binds the function and its input schema
@tool(args_schema=WeatherInput)
def get_current_weather(city: str) -> str:
    """Fetches the current weather for a specified city...""" # The description

    # 3. Securely get API key
    api_key = os.getenv("OPENWEATHERMAP_API_KEY")
    if not api_key:
        return "Error: OPENWEATHERMAP_API_KEY environment variable not set."

    # ... (API call logic) ...
    try:
        # 4. Core logic: make the request
        response = requests.get(base_url, params=params)
        response.raise_for_status() # Important for catching HTTP errors
        data = response.json()

        # 5. Process and format the output
        temperature = data["main"]["temp"]
        description = data["weather"][0]["description"]
        return f"The current weather in {city} is {temperature}°C with {description}."

    # 6. Graceful error handling
    except requests.exceptions.HTTPError:
        return f"HTTP error occurred: City not found or API error."
    except Exception as e:
        return f"An error occurred: {e}"
This pattern is a blueprint you can adapt for almost any tool that interacts with an external service.
Connecting the Tool to the Agent
So, you've written the function. How does the agent actually call it?
When the LLM returns a tool_call object, your application code is responsible for executing it. This involves mapping the tool name from the LLM's response to the actual Python function you've written. A simple dictionary is often used for this mapping.
The following video shows this process in action.
How does OpenAI Function Calling work?
In 'How does OpenAI Function Calling work?', Mark Richman demonstrates the full loop, including the crucial step where the application code executes the function suggested by the LLM.
Watch from 01:34 to 03:49. Pay close attention to how the get_current_weather function is defined (the backend logic) and then how, inside the run_conversation function, an available_functions dictionary maps the string 'get_current_weather' to the actual function object. This is the mechanism that connects the LLM's intent to your code.
As the video shows, the typical execution flow is:
- Define your tool functions (e.g.,
get_current_weather). - Create a dictionary mapping tool names to functions:
available_functions = {"get_current_weather": get_current_weather}. - Receive the
tool_callsobject from the LLM. - Iterate through the
tool_calls. - For each call, get the function name (e.g.,
tool_call.function.name). - Look up the corresponding function in your
available_functionsdictionary. - Call the function with the arguments from the
tool_call(e.g.,json.loads(tool_call.function.arguments)). - Append the function's output to the message history and send it back to the LLM.
Test your understanding!
You need to create a tool that finds the square root of a number.
- Write the complete Python function
calculate_square_root, including the@tooldecorator, a clear docstring, type hints for a single floating-point number input, and error handling for negative inputs. - If the LLM returns a
tool_callobject withfunction.name = 'calculate_square_root'andfunction.arguments = '{"number": 25}', what should your function return? - What should it return for
function.arguments = '{"number": -4}'?
Show answer
-
Function Implementation:
import math from langchain.tools import tool from pydantic import BaseModel, Field class SquareRootInput(BaseModel): number: float = Field(description="The number to find the square root of.") @tool(args_schema=SquareRootInput) def calculate_square_root(number: float) -> str: """ Calculates the square root of a non-negative number. Use this tool when you need to find the square root of a number. """ if number < 0: return "Error: Cannot calculate the square root of a negative number." result = math.sqrt(number) return f"The square root of {number} is {result}." -
For an input of 25: The function would return the string:
"The square root of 25 is 5.0." -
For an input of -4: The function's error handling would catch this, and it would return the string:
"Error: Cannot calculate the square root of a negative number."This informs the LLM of the failure, allowing it to generate a sensible response to the user.
Conclusion
Today you've bridged the gap between tool design and execution. You've learned how to implement the backend logic for a custom tool by writing a standard Python function and augmenting it with decorators, type hints, and robust error handling to make it a reliable component of an agentic system.
Key Takeaways:
- The
@toolDecorator is Your Friend: It simplifies turning a Python function into a tool by inferring the name, description (from the docstring), and schema (from type hints). - Backend Logic is Just Python: At its heart, a tool's logic is a regular function that performs a task. The key is to make it robust for an automated caller (the LLM).
- Production-Grade Tools are Robust: Always include secure credential management (environment variables), specific input validation (Pydantic), and comprehensive error handling (
try...except) to build reliable agents. - Execution is Explicit: Your application code acts as the orchestrator, receiving the LLM's intent and explicitly calling the correct backend function based on the tool's name.
What's Next?
So far, we have designed a tool's API and implemented its backend logic. We have the building blocks. In the next lesson, "Build a multi-step agent that uses multiple tools to accomplish a complex goal using an orchestration framework," we will level up from single tool calls to creating sophisticated agents that can reason, plan, and chain multiple tools together to solve complex problems.