Hello and welcome to your first lesson in building a Roblox game! Today, we're going to take our first steps into Roblox Studio, the workshop where you'll create your Obby. Our goal is to get comfortable with the main tools you'll be using. By the end of this hour, you'll know your way around the most important parts of the screen and how to use them to look at the objects in your game world.
Your Game-Making Workshop
Before we start, let's look at a map of Roblox Studio. Just like an artist's studio has an easel, brushes, and paints, a game developer's studio has different windows and tools for different jobs.
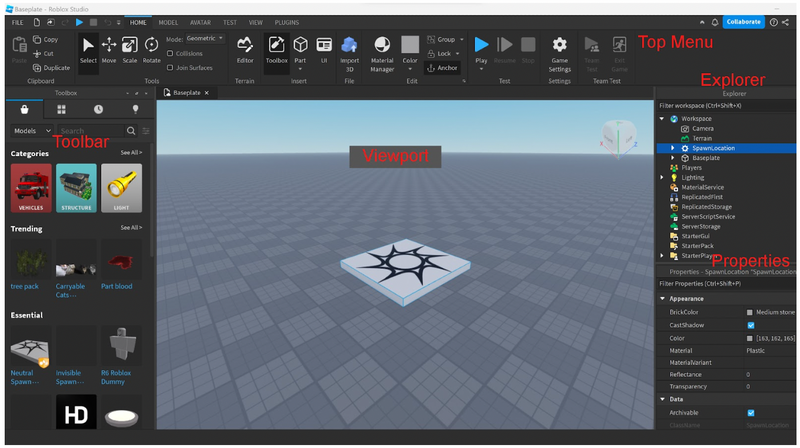
We'll be focusing on four key areas today:
- 3D Viewport: Where you see and build your game.
- Explorer: A list of every single thing in your game.
- Properties: A panel that shows the details and settings of any object you select.
- Output: A message box that will be useful later when we start coding.
Opening Your First Project
First things first, let's open Roblox Studio and create a new world to build in. We'll start with a simple, empty project called a "Baseplate."
The ULTIMATE Beginner Guide to Roblox Studio.. (Start BUILDING Now!)
This video from the SmartyRBX channel will show you how to find and open Roblox Studio on your computer and then how to start a new project.
Watch from the beginning to open the program and select a new "Baseplate" template. You can stop watching after your new project is open.
Great! You should now be looking at a large grey floor (the Baseplate) and a small square platform (the SpawnLocation, where players will appear). This is your starting point.
Finding Your Tools
Sometimes, the windows we need might be hidden. Let's make sure you can see the Explorer, Properties, and Output windows.
The Basics of Roblox Studio - Community Tutorials - Developer Forum | Roblox
This guide on the Roblox Developer Forum shows exactly how to make sure the essential windows are open.
First, follow the steps under "Now let’s set up Roblox Studio". You'll need to click the "VIEW" tab at the top of the screen and then make sure the "Explorer", "Properties", and "Output" buttons are pressed and greyed out. This means they are open and ready to use.
Now that all your tools are laid out, let's learn what each one does.
Exploring Your World
The 3D Viewport: Your Window to the Game
The big 3D window in the center of the screen is the Viewport. This is your interactive view of the game world. You can fly around it to see your creation from any angle.
ABSOLUTE Beginner Basics.. Roblox Studio For Noobs 2025
The creator RoBuilder gives a quick and clear lesson on moving around the Viewport.
Watch the section from WASD movement to learn the basic controls. You can use the W, A, S, and D keys to move, just like in many Roblox games. While holding down the right mouse button, you can move your mouse to look around. Also, try selecting the SpawnLocation part with your mouse and pressing the F key to focus your camera on it!
Spend a minute or two flying around your Baseplate. This is how you'll move around as you build your Obby.
The Explorer: A List of Everything
On the right side of your screen, you'll see the Explorer window. Think of this as a complete list of every single object, character, and script in your game. If you've used Scratch before, this is a bit like the sprite list where you can see all your characters and backdrops.
Everything you can see in the Viewport, like the Baseplate and the SpawnLocation, is listed in the Explorer under a folder called Workspace. The Workspace contains all the visible parts of your game world.
ABSOLUTE Beginner Basics.. Roblox Studio For Noobs 2025
Let's watch RoBuilder explain the Explorer in simple terms.
In this part of the video, he calls the Explorer a "listed version of everything that's in this viewer." Notice how when he copies the spawn pad, a new one appears in both the Viewport and the Explorer list.
The Properties Window: The Details Panel
Below the Explorer is the Properties window. This window is very powerful! It shows you all the settings for any object you have selected. If you select a part, you can change its color, how shiny it is, whether players can walk through it, and much more.
Let's try this out. This is how you'll customize almost everything in your game.
The Basics of Roblox Studio - Community Tutorials - Developer Forum | Roblox
We'll return to the Developer Forum guide, which has a great step-by-step activity for using the Explorer and Properties together.
Find the section titled "the Explorer" and read about the Workspace. Then, follow the instructions in the next section, "the Properties Tab". Click on "SpawnLocation" in your Explorer window. Watch how the Properties window fills up with details. Now, find the BrickColor property and change the color of your spawn point!
You've just edited your first object! You selected an object in the Explorer and changed one of its properties. You'll be doing this all the time when building your Obby.
The Output Window: Your Message Board
Finally, look for the Output window, which is usually at the bottom of the screen. Right now, it might be empty or have a few messages from Roblox Studio.
We won't use this window much today, but it's very important to know where it is. Later, when we start scripting, this is where we can print our own messages to see what our code is doing. It's also where Roblox will tell us if there are any errors in our scripts.
For now, just know that the Output is like a message board for you and your game's code.
Lesson Summary
Great job on completing your first lesson! You've taken a tour of your new workshop and learned about its most important tools.
Here are the key takeaways:
- Roblox Studio is the program used to create Roblox games. You can start a new project from a Baseplate template.
- The 3D Viewport is your main window into the game world, where you can fly around using the
WASDkeys and your mouse. - The Explorer window lists every single object in your game. The objects you can see and touch are stored in the Workspace.
- The Properties window lets you see and change the settings—like color and material—of any object you select.
- The Output window displays messages and errors from your scripts.
You now have the basic knowledge needed to navigate the studio. In our next lesson, we'll learn how to save your project and how to "play test" your game to see how it feels for a player.