Hello! Welcome back to our module on advanced 3D generation techniques.
In our last lesson, we established a foundational framework for single-view 3D reconstruction using a conditional NeRF. We saw that this is an ill-posed problem, and the main solution was to train a model on a large multi-view dataset to learn a geometric prior. This approach, while effective, is constrained by the availability and diversity of such 3D datasets.
Today, we're going to explore a more powerful and flexible method. Instead of learning a prior from scratch using 3D data, we will leverage the immense knowledge already encapsulated within large, pre-trained 2D diffusion models like Stable Diffusion. You'll learn how to apply one of these models as a "generative prior" to guide the optimization of a NeRF from just a single input image. This technique is at the heart of many recent breakthroughs in 3D content creation.
1. The Core Idea: Distilling a 2D Prior into a 3D Representation
Imagine you have a NeRF that is randomly initialized. If you render an image from a random viewpoint, it will look like noise. How can we tell the NeRF how to improve? We need a "teacher" or a "critic" that knows what plausible objects look like. This is where a pre-trained text-to-image diffusion model comes in.
The central mechanism we'll use is called Score Distillation Sampling (SDS), first introduced in the DreamFusion paper. The key insight is that we can use the gradients from a frozen, pre-trained 2D diffusion model to update the parameters of our 3D representation (the NeRF).
To get a solid grasp of this concept, let's watch a couple of short videos that explain it from different angles.
First, this video from Jia-Bin Huang provides a concise, technical introduction to how 2D diffusion models can update a 3D representation using Score Distillation Sampling.
Watch the segment from 00:20 to 03:21. Focus on how the diffusion model's training objective is repurposed at inference time to provide a gradient for updating the parameters (θ) of a 3D model.
3D Renderings from Text! DreamFusion Explained
Next, this video on DreamFusion frames the same process in a more conceptual way, describing the pre-trained image model as a 'frozen critic' that guides the NeRF.
Watch the segments from 01:54 to 05:30. Pay attention to the motivation for using a 2D model (avoiding large 3D datasets) and the iterative loop: render an image, add noise, and use the diffusion model to guide an improvement.
These videos explain SDS in the context of text-to-3D. Let's formalize the process and visualize it before adapting it to single-view reconstruction.
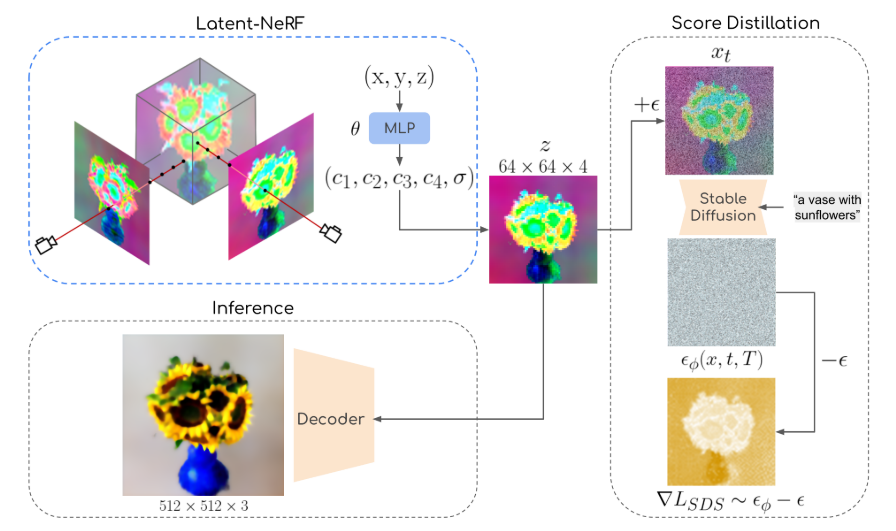
The iterative SDS update loop for a single optimization step looks like this:
- Render: Generate a 2D image by rendering your NeRF (with parameters ) from a random camera pose.
- Noise: Add random Gaussian noise to the image to get a noisy version at a random timestep .
- Predict Noise: Use the frozen U-Net of a pre-trained diffusion model, , to predict the added noise. This prediction is conditioned on a text prompt : .
- Compute Gradient: The core of SDS is to treat the difference between the predicted noise and the actual noise as a loss. The gradient of this loss with respect to the NeRF parameters is used for the update: This gradient essentially tells the NeRF how to change its parameters so that its render becomes an image that the diffusion model considers more plausible for the given text prompt .
2. Adapting SDS for Single-View Reconstruction: The RealFusion Method
The process described above generates a 3D object from a text prompt. Our goal, however, is to reconstruct a specific object from a single image. We need to make two crucial adaptations:
- Grounding in the Input Image: We must ensure the final 3D model looks exactly like the input image from the known camera view.
- Conditioning the Prior: The diffusion model shouldn't just dream up any object matching a generic prompt; it must dream up novel views of the specific object in our input image.
A great case study for this is the RealFusion model. Its methodology combines a traditional reconstruction loss with the SDS prior loss.
Official code for "RealFusion: 360° Reconstruction of Any ..."
The RealFusion GitHub repository provides a perfect real-world example of the system we're discussing. The abstract and method diagram clearly lay out the approach.
First, read the Abstract to understand the high-level goal and method. Then, carefully examine the Method diagram. Try to identify the two main optimization paths: one for matching the input view and one for generating and judging novel views.
As you saw, the optimization process involves a hybrid objective:
- Reconstruction Loss: For the known input camera pose, render an image from the NeRF and compute a simple photometric loss (e.g., L2) against the input image. This forces the NeRF to be faithful to the provided view. \mathcal{L}_\text{recon} = || g(\theta_\text{input_pose}) - x_\text{input} ||^2
- Prior Loss: For randomly sampled novel views, render images from the NeRF and apply the SDS loss . This uses the diffusion prior to fill in the occluded and unseen parts of the object.
The total loss is a weighted sum of these two components.
Conditioning the Diffusion Prior with Textual Inversion
How do we guide the SDS loss? A simple prompt like "a photo of a teapot" is not enough to reconstruct the specific blue-and-white patterned teapot from our input image. We need to teach the diffusion model about this specific instance.
RealFusion solves this by using single-image textual inversion.
Official code for "RealFusion: 360° Reconstruction of Any ..."
Let's return to the RealFusion repository to understand how it conditions the diffusion model on the specific input image.
Read the section titled "Textual Inversion". The key takeaway is that before the main NeRF optimization begins, a special token embedding, let's call it <object>, is optimized to represent the visual concept of the object in the input image. This step essentially injects the specific object's identity into the vocabulary of the frozen text encoder.
Once this <object> token is learned, it can be used in the prompts for the SDS loss, enabling highly specific guidance like "a photo of a <object>, back view". This brings us to another critical detail for getting good geometry.
3. Implementation Details and Practical Gotchas
As an engineer, you know that the high-level idea is only half the story. The details of the implementation are what make it work. Let's dig into the supplementary material for RealFusion, which is a treasure trove of practical insights.
Supplementary Material for RealFusion 360
This supplementary material for RealFusion details the exact hyperparameters and architectural choices used. This is invaluable for understanding how to get these models to work in practice.
Please read the following sections to understand the key implementation choices: "Rendering and diffusion prior": Note the low rendering resolution (96px), upsampling for the VAE, adding noise in latent space, and the extremely high classifier-free guidance (CFG) strength of 100. "View-Dependent Prompt" (found in section 1): See how the text prompt is dynamically modified based on the camera angle to combat the 'Janus problem' (multi-faced objects). "Single-image textual inversion": This provides more detail on the process, including the crucial use of heavy data augmentation. "Unsuccessful Experiments and Regularization Losses": This is an extremely valuable section. Pay attention to what they tried that didn't work, such as using monocular depth or LPIPS loss.
Let's synthesize those practical details into a coherent pipeline:
- Preprocessing (Textual Inversion): Given a single input image, run single-image textual inversion for ~3000 steps with heavy augmentation to get a custom embedding
<object>that represents your specific object. - Main Optimization Loop (e.g., 5000 steps): In each step:
- Reconstruction Step:
- Render the NeRF from the known input camera pose.
- Compute an L2 loss against the ground truth input image.
- Prior Step:
- Sample a random camera pose (e.g., random azimuth, elevation).
- Generate a view-dependent prompt (e.g., "a photo of
<object>, side view"). - Render a low-resolution (96x96) image from the NeRF.
- Upsample it to 512x512 and encode it into a latent with the VAE.
- Perform the SDS update using this latent, the prompt, and a high CFG scale.
- Update: Apply the gradients from both losses to the NeRF parameters.
- Reconstruction Step:
Test your understanding!
You're implementing a RealFusion-style pipeline. Your 3D reconstructions are geometrically plausible, but their appearance is blurry and the colors are oversaturated. This was a common problem with early SDS methods.
Based on the principles we've discussed, what is a likely cause of this artifact related to the diffusion model's training, and what is a potential strategy to mitigate it?
Show answer
The likely cause is a domain mismatch. The diffusion model was pre-trained on a vast dataset of real-world photos. However, during SDS, it is fed synthetic, often simplistic, renders from an in-progress NeRF. These renders are "out-of-domain" for the diffusion model, causing it to produce artifacted gradients that lead to oversaturated and unrealistic textures.
A potential mitigation strategy, discussed in the "AI 3D Generation, explained" video, is to implement a form of domain correction. One way this is done in later work (like ProlificDreamer) is by using negative prompts or other techniques to better estimate and subtract this "out-of-domain" error component from the SDS gradient, resulting in a cleaner update that focuses on content and realism.
Conclusion
In this lesson, we have connected the worlds of NeRFs and diffusion models to tackle the challenging task of single-view 3D reconstruction. You've learned how a powerful, pre-trained 2D generative model can act as a prior to guide the optimization of a 3D scene.
Key Takeaways:
- Score Distillation Sampling (SDS) is the core mechanism that allows a frozen 2D diffusion model to provide optimization gradients for a 3D representation like a NeRF.
- For single-view reconstruction, the optimization objective is a hybrid, combining a direct reconstruction loss for the input view with a SDS prior loss for novel views.
- To make the prior specific to the input object, single-image textual inversion is used to create a custom token embedding for the diffusion model's text encoder.
- Practical success depends on key details like using view-dependent prompts to prevent geometric failures (like the Janus problem) and tuning parameters like a high CFG scale.
Next Lesson Preview:
We've focused on reconstructing a single, isolated object. What if our input is not a clean image of one object, but a partial scan of a larger environment, like a single photo of a room? In the next lesson, we will explore how these same diffusion prior techniques can be adapted for 3D scene completion, filling in missing geometry and texture in large-scale scenes from partial data.