Hello! Welcome back to our course on building complex websites with "vibe coding."
In our last lesson, we established a crucial architectural principle: the difference between Hugo's /content and /data directories. You learned to distinguish when to create a page-generating Markdown file in /content versus when to store reusable, structured data in /data. This sets the stage for today's lesson, where we bridge the gap between our Google Sheet CMS and our Hugo project.
Today, we'll tackle the "how": How do we get the data from our Google Sheet into the correct folders in our Hugo project? This is the heart of our automated workflow. By the end of this lesson, you will be able to configure an AI tool to generate a script that synchronizes a Google Sheet with your Hugo project's content or data folders. This automates the most tedious part of content management and empowers non-technical team members to update the website simply by editing a spreadsheet.
We'll explore three methods, from the simplest to the most powerful, ultimately focusing on the "vibe coding" approach you're here to master.
Method 1: The Simple "Publish to the Web" Approach
The most direct way to get data out of a Google Sheet is to publish it. This method is excellent for data that isn't sensitive and needs to be accessible via a public URL.
Google Sheets allows you to publish a sheet as a CSV (Comma-Separated Values) file.
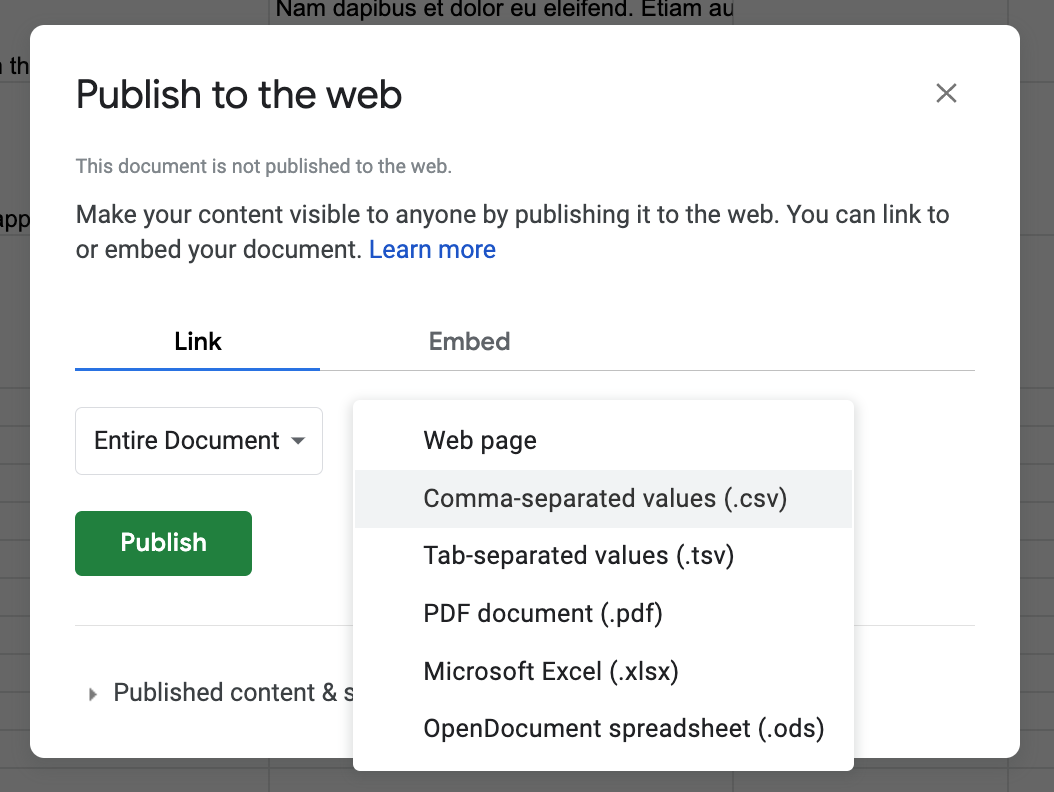
Once you have this URL, you can:
- For the
/datadirectory: Use Hugo's built-inresources.GetRemotefunction directly in your templates to fetch this CSV data in real-time when the site builds. This is a very efficient way to pull in external data. - For the
/contentdirectory: This is less direct. You would need a script to download the CSV from the public URL and then process it to create individual Markdown files.
Pros: Extremely simple to set up. No coding is required on the Google Sheets side.
Cons: The data is public. It's less flexible for complex data transformations.
This method is good for simple datasets, but for a true CMS experience, we need more control.
Method 2: The API-Driven Approach with Google Apps Script
A more robust and secure method is to turn your Google Sheet into a private API. This gives you precise control over what data is exposed and how it's formatted. We'll use Google Apps Script, a JavaScript-based platform built into Google's services.
Don't worry if you're not a JavaScript expert. The goal here is to understand the logic of the script so you can later instruct an AI to write it for you. This video provides an excellent walkthrough of the entire process.
How to Use Google Sheets as a Simple CMS
The video 'How to Use Google Sheets as a Simple CMS' by Coding in Public demonstrates how to write a simple Google Apps Script to turn your sheet into a JSON API endpoint.
Watch from 01:21 to 06:11. This is the core of the video. Focus on understanding the three main steps: Getting the data: Accessing the spreadsheet and a specific sheet by name (e.g., hours). Transforming the data: Mapping the rows and columns into a clean JSON format (an array of objects). Returning the data: Using ContentService to output the data as a JSON response and deploying it as a web app to get a private API URL.
After following the video, you will have:
- A script attached to your Google Sheet.
- A private URL that, when visited, returns the data from your sheet in a clean JSON format.

This API endpoint is the key. Now, instead of dealing with a raw CSV file, we have a structured JSON feed that a script can easily consume.
Method 3: "Vibe Coding" the Synchronization Script
We now have an API endpoint serving our content. The final step is to create a local script that fetches data from this endpoint and writes the corresponding files to our Hugo project's /content or /data folders.
This is where "vibe coding" shines. We won't write this script by hand; we'll instruct an AI to do it for us. The process involves clearly defining what we want and the rules for how it should be built.
The "Vibe Coding" Workflow
A powerful pattern for this is to separate your instructions into two files: a specification and a style guide.
Vibecode AppScript for Productivity: Let a Robot Do the Boring ...
The article 'Vibecode AppScript for Productivity' introduces an excellent methodology for this. While it focuses on generating Google Apps Script itself, the principle of separating the 'what' from the 'how' is universally applicable.
Read the sections 'Let’s Cook: Your First Automation' and 'The Magic Incantation'. Pay close attention to the concept of separating instructions into SPEC.md (the goal) and GEMINI.md (the rules/style guide). We will adapt this strategy for generating our Python sync script.
From Prompt to Python: A Real-World Example
Now, let's see this in action. How do you translate a specification into a working script that creates Hugo content files? The following article provides a perfect example. The author uses AI to generate a Python script that fetches data from an API (Raindrop.io) and creates Markdown files for a Hugo blog. The logic is identical to what we need.
Writing a Hugo Raindrop.io bookmark integration with AI
The article 'Writing a Hugo Raindrop.io bookmark integration with AI' by cmmx gives us a blueprint for our sync script. It shows the prompt, the resulting Python code, and the automation steps.
Read the sections 'The AI guided script generation' and the Python code block that follows. Notice how the author's prompt is just a series of commented-out instructions describing the desired outcome. The AI turns this directly into a functional Python script. This is the exact workflow we want to emulate.
The key takeaways from this example are:
- The Prompt: The prompt is a simple, clear list of requirements written as comments. It specifies where to get the data, how to format the output files, and what logic to apply (e.g., don't re-process existing files).
- The Script: The generated Python script uses common libraries (
requeststo fetch from the API,osto handle files) to perform the exact steps outlined in the prompt. - The Result: It successfully creates
.mdfiles in thecontent/bookmarksdirectory, formatted with the correct Hugo front matter.
Test your understanding!
Imagine you've used Google Apps Script to create an API endpoint that returns JSON data for a list of services for a company website. Each service object in the JSON looks like this:
{
  "title": "SEO Strategy",
  "slug": "seo-strategy",
  "summary": "Comprehensive SEO plans to boost your visibility.",
  "content": "Full markdown content about our SEO services..."
}
You need to write a SPEC.md file (a specification prompt for an AI) to generate a Python script. The script should fetch this data and create a separate page for each service in the content/services/ directory of your Hugo project.
Based on the examples you've seen, what would you write in your SPEC.md file?
Show answer
A good SPEC.md file would be a clear, commented list of instructions like this:
# This script synchronizes services from our Google Sheet API to our Hugo site.

# 1. Define the API endpoint URL.
# API_URL = "https://your-google-apps-script-url/exec"

# 2. Fetch the JSON data from the API endpoint.

# 3. For each service object in the JSON array:
#    a. Create a filename using the 'slug' field (e.g., "seo-strategy.md").
#    b. The file should be placed in the 'content/services/' directory.
#    c. If a file with that name already exists, skip it to avoid duplicates.

# 4. Generate the content for each markdown file with the following front matter and content structure:
#    +++
#    title = "<title from JSON>"
#    summary = "<summary from JSON>"
#    date = <current date in YYYY-MM-DD format>
#    +++
#
#    <content from JSON>

# 5. Print a message indicating how many new service files were created.
This specification is clear, step-by-step, and gives the AI all the information it needs to generate the correct Python script.
Conclusion
You have just learned the critical technical component of the "Google Sheets as a CMS" workflow. You now have a complete path from a simple spreadsheet row to a fully rendered page on your Hugo site, all automated through a script generated with AI assistance.
Key Takeaways:
- There are multiple ways to get data out of Google Sheets, from a simple public CSV to a robust private JSON API using Google Apps Script.
- The API-driven approach is more secure and flexible for a production website.
- The "vibe coding" workflow involves writing a clear specification (
SPEC.md) that an AI tool can use to generate a synchronization script (e.g., in Python). - This script acts as the bridge, fetching data from your API and writing the necessary files to your Hugo project's
/contentor/datadirectories.
Preview of the next lesson:
Now that we've built the technical pipeline, our next step is to create a process around it. In the final lesson of this module, we will focus on defining a content update process for non-technical users. We'll document the workflow, establish conventions, and ensure that anyone on your team can confidently update the website by simply editing the Google Sheet we've configured.