Introduction
In our last lesson, we conducted a systematic fitting of the toile, transforming it from a simple prototype into a source of critical data. By methodically assessing the band, bridge, cups, and straps under both static and dynamic conditions, you have essentially completed the data collection phase of your design experiment. You should now have a precise list of fit issues—the variances between your theoretical pattern and the physical reality.
Today, we address the core of the design refinement process: translating those fitting observations back into accurate, geometric alterations on your 2D paper pattern. This lesson will equip you with the technical methods to correct the errors you diagnosed. For someone with your background in experimental design and analysis, you can think of this as the crucial step of adjusting your model's parameters based on the observed outcomes. We will explore how to surgically modify the pattern to resolve issues like gaping, tension problems, and incorrect volume, ensuring our next iteration is a significant improvement.
1. Methodologies of Pattern Alteration
At its core, translating a 3D fit issue to a 2D pattern involves one of two fundamental approaches. Your choice depends on the nature and complexity of the problem you identified.
- Pin and Transfer: This is the most direct method, used for adjustments along seam lines or for removing small amounts of excess fabric (gaping). During the fitting, you would pin out the excess fabric directly on the toile. Back at your drafting table, you then transfer these pinned changes to the paper pattern by measuring the pin tucks and redrawing the lines. This is a direct, empirical correction.
- Slash and Spread/Pivot: This technique is used for more complex changes involving volume, length, or shape redistribution, such as increasing cup size (a Full Bust Adjustment or FBA) or adding projection. You strategically cut your pattern piece (slash) and then spread the pieces apart to add volume or overlap them to remove it. Pivoting from a fixed point achieves a similar result with more control over the pattern's shape.
This first video provides an excellent demonstration of the "Pin and Transfer" method. It also shows how to handle adjustments for asymmetry, a common requirement in custom design.
How to Transfer Fit Adjustments to the Pattern
This video by J Stern Designs shows the entire workflow from marking a pinned muslin to transferring those corrections to the paper pattern pieces.
Watch the entire video, but pay close attention to these key stages: Marking the Muslin (watch this segment): See how pinned-out fullness is marked with a pen to create a new seam line. Notice how she also marks a new, narrower strap line directly on the fabric. Transferring to the Side Front (watch this segment): Observe how she translates the markings into two distinct actions on the paper pattern: closing a wedge to remove fullness and tracing the new curved seam line. Transferring to the Center Front & Strap (watch this segment): This section is crucial as it shows how to blend the new seam lines and adjust adjacent pieces (like the back strap) to ensure they still match.
2. Foundational Corrections: The Frame and Band
As we established in the fitting, the frame and band are the engineering foundation. Corrections here must be made first, as they affect everything else.
Bridge (Gore) Adjustments
If your diagnostic notes say "bridge doesn't tack" or "wire digs into breast tissue at center," the issue lies with the bridge pattern piece. It might be too wide, too narrow, or the wrong shape for the wearer's breast separation. The following guide provides a clear, systematic way to correct this.
[PDF] 5 Common Bra Pattern Alterations - International Bra Sewing Bee
This PDF from the International Bra Sewing Bee offers precise "slash and pivot" methods for various bridge alterations.
Focus on the first page, under "Bridge Alterations". Study the diagrams for correcting a bridge that is Too Narrow, Too Wide, or Too Narrow at the Base. Notice how a simple vertical cut allows you to pivot the pattern pieces to add or remove space exactly where it's needed.
Underarm and Side Seam Adjustments
A common issue, especially on athletic builds, is gaping along the top edge of the band under the arm. This means the 2D pattern piece is too long or straight in that area for the 3D body. The fix involves removing a wedge of fabric, effectively creating a dart that is hidden in the side seam.
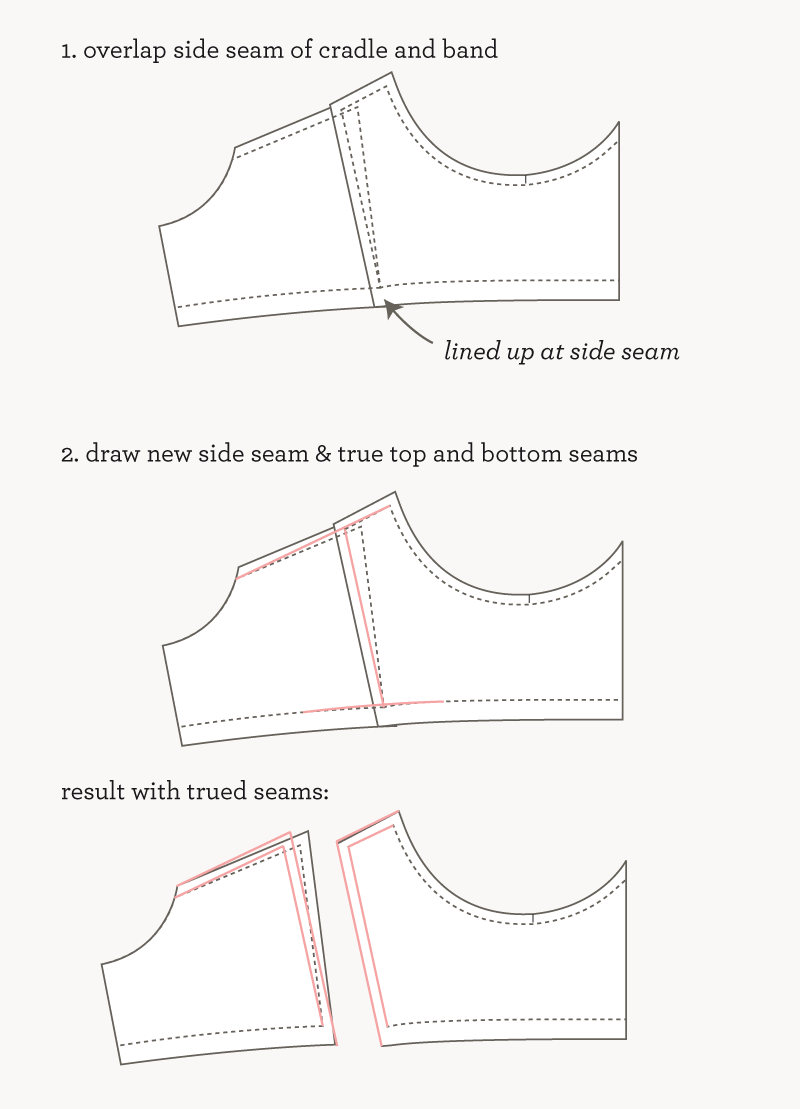
The image above visualizes the solution perfectly. You overlap the pattern pieces at the top edge by the amount of the gape you measured, keeping the bottom fixed. Then, you blend the side seam into a new, smooth line. This is a classic example of pattern "truing" after an alteration.
For more fundamental problems with how the entire wire line sits, a complete redraft of the frame might be necessary. This involves tracing your specific underwire, accounting for "wire spring" (how much the wire opens under tension), and redrafting the band based on stretch calculations.
Bra-making alterations: The Frame and the Band - BERNINA Blog
The BERNINA blog article demonstrates a more comprehensive redrafting process when minor adjustments aren't enough. It's a great example of an iterative design cycle.
Read the section "Adjustments to the frame and band." Pay attention to the concept of wire spring and how the band length is calculated using the fabric's stretch percentage. This quantitative approach should resonate with your background. Also, look at the images under "Tester 2," which show how the author made further small corrections after the first round of major adjustments.
3. Cup Adjustments: Mastering Volume and Projection
Cup alterations are often perceived as the most difficult, but they follow the same logical principles. The key is to distinguish between issues of volume (the overall size of the cup) and issues of shape or projection (how that volume is distributed).
Altering Shape and Fixing Gaping
Let's say your toile's cup volume is correct (no major spillage or wrinkling), but you have gaping at the very top or along the side. This is a shape issue. You need to remove a small amount of fabric from the edge of the cup pattern. A very clean way to do this is by creating a temporary dart, closing it, and smoothing the seam line.
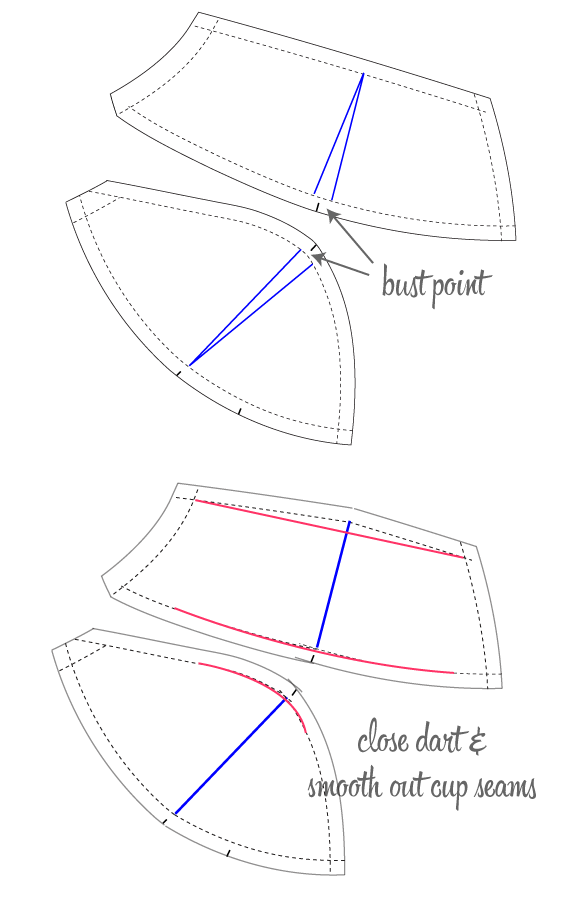
This method is precise and maintains the integrity of the overall cup shape while tightening the gaping edge.
Altering Volume: The Slash and Spread Method
When the cup is fundamentally too small (spillage) or too large (wrinkles), you need to change its volume. The "slash and spread" method is the standard for this. The following video demonstrates a Full Bust Adjustment (FBA) on a bodice, but the principle is identical for a bra cup. It masterfully shows how to use the cut-open muslin on the body to determine the exact amount of adjustment needed—a perfect marriage of draping and flat pattern-making.
The Simple Way To Adjust The Bust (Full Bust Adjustment) On Any Sewing Pattern!
This video by Sew Anastasia provides an exceptionally clear, step-by-step guide to the slash-and-spread technique.
Watch from the start of the process, where the pattern is marked for slashing. The most insightful part is from this segment, where the slashed muslin is put back on the form. See how repositioning the muslin reveals the exact amount of fabric to be added. Finally, observe from this point how those measurements are transferred to the paper pattern, spread open, and how the darts and seams are redrawn ("trued") to create the new, larger pattern piece.
Altering Projection for High-Impact Support
For a Bollywood dance number, simple volume isn't enough; you need projection and support to control movement. If your fitting notes indicate "flattening of the breast tissue" or "stress lines across lower cup," it means the cup is too shallow. You need to add depth without necessarily increasing the total volume. This is achieved by splitting the lower cup piece.
[PDF] 5 Common Bra Pattern Alterations - International Bra Sewing Bee
This final reading from the Bra Sewing Bee PDF details a more advanced technique crucial for performance-wear.
Read section "5. Splitting the Lower Cup" (read this section). This technique introduces a new seam into the lower cup, allowing you to build a more projected, 3D shape that better encapsulates the breast tissue. This is a key engineering step to minimize bounce, as it creates a deeper "pocket" for the breast to sit in.
Case Study: Correcting the Pattern for a High-Tempo Dance Number
Let's synthesize these techniques. Imagine your fitting of a toile for a lead dancer revealed three key issues:
- Bridge lifts 1cm off the sternum during movement.
- Top edge of cups gapes by 0.75cm on both sides when at rest.
- The "Jump Test" shows excessive vertical movement (bounce).
Here is your data-driven correction plan:
- Problem 1 (Bridge): The bridge is likely too wide at the base. You will apply the "Too Wide at the Base" alteration from the LINK PDF. You'll slash the bridge pattern vertically, overlap the base by a measured amount (e.g., 0.5cm, which removes 1cm total from the finished garment), and true the lines.
- Problem 2 (Gaping): This is a shape issue. You will apply the technique from the LINK image. On your upper cup pattern piece, you will draw a small dart from the top edge to the apex, 0.75cm wide at the edge. You will close this dart on the paper and smooth the new, shorter, and more curved neckline seam.
- Problem 3 (Bounce): This indicates a lack of projection and containment. You will apply the "Splitting the Lower Cup" technique from the LINK PDF. You will add a horizontal seam to your lower cup piece, introducing a curve to create more depth. This will provide a more secure "seat" for the breast, controlling its movement far more effectively than a shallow cup.
By applying these three distinct alterations, you are not just guessing; you are using specific, targeted algorithms to correct the specific variances you observed in your experiment.
Conclusion
You are now equipped with the primary techniques for translating 3D fitting data into 2D pattern corrections. This is where the analytical and the artistic aspects of design converge. The process is systematic, precise, and iterative.
Key Takeaways:
- Diagnose, then Prescribe: Match the specific fit problem (the diagnosis) to the correct alteration technique (the prescription).
- Work from the Foundation Out: Correct the band and frame first, as these changes will affect the position of the cups.
- Distinguish Shape from Volume: Gaping is often a shape issue fixed by darts, while spillage is a volume issue fixed by slashing and spreading.
- True Your Seams: After any alteration, you must walk your pattern pieces along the seam lines to ensure they are still the same length and will sew together smoothly. This is called "truing."
- Embrace Iteration: Your corrected pattern is Hypothesis 2.0. It's an improvement, but it may still require another round of testing and minor refinement. This iterative loop is the path to a perfect fit.
Next Lesson Preview
Having meticulously corrected your paper pattern, you have now finalized the blueprint for your design. The next logical step is to move from prototype to final product. In our next lesson, "Create a final sample garment using the corrected pattern and specified fashion fabrics," we will discuss the considerations for constructing the real garment, using the actual materials chosen for the final on-screen look.