Hello! Welcome to the third module, "Managing Stateless Applications."
In the last module, we focused on cluster interaction and troubleshooting. You learned how to inspect running Pods and diagnose common failure states like ImagePullBackOff and CrashLoopBackOff. Now, we shift from debugging to creating. This lesson is your first step into the world of Kubernetes application deployment.
Your experience with IaC tools like Terraform has introduced you to the power of declarative configuration. Kubernetes embraces this same philosophy. Instead of running a series of commands to build an application, you will define the desired state in a configuration file, and Kubernetes will work to make it a reality.
Today, we will focus on the most fundamental building block in Kubernetes: the Pod. You will learn how to write a YAML manifest file to define and create a simple, single-container Pod. This is the foundational skill upon which all other Kubernetes deployments are built.
1. The Anatomy of a Kubernetes Manifest
A Kubernetes manifest is a YAML or JSON file that describes the desired state of a resource, such as a Pod, Deployment, or Service. For readability and ease of use, YAML is the industry standard.
Every Kubernetes manifest, regardless of the resource it defines, contains four essential top-level fields:
apiVersion: Specifies the version of the Kubernetes API you're using to create this object.kind: The type of Kubernetes object you want to create (e.g.,Pod,Service,Deployment).metadata: Data that helps uniquely identify the object, including itsname,labels, and optionalnamespace.spec: The "specification" or desired state of the object. This is the most complex section and varies significantly depending on thekind.
To get a clear overview of these four components, the following reading is an excellent reference.
Writing Kubernetes Manifests: From Beginner to Advanced
The article "Writing Kubernetes Manifests: From Beginner to Advanced" provides a clear and concise explanation of the core structure of a manifest file.
Please read the section titled '3. Understanding Manifest Structure'. Focus on the purpose of apiVersion, kind, metadata, and spec.
2. Crafting a Pod Manifest
Now, let's apply this structure to create our first Pod. A Pod is the smallest and simplest unit in the Kubernetes object model that you create or deploy. It represents a single instance of a running process in your cluster and can contain one or more containers.
For our first Pod, we will define a manifest that runs a single container using the popular nginx web server image.
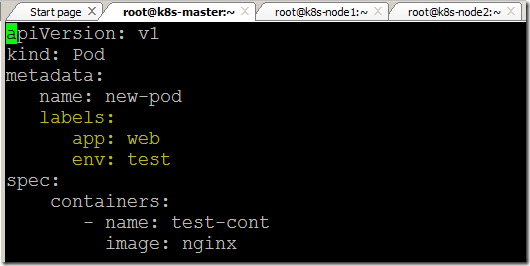
Let's break down the metadata and spec sections for a Pod in more detail.
Learn & Implement Kubernetes: Kubernetes POD Definition with YAML
The video 'Learn & Implement Kubernetes: Kubernetes POD Definition with YAML' from KodeKloud provides an excellent, structured walkthrough of building a Pod manifest. Let's watch the sections that detail the metadata and spec fields.
Watch from 01:53 to 06:02. Pay close attention to how metadata is used for naming and labeling, and how the spec section defines the container's name, image, and the fact that containers is a list.
The metadata block
As the video explained, under metadata, the two most important fields are:
name: A unique name for your Pod within its namespace (e.g.,my-nginx-pod).labels: Key-value pairs that you can attach to objects. Labels are critical for organizing resources and are used by other objects, like Services, to select which Pods to route traffic to. For example:app: webserver.
The spec block
This is where you define what you want your Pod to do. For a single-container Pod, the spec is straightforward:
containers: This is a list of containers to run in the Pod. Because it's a list, each item is denoted by a dash (-). Even for a single container, you must use this list format.name: A name for the container inside the Pod (e.g.,nginx-container).image: The container image to use from a registry (e.g.,nginx:1.25). It's best practice to specify a version tag rather than relying onlatest.ports: A list of network ports to expose from the container.containerPort: The port number the application is listening on inside the container (e.g.,80for Nginx).
A Complete Example
Here is a complete manifest file, which you can save as nginx-pod.yaml.
apiVersion: v1
kind: Pod
metadata:
  name: nginx-demo-pod
  labels:
    app: web
    tier: frontend
spec:
  containers:
  - name: nginx-container
    image: nginx:1.25
    ports:
    - containerPort: 80
Test your understanding!
You are asked to create a Pod manifest to run a Redis cache. The Pod should be named cache-pod, and the container inside should use the image redis:7.0. Which of the following YAML snippets correctly defines the spec for this Pod?
A)
spec:
  container:
    name: redis
    image: redis:7.0
B)
spec:
  containers:
  - name: redis-container
    image: redis:7.0
C)
spec:
  containers:
    name: redis-container
    image: redis:7.0
Show answer
Answer B is correct.
The spec for a Pod requires a containers field, which is a list (indicated by the dash -). Option A uses container (singular, not a list), which is incorrect. Option C correctly uses containers but fails to format it as a list item (it's missing the dash), which is a syntax error.
3. Deploying and Verifying the Pod
Once you have your nginx-pod.yaml file, you can create the Pod in your cluster. In the previous module, you used commands like kubectl get and describe to inspect resources. To create or update resources from a file, you'll use kubectl apply.
The command kubectl apply -f <filename> tells Kubernetes: "Read the desired state from this file and make the cluster match it."
Let's watch a live demonstration of this entire process.
#1 Write 1st Kubernetes manifest file | Create a pod using manifest file | Manifest file Explained
Now let's see this in action. The following video provides a great live demonstration of writing a manifest file from scratch, applying it, and verifying the result. The presenter even makes and corrects a small mistake, which is a realistic part of the workflow.
Watch the demonstration from 06:04 to 11:00. Notice the use of kubectl apply -f to create the Pod and kubectl get pods and kubectl describe pod to check its status.
As you saw in the video, the workflow is simple and powerful:
- Write your YAML manifest file.
- Apply it with
kubectl apply -f your-pod.yaml. - Verify its status with
kubectl get pods. You should see your Pod in theRunningstate after a few moments. - Inspect it further with
kubectl describe pod <pod-name>to see details like the image used, the labels assigned, and the events related to its creation.
For a quick text-based summary of this workflow, you can refer to the following article.
Kubernetes Manifests: Everything You Need to Know in 2024
The vcluster blog post 'Kubernetes Manifests: Everything You Need to Know' also summarizes the kubectl apply and verification steps nicely.
Read the sections 'Applying the Manifest' and 'Verifying the Pod'. This reinforces the commands you just saw in the video.
Conclusion
Congratulations! You have now learned the most fundamental skill in managing applications on Kubernetes: defining a Pod declaratively in a manifest file and bringing it to life in a cluster.
Key Takeaways:
- Kubernetes resources are defined declaratively in YAML manifests.
- Every manifest requires four fields:
apiVersion,kind,metadata, andspec. - For a
Pod, thespecmust contain acontainerslist, where you define theimage,name, and other properties for each container. - The
kubectl apply -f <filename.yaml>command is used to create or update a resource based on its manifest. - You can verify the Pod's creation and status using
kubectl get podsandkubectl describe pod.
In the previous lesson, we saw how a Pod could be OOMKilled (Out of Memory Killed) if it consumes too many resources. Our simple Pod manifest doesn't tell Kubernetes anything about its CPU or memory needs. In our next lesson, we will address this by learning how to configure resource requests and limits for containers, a critical practice for running stable and reliable applications at scale.